A function of the Hideaway that won't appear until you've completed a big chunk of Final Fantasy XVI, the Hunt Board is an optional component that you should probably undertake. Filled with nasty beasties of all shapes and sizes, the Hunt Board will provide you with a bundle of challenging battles - and a nice amount of swag, to boot.
In order to embark on hunts you'll first need to progress through the game until you reach the main story quest The Gathering Storm. There are two sub-quests in The Gathering Storm, and the second, Release, will send you to a corner of Three Reeds. Along the way you'll wind up fighting the first of the game's Notorious Marks.
Return to the Hideaway after completing The Gathering Storm and you'll find several new services available in the Mess. Among them is the Hunt Board, which is watched over by Nektar, a Moogle. Speak to Nektar to take on a hunt.
At the end of each hunt you'll find a Notorious Mark. These creatures are stronger-than-average, and can give many of the game's bosses a run for their money in terms of difficulty. You'll unlock more Notorious Marks as you progress through the storyline. The Notorious Marks aren't noted on the map, unlike most quests, so you'll need to track them down with hints provided on the Hunt Board. (Or by using this guide.)
This battle is a bit hectic. Ahriman specializes in hurling a multitude of projectiles and landmines in your way, and you'll need to dodge Ahriman's magic while still finding time to smack the beast around. You'll want to use your movement skills (primarily Phoenix Shift and Ignition) to stay in Ahriman's face as it teleports around, which in most cases will also take you past its attacks. Batter the eyeball mercilessly whenever you get in close, and save your Limit Break for the inevitable Staggers.
Known on the Hunt Board as the 'Angel of Death', Aruna is located in Claireview, the huge field near Northreach. Jump to the Northreach Obelisk and travel south along the road. Keep your eye on the field to your right and it won't be long before you see a large, winged creature wandering around. This is Aruna.
A winged fiend, Belphegor is located on the Broken Hilt, near Martha's Rest. Travel to Eastpool, then head south into the Broken Hilt. There's a wheat field ahead, and a path behind it that you needed to travel to find a labourer earlier in the game. At the end of the path is a clearing, where Belphegor awaits. Belphegor uses the following attacks:
- A long-range fireball
- A conical puff of fire breath
- A winging-swinging melee slice
- A melee cartwheel
- A spinning tail attack
- A puff of air that will stun Clive, followed by a flying charge attack
This is a relatively basic battle that will force you to dodge quickly more than anything else. Belphegor's greatest asset are its melee attacks, and it can leap at you from a surprising distance to slap you with its wings. It will often follow up with its cartwheel attack, so don't immediately segue into a combo after two wing slices. Circle the beat, attack whenever there's an opening, and be ready to dodge at all times.
Dozmare
Rank: B
Location: Caer Norvent River Gate
Reward: 1 Scarletite, 1 Meteorite, 20 Renown, 8,500 gil
Part of the Blacksmith's Blues side quest, Dozmare won't appear on the Hunt Board until you reach a specific part of the quest. Once you've asked Nektar about griffins you can find Dozmare by the Caer Norvent River Gate, to the south of Lostwing. Look around the clearing next to the Obelisk and you'll hit a cut scene to trigger the battle. Dozmare uses the following attacks:
- Short range pecks and claw swipes
- A medium-range, lunging claw attack
- A spinning, flying charge
- A short-range charge attack where Dozmare rises into the air a bit, then slams down into the ground where Clive is standing
- A long-range, magical ball of wind
- An AOE tornado attack
- Noble Dive, a diving attack that generates a shockwave of wind energy and stuns Dozmare
Dozmare is a capable foe, and fights a bit like the various Wyrms and Wyverns, only with windy magic on top. For the most part you want to draw Dozmare in for claw attacks, dodge away, and then use quick Eikonic Abilities to inflict heavy damage. Don't use attacks with longer effects, like Ignition, or you'll almost certainly be interrupted and damaged. After being Staggered Dozmare will start using Noble Dive, and keep in mind that you both need to dodge the dive itself and jump over the shockwave.
Sekhret
Rank: B
Location: Greensheaves, north of Martha's Rest
Reward: Minotaur Mane, 20 Renown, 8,200 gil
One of several Minotaurs in the area, Sekhret hides out in Greensheaves, a quick walk across the bridge to the north of Martha's Rest. Head to the northwest in the first area of Greensheaves and you'll find Sekhret on the other side of a dense clump of bushes, near the edge of the water.
Despite looking identical to other Minotaurs, Sekhret has a slightly different moveset that makes him more difficult to take down. He uses the following attacks:
- A sideways club smack
- An overhead club smash
- A club-dragging upward swing that sends Clive flying into the air if it connects
- A two-part charging attack where Sekhmet rushes Clive, then turns around and rushes at him a second time - though only if Sekhmet missed Clive on the first pass
- Big Swing, a club-whirling attack that slowly moves towards Clive
- Raging Bull, a slamming melee combo
Fighting Sekhret is a bit like fighting a combination of a Minotaur, a Gigas, and a Bighorn. He's stronger than any of the three, and combines all of their attacks... but still isn't that different from fighting a normal Minotaur. Once you get the gist of his new attacks you should be fine. Using Limit Breaks is a great way to Stagger Sekhret, as his club attacks are slow and unleashing a volley of Limit Break sword slices will usually Parry him. Otherwise, avoid his swings and wait for openings.
Severian
Rank: B
Location: Sorrowise, west of Martha's Rest
Reward: Electum, 20 Renown, 8,500 gil
One of many Fallen 'bots, Severian is hiding out in Sorrowise. Jump to Martha's Rest, use the western lift to reach Sorrowise, and head west along the upper half of the route. There are Fallen ruins in the distance, and as you approach them you'll see Severian in your way, inactive. Get close enough and it will activate.
(One word of caution, though: Severian moves around a lot, and you will, too. Be careful not to stray too far from the starting battleground, or Severian will walk back to its original position - and regain all its health. This may have happened to me.)
Flan Prince
Rank: A
Location: Hawk's Cry Cliff / Auldhyl
Reward: Gelatinous Mass, 30 Renown, 12,000 gil
A blobby menace, the Flan Prince is located on the border between Hawk's Cry Cliff and the field areas of Auldhyl. Travel north through Hawk's Cry Cliff, past Amber, until you see a largeish cliff ahead. Drop down it or go around. The Flan Prince is hiding in the ground at the bottom, a little ways east of the point where the path narrows and winds to the west. The Flan Prince uses the following attacks:
- A leaping body slam
- A quick headbutt
- A spinning AOE attack
- A cluster of lightning balls that will slowly attempt to track Clive
- Firaga, a large fireball
- Blizzaga, a trail of falling icicles
- Thundaga, a cluster of lightning lines
- Tornado, a wind attack that generates a series of tornadoes
- Stonega, an earth attack that creates a few marks on the ground that will explode seconds later
- Dualcast, which allows the Flan Prince to use two of the spells listed above, one after the other
- Hands Down, a melee crushing combo with a medium range
The Flan Prince is a bit strong for the first time you can fight it, so you'll need to use caution if you tackle it at a level lower than 38 or so. It moves between physical attacks and spells, typically using one, then the other. Almost every time the Flan Prince uses a spell it will hurl itself at Clive, so you need to be ready to avoid its attack. Wait for the Flan Prince to begin using a spell, use an Eikonic Ability on it, and back off. Dodge any projectiles, then move in and hit it if you see an opening. Back off again. Repeat until it is Staggered.
Once you've Staggered the Flan Prince it will begin using Dualcast and Hands Down. Dualcast is not a big deal - just two spells in a row - but Hands Down can surprise you with its speed, range, and timing. Back away from the Flan Prince and do your best to stay well out of its attack range, as getting caught by Hands Down can get Clive knocked out very quickly. The last hit will reach you, so time your dodge and try not to panic. Titanic Block works well for blocking the rest of Flan Prince's physical attacks, but it will not work against Hands Down, so don't even try.
Fastitocalon (A Hill to Die On)
Rank: B
Location: The Velkroy Desert
Reward: 2 Scarletite, 20 Renown, 10,000 gil
An upgraded Adamantoise, Fastitocalon hangs out in the Velkroy Desert. You can find it by heading to the northeast corner of the desert, which narrows into a bit of a canyon. You'll see the big hump of Fastitocalon's shell sitting at a dead end, and when yuo get close enough it will wake up and attack. Fastitocalon uses the following moves:
- A slow stomp
- A sideways bite
- A mobile spinning attack, both to assault Clive and to retreat
- Water Cannon, a rapidfire burst of water spheres
- Testudo Trompe, which sends the Fastitocalon flying into the air and triggers watery eruptions all over the battlefield
Fastitocalon is tougher than the average Adamantoise, though the battle isn't that different. Sidestep away from its attacks - particularly the shell charge, which can badly hurt Clive if it connects - and aim at Fastitocalon's head, which is the only vulnerable spot on its body. Stagger the beast and it will start using Testudo Trompe, which is more intimidating than it is difficult to avoid. Keep slicing until you win. It's possible to Parry Fastitocalon's wild charges, but the consequences for failing are a little too steep to risk it, even with a Limit Break active.
Soul Stingers
Rank: C
Location: Fields of Corava, south of the Dalimil Inn
Reward: 50 Sharp Fangs, 20 Bloody Hides, 10 Magicked Ash, 10 Renown, 5,500 gil
A horde of monsters, you'll find the Soul Stingers in the Fields of Corava. Jump to the Dalimil Inn and travel south through the Doeznov Terraces until you reach an intersection. The right path takes you to the Jaw, while the left path - which used to be blocked - takes you to the Sickle. Travel through the Sickle until you see a path with a towering Fallen ruin overhead. Use this path to reach the Fields of Corava, a wide plain. Travel east to find the Empty Hovel, on the edge of a canyon. The Soul Stingers are in the clearing to the east of the hovel.
Despite the dramatic music this fight isn't much more difficult than fighting normal waspish creatures. You can't pull them out of the sky with Deadly Embrace, alas, but most of your AOE moves can swat them down without the need to aim. Flames of Rebirth and Aerial Blast are both great for ripping the bugs to shreds. Once a Soul Stinger is on the ground you can move in and finish them off with Clive's sword attacks.
Grimalkin
Rank: C
Location: The Sickle, south of the Dalimil Inn
Reward: Grimalkin Hide, 10 Renown, 6,100 gil
A big cat with a horde of lackeys, you'll find the Grimalkin in the Sickle. Jump to the Dalimil Inn and travel south through the Doeznov Terraces until you reach an intersection. The right path takes you to the Jaw, while the left path - which used to be blocked - takes you to the Sickle. Travel east until you see a path on your right. Follow it south to find the Cattery, where the Grimalkin waits.
The battle begins against a pack of Wild Nakks, and you'll need to fight four waves of the creatures to advance to the next phase of the battle. They're just normal enemies, so this part should be a piece of cake. Whittle away the Grimalkin's buddies and the big cat itself will come out to play,
and it is essentially identical to the Republican War Panther from earlier in the game. The main difference now is that you can use Titanic Block, which will negate every one of the Grimalkin's attacks if used at the right time.
The Nine of Knives
Rank: A
Location: The Jaw, south of the Dalimil Inn
Reward: Fallen Iron, Orichalcum, 50 Renown, 20,000 gil
A bandit with a fearsome reputation, the Nine of Knives waits for opponents in the Jaw. If you jump to the southern-most Obelisk in the Velkroy Desert south of the Dalimil Inn, you'll find his battleground. The Nine of Knives is standing in the middle of the dirt path running through the area. He uses the following attacks:
- Knife-swinging combo attacks
- An acrobatic spinning attack that carries the Nine of Knives across the arena towards Clive
- A leaping retreat that turns into a whirling jump straight towards Clive
- Poison Mist, which creates a plume of purple poison in Clive's direction that will knock you down if you get caught
- Smokescreen, an explosion that can obscure the Nine of Knives' followup attack
- Undermine, a digging attack that allows the Nine of Knives to travel underground undetected for a short while, emerging as an AOE attack beneath Clive
The Nine of Knives is an upgraded version of the Stone Headsman that you fought in Rosalith Castle. He's more evasive, and will leap at you from great distances for most of the battle. You can either dodge him, as normal, or use Titanic Block to deaden the slices and quickly build up your Limit Break. Most of the Nine of Knives' attacks are straight lines, so you should always have a good sense of which direction to aim.
Using Limit Break will allow you to interrupt the Nine of Knives' combos with Parries and push him into a Stagger. Once Staggered you can really lay on the pain. The only move that can really put Clive down is Poison Mist, which chews away at your HP for every second you're in the cloud, so make sure you watch for the name on the screen and dodge away as soon as it appears.

Atlas (The Breaker of Worlds)
Rank: S
Location: Cressida, east of Martha's Rest
Reward: 50 Renown, 20,000 gil
A Fallen soldier of great power, Atlas is located on the outskirts of Cressida. You needed to visit this location while helping Mid during
Getting to Work, and you'll find it much the way you left it, in the swamps to the east of Martha's Rest. In the rear of what remains of the village is a large clearing, surrounded by Fallen ruins, and Atlas is idling here. It knows the following attacks:
- A slicing sword combo that can be executed at a long range, thanks to a starting jump
- A thrust with its shield that can come as part of a combo with the sword
- A sideswipe with its shield
- An AOE stomp that can come as part of a combo with the sword
- A sword-dragging charge attack that can send Clive flying into the air
- A three-part, long-range shockwave slice
- A long-range shockwave that leaves behind a damaging trail for a few seconds
- Celestial Sphere, an AOE attack that targets a large number of smaller spots in a huge circle
- Golden Section, which conjures an enormous sword - Follows up with Saber Dance, a swing with extremely long range for a melee attack
Atlas fights similarly to the Iron Giant from earlier in Final Fantasy XVI, though it is quite a bit tougher. Virtually every attack the Iron Giant knew is worse when coming from Atlas, either thanks to multiple strikes or knockback effects that can throw you off your game. Stagger Atlas once and it will start to use Golden Section and Saber Dance, both of which allow Atlas to temporarily grow his weapon to a much greater length.
There are two things you need to understand if you want to win this fight:
- Atlas typically attacks in groups of three, whether the combo consists of sword slashes, shockwaves, shield thrusts, or a mixture.
- Atlas has a slight delay on almost all of its attacks, roughly half a second in length. Master this delay and you can avoid the majority of damage.
For the most part you'll want to spend this fight close to Atlas. This will allow you to watch its moves and react accordingly. If you're good at Parrying then Atlas will give you many opportunities with its sword slices; otherwise, dodge until you've seen three attacks, then move in and do some damage. Normal melee combos won't do much damage and can eat up too much time, so you may want to stick to quick Eikonic Abilities. Any moves that drag on for too long will likely get you hit as Atlas moves into its next combo.
It is worth noting that, like most battles, Clive's Limit Break is great for initiating Parries against Atlas. That said, there is a decent chance you won't Parry attacks, and Atlas will annihilate your health as its sword slices through Clive. Make sure Clive's health is high before you enter Limit Break, and be sure to heal quickly if you don't get the results you like.

Bomb King
Rank: B
Location: The Crock, south of the Dragon's Aery
Reward: Bomb Ember, 20 Renown, 9,000 gil
Monarch of all Bombs, the Bomb King is located in the Crock, off the Dragon's Aery. You need to begin the side quest Weird Science, then ask Nektar about Bombs, to make it appear. You'll find the Crock to the south of the Dragon's Aery Obelisk, along a side path called the Imperial Chase. The Bomb King uses the following attacks:
- A fiery, body-slamming charge
- Fast-moving spitballs of fire
- Slow-moving, blue spitballs of fire that appear in clusters
- A plume of fiery breath with a short range
- Coronation, which lobs a fire bomb that leaves behind a long-lasting pool of flame - creates multiple pools later in the fight
- Witan, a slamming AOE attack that creates multiple doppelgangers of the Bomb King
- King's Justice, a flurry of fire bursts from the Bomb King and its doppelgangers, all aimed at Clive
The Bomb King is far more mobile than other Bombs, making this fight a pain. It will only give you a few moments to attack before zipping away, typically taking up a new position to hurl fire at you from afar. Coronation makes the arena irritating to navigate, especially later on, and the copies of the Bomb King created by Witan can absolutely demolish Clive's HP if you don't dodge their attacks in time. Note, also, that you can't Stagger the Bomb King, so you won't get any breathers during the fight.
There are two approaches you can take, and feel free to mix and match them:
- If you want to stick with close-range attacks you'll want to use either Phoenix Shift or Lunge to keep up with the Bomb King. Sweep up and use an Eikonic Ability or two before the Bomb King retreats. Coronation is a good opportunity for this, as the Bomb King will spit right over your head.
- If you'd rather fight at a range you'll want a suitable Eikon, and earlier in Final Fantasy XVI your choice will be Ramuh. Normal ranged blasts via the Triangle button are also quite handy. Once the Bomb King tries to charge Clive you can switch to close attacks.
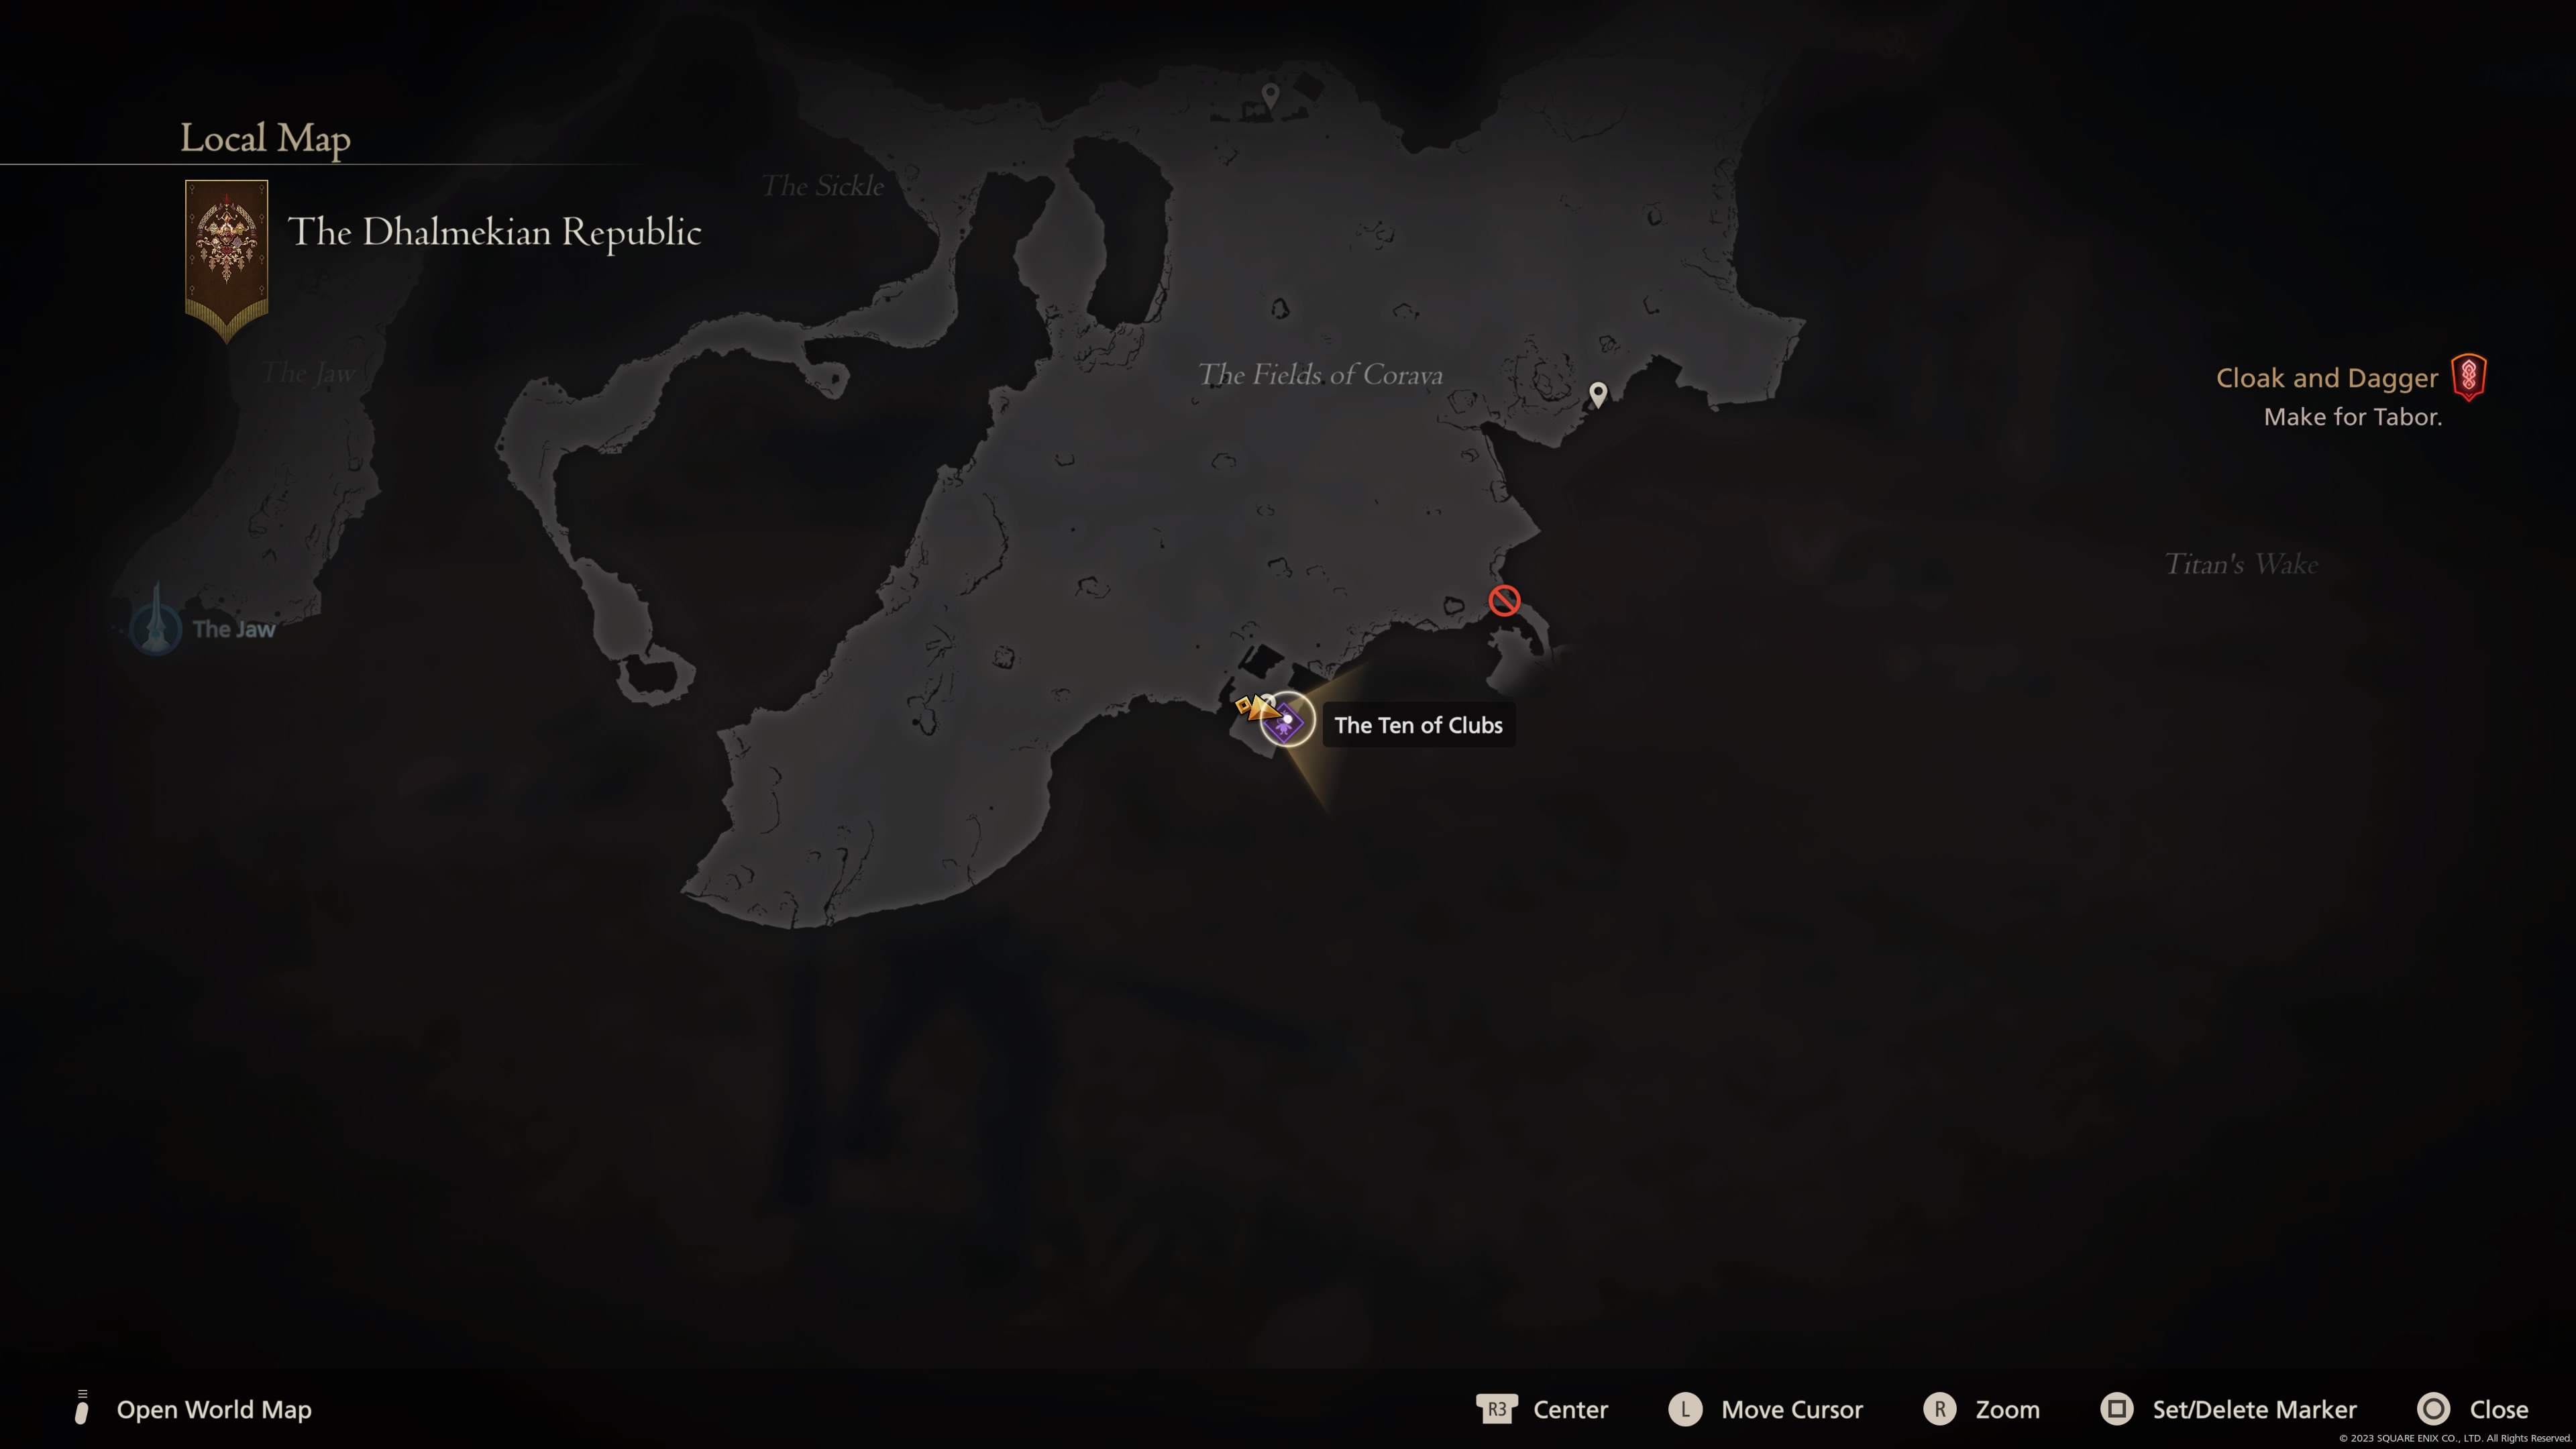
The Ten of Clubs
Rank: B
Location: Fields of Corava, south of the Dalimil Inn
Reward: 1 Scarletite, 1 Meteorite, 20 Renown, 9,200 gil
A hefty man with a heftier blade, you'll find the Ten of Clubs in the Fields of Corava. Jump to the Dalimil Inn and travel south through the Doeznov Terraces until you reach an intersection. The right path takes you to the Jaw, while the left path takes you to the Sickle. Head east through the Sickle until you reach the Fields of Corava. In the south is an abandoned village named Vamare, and this is where you'll find the Ten of Clubs. He uses the following attacks:
- A horizontal slice
- An overhead chop
- A pair of whirling weapon swings
- Peine Forte, which creates a cluster of earth-based explosions
- Execution, a slow but powerful combo that stuns Clive if he's close when it starts - ends in a minor AOE slam
The Ten of Clubs fights more or less the same as the many hefty warriors found in Final Fantasy XVI's side quests. His swings are a bit slow, and once you've seen them enough times it's not difficult to pull off a Parry (especially if you use Limit Break). His two unique moves, Peine Forte and Execution, are both rather painful and should be avoided at all costs. Execution in particular can demolish Clive's health, so if you get stunned with the initial shockwave rapidly hit the dodge button so you avoid the Ten of Clubs' first swing.

The Mageth Brothers
Rank: A
Location: The Quietsands, north of Port Isolde
Reward: 2 Meteorites, 30 Renown, 13,000 gil
A trio of hefty siblings, the Mageth Brothers wait for challengers on the Quietsands. Jump to the Port Isolde Obelisk and travel north through the Silken Strand. Head off the road when you reach the Quietsands and you'll find the Mageth Brothers down on the beach. Consisting of Cindwydd, Sandwydd, and Mindwydd, the Mageth Brothers use the following attacks:
- Basic axe swings and overhead chops
- Last Crusade, a simultaneous rushing attack by all three brothers
- Iron Gavel, a melee combo attack
This battle goes from intimidating to easy to potentially difficult in a short period of time. The Mageth Brothers are, for the most part, just normal heavy enemies, the main difference being that you're fighting three at a time rather than just one. They're relatively easy to dodge or Parry, and leading them around so they can't gang up on you shouldn't be a problem. All that said, they will occasionally use their Last Crusade attack, which isn't too difficult to avoid - but if it does hit, Last Crusade can obliterate Clive. Zip out of their path the moment Last Crusade appears on the screen.
Once you defeat two of the three brothers the third will become a bit more aggressive, and he'll begin to use the Iron Gavel combo. This hurts about as much as Last Crusade if you get caught, though by this point the remaining brother should have very little health left, so Iron Gavel won't be a huge worry.
Svarog (Ruin Reawakened)
Rank: S
Location: Mornebrume, southeast of Glorieuse
Reward: 1 Oricalchum, 1 Fallen Enigma, 1 Amber, 1 Empty Shard, 60 Renown, 30,000 gil
A dragon of legend, Svarog hides in the tiny region of Mornebrume. Jump to the Caer Norvent Glorieuse Gate and head east through Glorieuse, past a Dragon Aevis, to find a side path. This leads to a gate that used to be closed, which will take you into the narrow path that is Mornebrume. Follow it south - checking on your left as you go to find a floating chest containing a Ring of the Marksman - and you'll eventually come to a clearing. Svarog is waiting, and it uses the following attacks:
- A sweeping bite attack
- An AOE wing sweep
- An overhead cartwheel with an explosive finish
- A rearing, overhead stomp
- A fire beam that travels in a straight line and explodes
- A flurry of fireballs
- A flaming charge attack
- Blazing Legion, which creates a huge number of fiery orbs
- Red Dawn, which creates two crossed lines of exploding fire pillars
- Embroil, which generates a shockwave you need to jump, then creates several large fields of AOE explosions
If you decide to fight Svarog early in the game - anything below level 50, more or less - you'll need to watch out for virtually every one of its attacks. All of its fire strikes are brutal, and can wipe you out in two hits. Stay close to Svarog and try to remain in its face, which allows you to take advantage of the additional damage while keeping an eye on its body language. The charge attack (dodge forward or to the side) and the beam attack (dodge back if it runs horitzontal) are the ones you need to watch out for the most.
Stagger Svarog and it will immediately use a new attack when it gets back up:
- Dragon Dance, which combines the fireball flurry, the horizontal beam, the vertical beam, and the rush attack
Past this point Svarog combines its existing attacks, making them all more deadly. Blazing Legion, for example, will be combined with Red Dawn, forcing you to weave between fire orbs while avoiding fire pillars. Svarog will also use its melee attacks more than once, and in conjunction with other moves, so don't assume you're in the clear unless Svarog stops moving. Your tactics shouldn't change in this phase - aim for the head whenever you can - but you do need to be more cautious. Any move that carries you into the air and allows you to more easily strike Svarog's head is recommended, as you want to Stagger the beast again as quickly as possible.
Stagger Svarog again and it will bring in a new move:
- Last Dance, which combines Blazing Legion, Embroil, Red Dawn, multiple beam attacks, and the charging attack
This final flurry of moves is the only new thing you'll get out of Svarog, and if you can avoid all these attacks you'll be in the home stretch. Continue as you have and you'll win the battle.
The Pack
Rank: C
Location: The Gilded Path, south of Tabor
Reward: 20 Sharp Fangs, 50 Bloody Hides, 10 Magicked Ash, 10 Renown, 5,800 gil
A group of vicious Pack Wolves, the Pack makes their home on the Gilded Path. To reach them you'll need to pass south through Tabor, then head west at the first intersection. Take a left when you get the opportunity - if you keep going west you'll wind up at the Fields of Corava - and you'll find a small clearing. The Pack waits for you here.
For the most part the Pack Wolves are slow-moving and only use normal melee attacks. They tend to ignore normal damage, however, and will swiftly pick away at Clive if you try to duel close up. Their only special move is Thrill of the Hunt, which will send them all dashing at Clive. Any Eikonic Ability will do, though AOE attacks and skills that stun enemies are a good idea. Aimed properly you can use Flare Breath to tie up all of the Pack Wolves and slowly chip away at their health. All in all, not a difficult battle.
Dread Comet
Rank: A
Location: The Sickle, south of the Dalimil Inn
Reward: 1 Comet Feather, 30 Renown, 13,000 gil
A Chocobo possessed of exceptional ferocity, the Dread Comet lives on the Sickle, between the Doeznov Terraces and the Fields of Corava. Travel to any of the nearby Obelisks (there are several) and make your way to the Sickle. The Sickle splits into three different paths, and if you take the shortest, bulbous path that connects to the Fields of Corava you'll find the Dread Comet waiting. The Dread Comet uses the following attacks:
- A swift peck
- A quick, stomping kick
- A leaping charge that ends in a series of cartwheeling kicks
- A blue shockwave that knocks Clive back
- Choco Meteor, which summons a meteor from above that impacts with the ground and creates a shockwave that you can dodge or jump - may summon one or more meteors at a time
- Choco Meteorain, a looooong chain of Choco Meteors
This fight is tricky. The Dread Comet doesn't have a ton of attacks, but those it does are good at stunning and damaging Clive. You also can't stagger the Dread Comet, so there are no reprieves allowed. If the Dread Comet is coming after you with normal melee attacks - basically any time it runs at Clive - you can either Parry, if your timing is good, or just dodge and attack its flanks. Limit Breaks make Parrying a piece of cake in this battle. Give the Dread Comet some distance whenever it uses Choco Meteor, which will allow you plenty of opportunity to jump over the incoming shockwave.
Eventually the Dread Comet will use Choco Meteorain, which is the same as Choco Meteor... it just lasts for ages. Ignore the Dread Comet completely when this move goes off and move in a circle around the arena, avoiding the impact sites of each meteor as best you can. This will give you more than enough time to hop over the shockwaves and conserve your HP. There's a good chance the Dread Comet will use Choco Meteor immediately after Choco Meteorain ends, so don't go back to attacking until the bird charges for Clive.
Holy Trumpitour (The Man in Black)
Rank: B
Location: Lostwing
Reward: 1 Scarletite, 1 Meteorite, 20 Renown, 9,800 gil
The last of the Black Shields tasked with spying on Lostwing, the Holy Trumpitour hides in what remains of the village. Once you've completed For Great Justice II you can find him in the clearing where you fought Benedikta's men much earlier in the game. The path to the clearing is down a ladder in the town's church, on the upper half of Lostwing. Go through the Hanged Man and you'll find it nearby. The Holy Trumpitour uses the following attacks:
- A three-part melee combo that ends in an overhead slam
- A series of five quick cannon blasts
- A flamethrower that will follow Clive around for a few moments
- A ground blast that sends the Trumpitour flying backward, away from Clive
- Rocketeer, which sends the Holy Trumpitour flying towards Clive - he'll do this three times, unless he hits Clive
- Recoil, which sends the Holy Trumpitour into the air and crashing down on Clive's position - he'll do this three times, unless he hits Clive
- Fragmentation, which creates a huge number of AOE marks on the ground that will explode after a few seconds
This fight is more or less the same as the second phase of the
Imperial Cannonier. The Holy is much more aggressive from the get-go, and uses every move but Fragmentation right off the bat. He's fairly easy to Parry, once you get the timing of his cannon swings down, so stay at a medium range most of the time and only back off if he starts to use his flamethrower attack. On the whole the Holy Trumpitour is the most difficult of these cannon-based foes, but your approach the battle shouldn't change much.
Note that there is a chest on the side of the Holy Trumpitour's little arena, and you can open it once the battle is over. It contains a Goblin Coin, Black Blood, and ten pinches of Magicked Ash.
Carrot
Rank: B
Location: The Whispering Waters, east of Martha's Rest
Reward: 1 Morbol Tendril, 1 Morbol Flower, 20 Renown, 10,000 gil
Another mark that only appears as part of a side quest, Carrot lives in the Whispering Waters, an area you likely discovered during your first visit to Three Reeds. Jump to the Three Reeds Obelisk and walk west along the road until you come to a path on your right. The path leads to a wide pond, and Carrot will confront you when you enter the pond. Carrot uses the following attacks:
- Tentacle slaps
- Overhead tentacle pounds
- An AOE pound that releases a cloud of gas around Carrot
- An underwater tentacle strike that will try to hit Clive multiple times
- An oil spit that creates three AOE pools in the water - you'll slow down and take damage if Clive steps in one
- Bad Breath, a stream of gas that will track Clive slightly to the left or right
- Worse Breath, a similar stream of gas that tracks to the left or right much more quickly than Bad Breath
- Wild Rage, a two-part charging attack that ends with Carrot trying to dive on top of Clive - changes to a three-part charge after Carrot has been staggered
- Burrow, an underground tunneling attack that launches Carrot into the air in an attempt to crush Clive
- Acid Rain, which spews oil globs all over the field and is followed by multiple Burrow leaps
Carrot is a mixture of the two Morbols you fought during the main storyline. Its attacks are more or less the same as before, it just uses more of them in a single flurry to try and knock you off-balance. Your tactics won't change much: Keep Carrot near the middle of the battlefield, circle it, and unleash your attacks. Duck back if any AOE attacks or oil pools get in the way. Carrot's tentacle slaps are a bit on the slow side, so Parrying this creature is pretty easy.
Gorgimera (The Tricephalic Terror)
Rank: S
Location: The Velkroy Desert, northwest of the Dalimil Inn
Reward: 1 Orichalcum, 50 Renown, 20,000 gil
A powerful chimaera that lives in the desert, the Gorgimera is located between the Velkroy Desert and Dalimil Inn Obelisks. Fast Travel to the Dalimil Inn Obelisk, leave town, and approach the line of cliffs that separate the northwestern section of the desert from the southwestern. If you're running in the correct direction you'll see the Gorgimera from a long ways off. It uses the following attacks:
- A pair of crushing stomps, one after the other
- A flying attack that sends the Gorgimera rushing at Clive
- A fire breath attack
- A mine field of electrical AOE patches that attract lightning strikes after a few seconds
- A cluster of ice darts that leave long-lasting patches of ice behind
- The Ram's Voice, an AOE ice attack that explodes after several seconds
- Delta Attack, an AOE spell that explodes after several seconds
- Delta Force, which creates multiple Delta Attack AOE circles
- The Dragon's Voice, a large cluster of AOE marks that attract lightning strikes after a few seconds
This fight is very similar to the battle with the Chimaera in Blacksmith's Blues IV, just pumped up a few degrees. The Gorgimera occasionally comes at you with melee attacks, but for the most part it will target Clive with elemental magic and breath attacks. The difference here is that the Gorgimera likes to pair its attacks together, so you'll usually be targeted with, say, a blast of fire breath immediately after the Gorgimera sends out ice darts or uses Delta Attack. Stagger the Gorgimera once and it will start using Delta Force, which covers more ground, but otherwise the fight doesn't change.
The key to winning this battle is to circle the Gorgimera, keeping an eye on its face to ensure you don't get caught by its fire breath. This attack has the potential to do far more damage than the rest if you're sitting in the flames for too long. Pick away at the beast's sides with Eikonic Abilities, dodge any melee strikes, and look to the ground whenever AOE attacks go off. There are always safe spaces that will allow you to avoid the big bursts of magic, and they're often a lot closer to the Gorgimera than you'd think. The creature is slow, so you'll have plenty of opportunities to get in damage, stagger the Gorgimera, and claim the win.
Pandemonium
Rank: S
Unlocked: Begin Footfalls in Ash
Location: Wolfdarr, northwest of the Shadow Coast
Reward: Stained Loincloth, 50 Renown, 20,000 gil
An Orcish Warlord with some extra kick, Pandemonium lives in the Waloedian village of Wolfdarr. Proceed northwest through Wolfdarr from the Shadow Coast until you find a sort of town square, populated by orcs and Akashic. There's a southwestern path off of the square that will take you to the front of a castle gate, and Pandemonium will stroll out if you get too close. Pandemonium uses the following attacks:
- A teleporting overhead slam
- A cluster of energy darts that fly towards Clive
- A cluster of energy darts that appear around Clive and whirl towards his position
- A minefield of exploding AOE fields
- A charged AOE explosion emitted from Pandemonium's body
- Sanguine Rite, which creates a huge AOE field that will eventually be struck by an equally huge energy orb - After Pandemonium is staggered he creates multiple fields, enveloping most of the arena
- Rictus of Horror, an enormous beam attack - After Pandemonium is staggered he teleports once before firing the beam
This fight is the Orcish Warlord and then some. During the first phase Pandemonium acts more or less the same as his lesser kin, only with a few more attacks to throw you off balance. Most of his energy attacks, while painful, amount to distractions while Pandemonium teleports in and tries to bean you with his staff. Keep an eye on his position and either dodge or Parry his melee attacks. Pandemonium comes to you, so you don't need to worry too much about chasing him down.
The second phase becomes more hectic, as Pandemonium strings his attacks together more frequently. Expect to see energy darts, minefields, and the occasional Rictus of Horror flying your way while Pandemonium is casting Sanguine Rite, for example. This makes the battlefield look a bit more intimidating than it should, and so long as you keep your cool and don't panic dancing around these attacks is not difficult. Wait for Pandemonium to teleport in close, dodge or Parry his attack, and unleash your Eikonic Abilities.
Gobermouch
Rank: A
Location: Eistla
Reward: 1 Primitive Battlehorn, 30 Renown, 15,000 gil
A frisky goblin that is tougher than it looks, Gobermouch is located in Eistla. Jump to the town's Obelisk, then head west to the central plaza. On the west side of the plaza are wooden stairs leading to a higher level, where you'll find a clearing in front of a house. Approach the house and Gobermouch will jump up and attack. Gobermouch uses the following attacks:
- A series of melee club swings
- Little Swing, which spins Gobermouch around in a frenzied circle, leaving it dizzy when the attack ends
- Goblin Punch, a combo attack that sends Gobermouch flying at Clive
This fight is more dangerous than it looks, though not by much. Gobermouch is a 'normal' enemy, so he can't be staggered and is a little on the small side. His normal attacks aren't a big deal, but Little Swing and Goblin Punch can both prove rather surprising, as they go off multiple times and will carry Gobermuch across the arena towards Clive. Fortunately for you, Gobermouch is vulnerable to knockdown attacks, and can be juggled if he's knocked into the air. Once you learn how to avoid Little Swing and Goblin Punch you should be fine.
Bygul
Rank: A
Location: Kritten Hollow, north of Eistla
Reward: 1 Coeurl Whisker, 1 Meteorite, 35 Renown, 16,000 gil
A variant of the Coeurl, Bygul is located in Kritten Hollow, the huge field to the north of Eistla. You'll travel through here as part of the Brotherhood quest. Bygul is visible from a great distance, roaming around the middle of the area. Look near the left side of the 'Kritten Hollow' lavel on the map and you'll find it. Bygul uses the following attacks:
- A pair of close-range claw attacks
- A leaping charge from a great distance
- A large lightning dart blasted at Clive
- Several smaller, slower lightning darts blasted at Clive
- A quick AOE twirl
- Whipcrack, a whirling AOE attack
- Static Torrent, which creates a field of marks that get blasted by lightning bolts - later includes lines of electricity between the marks
- Wild Charge, which creates a field of lightning bolt marks and pairs it with leaping stomp attacks from Bygul
This fight is quite similar to the Coeurl battle in Rosaria Castle. Bygul is extremely agile, and will blast you with lightning from afar, then leap in to ram you with tentacles or slice you with its claws. Trying to chase Bygul is generally fruitless, even using Phoenix Shift, so wait for the beast to get in close and dodge its attack before going on the offensive. You'll usually have time for one or two Eikonic Abilities before it lashes out again.
Stagger Bygul and it will chage up its attacks a bit by creating electric beams between the marks Static Torrent leaves behind. This is quite annoying, and more than enough to trip you up. Do your best to back away from the lines, ignoring any chances to go on the offensive, and wait until you're in the clear - or until the attack ends. Other than that change the fight is more or less the same throughout.
Agni
Rank: A
Location: Halfcombe, southeast of Eistla
Reward: 1 Stone Tongue, 35 Renown, 15,500 gil
An armored lizard the likes of which you've seen before, Agni is located in Halfcombe, the narrow, rocky path that leads from Eistla to the Edge of Infinity. Jump to the Edge of Infinity Obelisk and you'll run into Agni in a clearing where you'd previously fought a Plague monster. Agni uses the following attacks:
- A head ram
- A series of stomps
- A sideways roll (only when Clive is flanking Agni)
- A tail sweep (only when Clive is behind Agni)
- A series of rolling leaps that attempt to crush Clive
- Collider, a rolling charge attack that ends in a flop
- Firewater, a horizontal beam attack - Used twice in a row after Agni is staggered
Agni fights more or less the same as the other hefty lizards, though with more emphasis on melee attacks and quick movements. Agni varies its attack speed quite a bit with each move, and you need to learn how long they take to avoid dodging too slowly or too quickly. Stay in front of Agni, dodge its stomps, and target its head. Dodge into Collider when it goes off and get to Agni's side when it unleashes Firewater. It's a basic fight, if a bit hectic.
Thanatos (Usher to the Underworld)
Rank: A
Location: Titan's Wake, south of Tabor
Reward: 1 Darksteel, 45 Renown, 17,000 gil
A hefty Echo, the likes of which you've seen before, Thanatos is located in Titan's Wake. Jump to the Gilded Path Obelisk and head west through Titan's Wake. Stick to the northern path when the road diverges and you'll run alongside some Fallen ruins. Thanatos will appear and attack when you get too close to the ruins. Thanatos uses the following attacks:
- A variety of punches
- A backhand
- A stomp
- A fist slam that creates an AOE explosion
- A full-body charge
- A leap that produces a shockwave - After being staggered Thanatos will use this multiple times in a row
- Spirits Without, a lengthy beam attack aimed in a variety of directions
- Destrudo, which creates a minefield of explosions that go off as Thanatos performs other attacks
This battle is similar to fighting an Undertaker, but ramped up by several degrees. The physical attacks are all more or less the same, but Spirits Without is much more dangerous than Spirits Within. It lasts longer, covers a lot more ground, and will shift angles on a regular basis. Spirits Without is your best chance to deliver heavy attacks on Thanatos, but you need to be safely on its side or rear before you try anything.
Stagger Thanatos and it will start using Destrudo, which creates a huge field of explosions. This attack becomes distracting when you're attempting to track Thanatos, and you should forget about your own attacks while it is going off. Keep an eye on Thanatos's movements, wait for the explosions to stop, and then go back to business as usual.
Terminus (The Blood Moon)
Rank: A
Location: The Crock, south of the Dragon's Aery
Reward: 2 Meteorites, 35 Renown, 9,800 gil
A circular Echo that should look familiar, Terminus is located in a small area called the Crock, in the exact same spot that you battled the Bomb King.You'll find the Crock to the south of the Dragon's Aery Obelisk, along a side path called the Imperial Chase. Terminus uses the following attacks:
- A swift rushing attack
- A crushing attack where the Control Node splits apart, then tries to clamp back together around Clive's body - Terminus will use this three times in a row
- A cluster of energy darts that fly at Clive
- A beam that it sweeps across the room, either horizontally or vertically
- An AOE field attack
- Short Circuit, a flurry of beams that erupt out of all sides of the Control Node
- Hypersurge, a ground-pounding AOE attack
Stagger Terminus and it will more or less only use three attacks from this point on: Its rushing attack, Short Circuit, and Hypersurge. The two named attacks make it quite difficult to get close to Terminus. If you don't have any strong ranged abilities equipped - a distinct possibility - you'll need to wait until Terminus tries to rush Clive, then hit it before it can take flight again. Peppering Terminus with magical darts while it fires off beams is also a good idea.
Behemoth King (The Masterless Marauder)
Rank: S
Location: Vidargraes
Reward: 1 Behemoth Shackle, 1 Orichalcum, 55 Renown, 20,000 gil
A variant of the Behemoth, the Behemoth appears in Vidargraes once you've completed the Nobody's Tool side quest. Jump to the Vidargraes Obelisk, in the far north of Ash, and look to your right. You should see the Behemoth King walking around in the field, ready to battle. It uses the following attacks:
- A claw slam followed by an AOE spin
- A claw slice followed by a backhand
- An AOE tail spin
- A sliding shoulder slam
- A diving tackle
- A tail swipe (only if you're behind the Behemoth King)
- A cluster of small comets, appearing near the Behemoth King's shoulders, that fly at Clive
- A field of lightning strike points
- Four Horsemen, which brings down four comets around Clive that hit the ground and generate fast-moving shockwaves
- Maelstrom, a tornado summoned where Clive is standing
- Reign of Fire, which summons huge lines of meteors that strike the ground
- Apocalypse, which starts off with Reign of Fire, adds in some smaller comets, changes to Fore Horsemen, and then summons a massive AOE meteor
All of the melee aspects of this fight are identical to those found in the other Behemoth battles. The change-up here is the magic, which the Behemoth King uses more often. None of its spells are that difficult to avoid - Four Horsemen is perhaps the toughest to dodge, though running away from the Behemoth and then jumping the shockwaves should keep you unharmed - but they serve as a great distraction. The Behemoth King will almost always try to tackle or divebomb you. Keep an eye on the monster, avoid its slashes and swipes, and go for the head.
Stagger the Behemoth King and it will eventually use Apocalypse, a multi-part attack that really does feel like the end of the world. Keep your distance from the Behemoth King and you shouldn't have any trouble avoiding the majority of the flames. The one exception is the Reign of Fire at the end, which shows up around Clive. It is vital that you not stop running after the shockwaves end, as there's a faint AOE field around Clive that denotes the impact zone of the final meteor. Get out of the way or you're in for some pain.
Kuza Beast
Rank: A
Location: Balmung Dark, near the Great Southern Gate
Reward: 1 Behemoth Shackle, 2 Meteorites, 35 Renown, 15,000 gil
Yet another variant of the Behemoth, the Kuza Beast plays a major role in the late-game side quest Nobody's Tool. It's effectively the final boss of Dorys' storyline, and the final obstacle in completing Nobody's Tool. You'll find it in Balmung Dark, a Waloeder prison.
- It starts off using several of its attacks more than once. Expect multiple paw swipes, and for Comet to come down up to three times when cast.
- The Kuza Beast doesn't use any moves fancier than Comet. The majority of its attacks are physical.
This makes the fight overall easier than the Behemoth, in other words, though more difficult than the Behemoth's first phase. Stay in front of the Behemoth and target its head, dashing out of the way whenever it prepares to charge or stomp you with its feet. The head takes more damage than the rest of the body, and will stagger the monster more quickly. The Kuza Beast's attacks all take about a second to go off, so watch closely and don't dodge too slowly - or too hastily.
Gizamaluk (The Wailing Banshee)
Rank: A
Location: Garnick, near Vidargraes
Reward: 1 Clouded Eye, 20 Sharp Fangs, 10 Magicked Ash, 45 Renown, 9,700 gil
Another variant of Chirada and Suparna, Gizamaluk is located in the village of Garnick, on the western edge of Vidargraes. It won't appear until you complete An Inconvenient Truth, at which point entering the village and looking on your right will bring the beast out of hiding. It uses the following attacks:
- A combo of three slices, each taken from different angles around Clive
- An AOE spin
- A charging body slam attack
- Several wind darts, launched at Clive from afar
- Points of energy on the ground that explode after a few seconds
- A blast of wind magic, launched in a straight line behind Clive
- Cacophony, which creates a minefield of exploding points which spawn for several seconds
- Storm Chaser, a combination of the windy minefield and Gizamaluk's charge attacks
As with so many Notorious Marks, Gizamaluk is an earlier boss buffed up. She uses more or less the same attacks as the merged form of Chirada and Suparna, but they come more quickly, in different combinations, and from different angles. It's the angles that cause the most trouble here, as Gizamaluk frequently takes to the air, goes over Clive, and then attacks from behind. Keep the camera on her as much as you can, and either stick to ranged attacks or wait for Gizamaluk to move in close on her own. It is a frsutrating battle, but not that difficult once Gizamaluk's position changes stop tripping you up.
Prince of Death (The Grim Reaper)
Rank: A
Location: Westwatch, west of Northreach
Reward: 1 Darksteel, 45 Renown, 15,000 gil
A variant of the Lich, the Prince of Death is located near the guard tower of Westwatch. Leave Northreach for the Royal Meadows and head west, following the road. It won't be long before you spot the watchtower, and it is surrounded in an aetherflood. Check the field northeast of Westwatch to find the Prince of Death. It uses the following attacks:
- A teleporting scythe swipe, usually two in a row
- A teleporting AOE scythe spin
- A long-distance shockwave attack that leaves behind an AOE field
- A long-distance shockwave that is used three times in a row, and the Prince of Death teleports to a new position each time
- Soul Harvest, a lengthy combo attack wherein the Prince of Death teleports several times to keep up with Clive
The Prince of Death is, unsurprisingly, very similar to the Liches that populate the rest of the game. It spends the entire battle teleporting around, and will either get in close to launch combos or move away and hurl projectiles. Wait for the Prince of Death to teleport close, dodge / block / Parry its attack, and get in one or two hits of your own. Trying to chase it down is largely fruitless.
Once you reach the second phase the Prince of Death will begin using Soul Harvest, a long combo attack. It looks much more intimidating than it is, and all you really need to do is run or dodge in the opposite direction of the attack. This will leave Clive in a good position to avoid moments where the Prince teleports and tries to get at you from a different angle. Once the combo ends the Prince of Death will be vulnerable to your own attacks.
Knight of the Splendent Heart
Rank: A
Location: Royal Meadows Obelisk
Reward: 2 Meteorites, 35 Renown, 17,000 gil
The last of the dragoons, the Knight of the Splendent Heart stands guard on the road to the gates of the former imperial capital. If you fast travel to the Royal Meadows Obelisk you'll be standing behind him. The Knight of the Splendent Heart uses the following attacks:
- A swift thrust that sends the knight flying across the field
- An overhead slam of the knight's polearm that sometimes carries through into a whirling combo
- A swirling AOE arc of the knight's polearm
- A combo that ends with the knight charging up his polearm and throwing it at the ground in front of him
- Mirage Dive, which creates a series of Jump points, roughly following Clive's path, all of which the knight strikes over time
- Mirage High Dive, which is basically the same as Mirage Dive but faster
- Phantom March, which is an even faster version of Mirage Dive that always ends with the knight diving directly at Clive - and if Clive dodges the last attack, the knight will perform a rushing attack immediately after
The first phase of this battle isn't too different from previous dragoon fights, aside from Mirage Dive. Perform the usual dance of dodging and attacking (and, if possibly, Parrying - all of the knight's attacks are melee, after all). Whenever the knight is recovering from a combo or Mirage Dive he'll leave himself vulnerable, and that's your chance to strike.
Things change a bit after you stagger the knight, as he'll start using Phantom March to overwhelm Clive... and he uses it often. Rather than dodging all the Jump points your best bet is to just run from them, waiting until they clear up. That's the point where the knight will try to land directly on Clive. Dodge out of the way before that happens, then be prepared to block or dodge the knight's rushing attack. This will leave the knight open to attack. Beyond that the second phase is more or less the same as the first.