Part 20: The Dame
Main Walkthrough
Important Note: If you haven't started this quest yet - or if you did, and are second-guessing yourself - it's important to note that completing The Crystals' Curse will lock you off from any side quests that you haven't already finished. If there are any missions you want to see through, you may want to reload a save.
Drake's Head - Enemies
- Imperial Astrologer
- Imperial Captain
- Imperial Legionnaire
- Imperial War Wyrm
After some spirited chatting the group will set off into Drake's Head, and you'll have both Cid and Jill in your party. Follow Cid into the nearby passage, then check the pit on your left when you see a ladder. There's a chest down here containing 800 gil. Grab the money, then head back up the ladder and keep following Cid.
At the end of the passage you'll find what appears to be a break room, and it is full of imperial soldiers. Leap down and engage them. This is a great spot for an AOE attack or two. On the other end of the room is a boarded-up tunnel, and you'll need to break through to continue.
There are two chunks of Wyrrite ahead, just as you come within view of a bridge. Keep following Cid and he'll take you through a tight space, beyond which you'll find a Sharp Fang and two more chunks of Wyrrite. Eventually the passage opens into a mine shaft, and you'll be forced to jump out of hiding and fight a squad of soldiers. Take them all out and a much bulkier opponent will take their place.
Imperial Cannonier
That... is a substantial cannon. The Imperial Cannonier is slow, but he has some massive firepower that can hit you at great distances. Use caution. The Imperial Cannonier has the following attacks:
- A two-swing melee cannon with his cannon
- An overhead smash with his cannon
- Three fiery cannon blasts at a range
- A short-range AOE blast aimed at the ground
- A flamethrower-like jet of flame that the Cannonier maintains for a few seconds
- Black Powder, which creates a line of AOE explosions aimed towards your position
The first half of this battle is simple enough. The Imperial Cannonier will spend the battle trying to close on Clive, using his melee swipes up close and his ranged attacks when far away. The melee attacks are easy enough to avoid, so keep in close and circle around the Cannonier for the majority of the battle, only backing off when he blasts the ground. It's possible to Parry the cannon swings, but missing will usually get Clive hit by two attacks and sent flying, so... maybe just stick to dodging.
Do enough damage and the Imperial Cannonier will go 'Akashic', whatever that means, which restores his health to full, makes him a bit faster and meaner, and gives him a few more attacks:
- A three-swing melee combo that ends with an overhead smash
- Five fiery cannon blasts at a range
- A quick cannon blast that sends the Cannonier flying away from danger
- Black Powder, which lasts longer and now follows Clive sideways
- Rocketeer, which sends the Cannonier flying towards Clive - is used three times in succession
- Hard Launch, which sends the Cannonier flying into the air in an attempt to land on Clive
The second half of the battle isn't that different from the first, just more hectic. Almost all of the Imperial Cannonier's attacks are enhanced in some way, and he can close in on Clive much more quickly than before. He's also quicker to retreat, so you'll spend a lot of time closing the distance on him. Wait for the Cannonier to get in close (Hard Launch is perhaps your best opportunity) then mash the Cannonier with a few Eikonic Abilities before getting out of the way. Stagger him, then activate your Limit Break and go nuts on the Cannonier's health bar. Not overly complicated.
You'll receive The Favor of the Inferno (Ignition), Wyrrite, and Steelsilk for defeating the Imperial Cannonier. With the big man out of the way you can proceed deeper into the mines via an elevator.
The Glass Mines - Enemies
- Akashic Captain
- Akashic Champion
- Akashic Legionnaire
- Akashic Miner
- Akashic War Wyrm
Check to your left when you exit the elevator to find Steelsilk, then check the rock formations in front of the elevator for a Potion and a High Potion. On the right side of the mine shaft ahead you'll also find a chest containing a Meteorite. Snag everything, then proceed down the shaft.
Check on your right a short way down the shaft to find Steelsilk, then head to the next large chamber. It is full of Akashic enemies, which are fairly standard melee foes. Check to your left once they're all gone to find boards blocking the way forward. Knock them out of your way. Beyond are two pinches of Magicked Ash. There's a bridge to cross...
... and the game will try to scare you for a moment...
... and then you can proceed. The next huge chamber contains many more Akashics, and you'll get a quick tutorial about the enemy move Warcry, used by the Akashic Captains to buff their stats. This makes them the most dangerous enemies in the area, so you might as well target them first.
Look down the left side of this spacious tunnel to find 2 gil and a Bloody Hide, then turn around and follow the mine cart tracks to the other end. You'll find a Potion in the middle of the tracks, and on the right side of the tracks a chest containing 60 gil and seven Sharp Fangs. At the end of the tracks is a heap of rubble that you can slip beneath.
.
The next chamber beyond the rubble contains a Potion. Take a right and you'll find another Potion at a dead end, as well as a chest containing ten chunks of Wyrrite. When you try to backtrack you'll be ambushed by a swarm of Akashic enemies, so be ready to brawl. Opposite the rubble you crawled beneath to enter this chamber you'll find a large gate, and you can open it via a switch on the right.
On the other side of the gate you'll find 2 gil, and the tunnel carries on a bit further, until you run into a group of enemies. They count among them an Akashic Champion, and he fights exactly the same as the Imperial Champion you battled in Eastpool. Wipe out the lesser enemies early so you can focus on the Champion. He'll receive reinforcements halfway through the battle, so make sure you wipe them out, too. You don't need any distractions.
The path forward at the end of the tunnel is blocked by more breakable boards, and you'll find a Potion on the other side. Head down the tunnel until you come to a metal gate. Check the heap of supplies in this room for a chest containing a Coral Sword - might as well equip this now - then help Cid knock down the gate.
Things get dark in the next tunnel. Check on your right for a Sharp Fang, and straight ahead for a Potion. The scenery gets much prettier when you reach the end of the tunnel.
The Path of the Goddess - Enemies
The team will have a quick chat about Cid's last visit to this area, then you can continue your trek. Take a right and you'll wind up in a clearing that is full of Wraiths, the enemies you fought back beneath the Phoenix Gate Ruins. They're a bit meaner than the Akashic soldiers from earlier, but still not a big deal. Go through the door on the other side of their little arena.
Go down stairs and through another door to fight a mixture of Specters and Wraiths. The Specters make things more confusing, so take them out first. The first wave of enemies will be replaced by a second, and this wave is headed by a Lich. It's difficult to focus on the Lich while you're getting smacked around at all times, making a few quick AOE attacks useful to clear the room.
Through the next door you'll find a High Potion and a Potion. Clive will mention some sort of 'guardian', and, no surprise, you'll run into just such a thing when you go through the final door.
Akashic Dragon
Big arena, big enemy. An intimidating foe, the Akashic Dragon trades speed for raw power, and it hits quite hard if you're slow to avoid its moves. The Akashic Dragon uses the following attacks:
- A bite at close range
- A sweeping charge attack
- An AOE wing sweep
- An overhead wing slam
- A fireball from long range
- A thin, laser-like fire beam that travels along a straight line, triggering an AOE explosion along the path of the line
The battle starts off with the Akashic Dragon engaging your team close-up. For the most part you'll be going head-to-head with the dragon, avoiding its bites and wing attacks. All of its attacks, melee or ranged, can be dealt with via simple dodging to the left or right. Focus on the dragon's head, as strikes to the face will do more damage than targeting other parts of its body.
Stagger the Akashic Dragon once and it will take off, flying around the arena. After a few moments it will gain some new attacks:
- Cauterize, where the dragon flies into the air and sweeps down the arena, breathing a huge plume of fire back and forth across the ground
- An overhead, full-body tail swing
- Multiple fireballs from long range
- Its laser-like fire beam, which it now uses twice in a row
- A variation of the laser-like beam which strikes the ground horizontally in front of the dragon
- Dragon Dance, which sweeps everyone back, then combines the dragon's fireballs and laser-like line attacks into a single combo, ending with a fiery, full-body charge straight at Clive
The Akashic Dragon is much more mobile in the second phase, and its attacks come more quickly than before. It starts off with Cauterize, which looks deadlier than it is - run at the flame and watch which direction it's sweeping, then just run the other way. After this you can expect the dragon to jump between melee attacks, which are your best opportunities to hit its head, and fire attacks, which you should straight-out avoid. Dragon Dance is the deadliest weapon in the Akashic Dragon's repertoire, but it will stun itself for a long time once the combo ends, giving you a chance to turn on Limit Break, get it into Stagger, and demolish its health bar.

You'll receive Bloody Hides, Meteories, and Black Blood for defeating the Akashic Dragon. You'll also open the way to a huge gate at the end of the arena, beyond which you'll find two Potions. Climb the stairs to your destination and, after the first set, you'll find another Potion on your right and a chest containing ten spools of Steel Silk, ten Bloody Hides, and ten pinches of Magicked Ash. The number of restoratives should clue you in to what's coming when you finish climbing the stairs.
Many things will happen, and when they're done Clive will be fighting alone against a group of Revenants. They're melee combatants that can unleash some slow-moving magic attacks, and not a huge threat. Next is a group of Specters, and they're accompanied by slow AOE magic bursts. Use Phoenix Shift or Deadly Embrace to close the distance with the Specters. After that is a large squad of Wraiths, and they're accompanied by more AOE bursts, along with line-based beam attacks. Your own AOE attacks will do well here.
Defeat the three groups of enemies and you'll need to avoid one attack. After that, the true enemy comes out to play - and so does Ifrit.
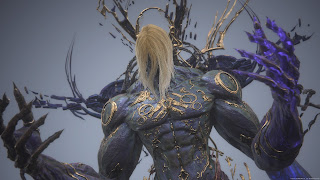
Typhon
Yep, back to Kaiju mode. A mystery being who is probably another Eikon, Typhon is slow-moving but powerful, and can teleport straight to Ifrit when he feels like it. Typhon uses the following attacks:
- A variety of one- and two-handed melee attacks
- A hand chop that ends in an explosion
- A hand chop that sends a shockwave on a line straight at Ifrit
- A thrusting melee charge that Typhon can use at great distances
- A long-range, quick finger laser
- A cluster of six finger lasers that Typhon sweeps towards a single point
- A swarm of fireballs launched from both hands
- Unending Clamor, which creates an enormous AOE field with Ifrit stuck in the middle
Unlike previous giant monster brawls this one is almost entirely a normal fight, with no Cinematic moments that give you an opportunity to land cheap hits. Typhon varies between close-range melee attacks and long-range projectiles, moving more to the projectiles as the fight wears on. You'll know Typhon is moving into his second phase when he uses Unending Clamor.
Thanks to his increased affinity with the Eikon, Clive can now employ a few new moves as Ifrit:
- Perform melee attacks, use Fireball Burst (Triangle button), then hit Triangle again to use Backdraft.
- Use the Circle button to activate Wildfire, a fast-traveling move that is identical to Clive's Ignition Ability. It is less useful is a damage-dealing move, however, as it won't stun Typhon.
- Hit the right control button to use Firelight, which restores some of Ifrit's health. You can use this six times.
- In addition to the moves listed above, Ifrit has a ton of other maneuvers that work more or less similarly to Clive's normal combat skills. Check the menu for a full breakdown of Ifrit's moveset.
Clive as Ifrit is much more agile this time around, and your dodging skills will allow you to slip around Typhon's attacks with relative ease. The only attack you can't just dodge is Unending Clamor, which has a massive attack radius. Use Wildfire to zip out of the way as soon as Typhon teleports to a distant point on the battlefield. So long as you can dodge consistently - and it's really not that difficult, so long as you watch Typhon's arm movements - this fight shouldn't last too long. Alas, it isn't over yet...
Typhon the Transgressor
Woof. Essentially the previous fight on steroids, your encounter with Typhon the Transgressor is appreciably more difficult. Typhon can do everything he did before, but all of his moves are now more dangerous - and harder to avoid. Typhon the Transgressor can use the following attacks:
- Chopping and slashing melee combos
- A teleporting overhead chop
- A whirling AOE attack that creates a shockwave around Typhon
- A faster finger laser that he uses three times in a row
- Vertical and horizontal shockwaves
- Unending Clamor, which now creates three overlapping AOE fields
- Demon Wall, which creates a series of barriers that will rush at Ifrit, each with only one gap to escape through
- Catacemeune, which creates a series of energy pillars on the ground and is followed up on by Unending Clamor
Typhon the Transgressor spends more time at a distance from Ifrit, using finger lasers and shockwaves to keep you from landing hits. You need to wait until Typhon decides to come in for chop attacks, then smack him around before he teleports away. Using Backdraft whenever possible will make your combos count for me. Unending Clamor is now much more dangerous than before, and the addition of Demon Wall makes it all the more important that you be ready to zip around using Wildfire. Still, all things considered, this fight isn't that difficult... so long as you remember that you can heal yourself.
Get Typhon's health far enough down and you'll need to perform a few Cinematic actions to finish the fight. You'll receive The Breath of Fire (Flames of Rebirth), Sharp Fangs, Steelsilk, and Magicked Ash for defeating Typhon the Transgressor. What follows is... well, see for yourself. A great deal is about to change.
Part 22: Cid the Outlaw
Main Walkthrough


