Part 34: Onward
Main Walkthrough
Crystalline Dominion - Enemies
- Dragoon Astrologer
- Dragoon Knight
- Dragoon Knight Captain
- Dragoon Lancer
- Elite War Aevis
- Elite War Wyrm
- Megalocrab
After a quick round of plotting - which ultimately proves to be unnecessary - Clive, Jill, and Torgal will be set loose on the rooftops of the Crystalline Dominion. Something major is happening, and it may just prove to be a great distraction. There are no enemies to fight or items to find in the first area, so just make your way across the rooftops and enjoy the view.
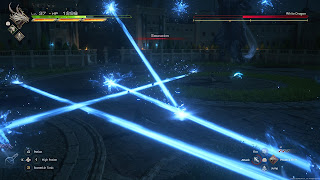
Eventually a cut scene will send you down to street level. Head down the street and you'll be facing off against a squad of Dragoon Knights before long. Despite their names these guys don't do any jumping, and should be no match for your party. Keep following the path after you oust the first lot and you'll find another squad of dragoons, including some Dragoon Astrologers. Target the magic users first.
After you defeat the second squad of knights you'll be challenged by a Dragoon Lancer. This guy is more what you'd expect of the dragoons, and is basically a revamped version of bosses you've fought previously. You're more than a match for this guy by now, and you can use Titanic Block to ward off the majority of his attacks. Check the left side of this battlefield for a chest containing fifteen chunks of Wyrrite once you're done fighting.
Also on the left is a fallen archway. Crawl beneath it and you'll drop into the city's sewers, where Megalocrabs wait. They shouldn't give you any trouble along these narrow paths. Continue along the main route to find a Potion, two pinches of Magicked Ash, and, once you exit the sewers, another Potion. The second Potion will put you on some docks.
Follow the path until you find the lever for a lift. Use it to return to the street. There are more dragoons ahead, including a Dragoon Knight Captain, though they shouldn't pose a threat. Slip under the debris once you defeat the dragoons and you'll find another Potion a bit further up the street. Beyond are many more dragoons, and they've added Elite War Wyrms to their ranks. These flying units can make ground combat irritating, so try to pull them out of the sky with Eikonic Abilities.
Defeat the first squad and another will show up, consisting of an Elite War Aevis and more dragoons. You've fought many of these dragon offshoots before, but the darkness of the street can make this fight a bit more dangerous than normal. Try to wipe out the dragoons first so you can concentrate on the Elite War Aevis. Once the creature is by itself this fight is business as usual. Check the left side of the street once you've cleared all the enemies to find the path forward.
Beyond the gate you need to open is a chest containing ten Sharp Fangs and ten spools of Steelsilk, on your left, and a ladder, on your right. Climb the ladder to find a Potion, as well as the main path. Follow it along the roofs to find a High Potion, as well. as two hapless dragoons. Wipe them out and you'll find the way forward on your right, past a Dragoon Astrologer.
Up a ladder and through a door you'll find a small chamber with another door. Look to your right before proceeding to find a Potion. Beyond the door is a long, conspicous walkway, and you'll run into a Dragoon Lancer, a Dragoon Astrologer, and several Elite War Wyrms. The mooks are very distracting when you try to fight the Lancer, so rush around and take them out first.
At the far end of the walkway is another door. Pop through it and the next one to continue your trek. There's a Potion on your left once you get back outside. Ahead you'll enter another section of building, and there's a Sharp Fang on the stairs you need to decend. There are also dragoons to beat up. At the bottom of the steps you'll find a chest containing The Favor of Earth (Raging Fists) on your left and a High Potion on your right.
Near the High Potion is a huge set of double doors. They're conspicuous enough that you should be ready for trouble when you pass through.
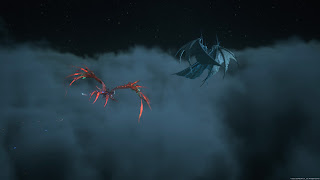
White Dragon
It has been a while since you last fought a dragon, and the White Dragon is largely a new experience. You can expect the following attacks from the White Dragon:
- A side-to-side biting attack
- A rushing charge that creates a line of ice around and behind the White Dragon
- An overhead wing smash
- An AOE wing sweep that creates a large field of ice around the dragon
- A ground stomp that creates a spread of ice in front of the dragon
- A spread of ice crystals fired at random
- A flurry of ice darts that home in on Clive
- Heavenly Host, which creates five slow-moving orbs that follow Clive around
The White Dragon is a bit on the slow side, but its range is great and it can cover a massive area with the icy aftereffects of its attacks. For the most part you want to keep the White Dragon in front of you, alowing you to watch its body language and react to incoming strikes. This will also alow you to attack its head, which does more damage than hitting any other part of the White Dragon's body.
Stagger the White Dragon and it will add a few new attacks to its repertoire:
- Emanation, which releases several ice crystals capable of emitting beam attacks that will sweep around the arena and try to trap Clive - the attac ends with the crystals gathering together and unleashing an AOE attack
- An ice attack that descends on Clive's head, then creates an outcropping of lines when it hits the ground, similar to the snowflake
- An AOE breath attack that spreads slowly outward from the dragon's body
- Dragon Dance, which combines Heavenly Host, the dart attack, the snowflake attack, Emanation, and the icy rush - also a similar attack called Holy Twinning which only combines a few of these attacks, and is easier to avoid
The second phase is more frustrating than the first, as the White Dragon is more mobile and makes it more difficult to target its head. Its new moves are fairly easy to see coming, though its combo attacks - Dragon Dance in particular - can throw you for a loop, given the sheer amount of stuff happening on the screen. Continue to focus on the White Dragon, dodge in the direction of the dragon so you get closer to its head, and unleash quick Eikonic Abilities whenever you're in range. Dragon Dance will stun the White Dragon for a few moments, so be ready to unleash Clive's power on its face the moment the combo ends.
You'll receive Whitewyrm Bones, Sharp Fangs, and Bloody Hides for defeating the White Dragon. Crazy happenings will engulf the Crystalline Dominion in the cut scene that follows, and when it is done you'll be left in rubble with Jill, Torgal, and Goetz. Goetz provides the combined services of a merchant and a blacksmith, and at the very least you should stock up on Potions and High Potions before you go anywhere else. Speak to Jill when you're ready to proceed.
The Remnants - Enemies
- Akashic Astrologer
- Akashic Captain
- Akashic Dragoon
- Lich
- Revenant
- Specter
- Undertaker
- Wraith
The city has more or less been destroyed, forcing you to pick your way through what remains. Follow the main path and you'll find a High Potion. Eventually you'll emerge near a courtyard, on your right, and a bunch of Akashic Dragoons will attack. Their Akashic Captain can use Warcry to empower everyone else, so try to take him down first.
There's a gate at the far end of the courtyard, and on the other side you'll find three chunks of Wyrrite. Past here is a drop into another clearing, and when you fall down the Akashic Dragoons will be joined by a Lich. The dim light makes tracking this creature a pain, so Lock On and be ready to dodge whenever you see its silhouette move. Leave the dragoons to Jill and Torgal. The Lich will be joined by Wraiths partway through the fight, though you should ignore them and finish the Lich off first.
Climb the rubble on your right to find a Potion, then immediately turn around. Behind you is a chest containing The Breath of Lightning (Judgement Bolt) and fifteen pinches of Magicked Ash. Follow the main path up the stairs and you'll find four pinches of Magicked Ash. Up the next climb you'll catch a cool cut scene.
Keep on trekking along the rubble and you'll run into a squad of Revenants. On the right side of their little arena you'll find three Sharp Fangs, as well as the way forward. Keep going to hit another cut scene, and just past it a battle with a group of Specters. Defeat them and a second wave will show up, joined by Revenants. The Specters can cast Protect on the Revenants, so you want the Specters gone first.
Climb the wall on your right to find five
Bloody Hides. A bit further up is a
Potion, and beyond it is a gate. Shimmy through and you'll be forced to battle an Undertaker and some Revenants. The Undertaker fights the same as the one in
Drake's Fang. The Revenants will prove no nuisance, but the Specters that show up to help the Undertaker later in the fight can put a crimp in your strategy. Redirect your attacks to them until you're alone with the Undertaker again.
On the other side of the Undertaker's arena is a wall to climb, and you'll find a Potion at the top. Keep following the path until it veers to the right. Next to a fire on your right when you turn is a chest containing Black Blood and ten Bloody Hides. Straight ahead is a High Potion. Take a right from the High Potion and you'll find a drop down to lower ground. A nasty enemy awaits.
Necrophobe
That's a bit of a blast from the past. The Necrophobe is a master of the elements, and will batter you from all sides with a wide variety of colorful attacks. The Necrophobe uses the following moves:
- A high-speed charge (purple)
- A whip-like melee strike (light blue)
- A long range projectile (light blue)
- A cluster of energy spheres (dark blue)
- A slow-moving, flaming sphere (orange)
During the first phase of this battle the Necrophobe is rendered somewhat predictable thanks to the four satellites that it uses to attack. They're quick and strong, yes, but they're also color-coded, and it you pay close attention to their hue you'll know which attack is coming next. The only attack that may catch you off guard on a consistent basis is the rush, which is quite fast.
Do enough damage and Necrophobe will activate Elemental Dissonance, which changes up its attack pattern to include some new moves:
- A melee sword combo
- An electricity-tinged rushing attack
- Firaga, which creates a swirling cluster of flaming spheres
- Blizzaga, an icy line attack
During this second phase you'll find Necrophobe a bit more difficult to predict, as it teleports more often and dispenses with its satellites. At this point your greatest enemy will be Blizzaga, as it has a tendency to go off when you're using Eikonic Abilities and can decimate Clive's health. Stick to shorter Eikonic Abilities and you should have plenty of time to get out of the way.
Stagger Necrophobe and it will begin charging up its Death spell. If you fail to deplete the gauge in the top-right corner of the screen quickly enough you will, quite simply, lose the battle. Break out your strongest Eikonic Abilities and use them to relentlessly pound Necrophobe. It will use magic attacks during this bit to try and drive you away, though you should do your best to ignore them and continue hitting. The timer's ticking, and it doesn't last long.
Take out the Necrophobe's Death attack and it will add a few more moves:
- An electric rushing attack
- An ice beam
- Enfiraga, which adds fire to its sword combos
- Enblizzaga, which creates an ice field around the Necrophobe
- Enthundaga, which creates electricity mine traps all over the field
- Dualcast, which allows Necrophobe to use Firaga or Blizzaga twice in a row
The final phase isn't that different from the previous phases, it's just more fast-paced. Dodge the sword attacks - Parrying isn't recommended unless you're really good - and watch out for the normal ice beam and Dualcast: Blizzaga. Both attacks will rip Clive to pieces if you get caught for an extended period of time. Use Phoenix Shift or Lunge to keep up with the Necrophobe whenever it teleports, then unleash your Eikonic Abilities to claim the win.
You'll receive The Favor of Earth (Windup), Wyrrite, and Magicked Ash for defeating the Necrophobe. Once the next cut scene is done you'll be facing the next wall you need to climb, and you'll find three chunks of Wyrrite at the top and on your right. The items more or less mark the entry point into the building that you need to climb.
Make your way up the building and you'll find a door leading to a surprise confrontation - and a few reunions. And then...
Bahamut
Of course you get to fight Bahamut. The first chunk of this fight is Cinematic in nature, with minimal input from you, though after a while you'll get to battle the dragon as Ifrit. Bahamut uses the following attacks:
- A whirling charge
- Slicing, long-range shockwaves
- A breath attack that travels in a thin line
- Aura Burst, an AOE attack
- Quintessance, which creates a cluster of explosive orbs aimed at Ifrit
- Megaflare, a flurry of bolts that converge on Ifrit
The first phase of this fight is fairly simple. Bahamut tends to stay away from Ifrit, launching itself toward you to perform attacks. Rush in close (Circle button) and wait for an attack, then leap up into Bahamut's face and perform a combo. Keep doing this to whittle down its health. Partway through the battle Ifrit will learn Spitfire, a blazing line attack that you can release by pressing down R2 and the Triangle button. Use the left joystick to aim... or just get into Bahamut's face and use it without needing to aim.
Do enough damage and Bahamut will use Gigaflare on Ifrit. At this point you'll gain control of the Phoenix instead, and this rail-shooting section is a bit different from earlier. The Phoenix can now charge its fireball attacks, and you can use the Volley move (hold the Circle button) to lock onto projectiles and destroy them before they can hit you. Do this to get rid of any orbs Bahamut sends your way.
Throughout this battle Bahamut will launch several sustained laser attacks. Generally speaking your best bet for minimizing damage is to move in a circle around the screen, dodging constantly, until Bahamut stops attacking. It will also summon spheres that can launch their own laser attacks, and you'll want to attack and destroy these so you're not avoiding lasers from all angles.
Eventually Bahamut will summon six spheres and begin charging up for Gigaflare. Ignore everything else flying at you and use Phoenix's charged attacks to quickly destroy the spheres. Dodge whenever flurries of bolts get too close, but otherwise focus on offense. Once the spheres are gone Bahamut will be left vulnerable, and you can rip away at its health.
The final phase of this battle returns you to Ifrit, with more support from Phoenix on the sidelines. The battle is more or less the same as before, though Bahamut is more evasive than before - and tends to take longer to recover when winded. Use Wildfire to quickly zip away from any Megaflares sent your way, smack Bahamut around whenever you get an opening, and wait for Spitflare to charge. Spitflare will likely do most of the work getting you to a Stagger, and once Bahamut is grounded you can lay on some serious pain.
Eventually you'll do enough damage for Bahamut to charge up Teraflare. Do as Phoenix bids and rush up behind it before the attack goes off, then pound the Square button to survive. After that you're in the home stretch, and you just need to keep inflicting damage - and performing Cinematic actions - until you finish the dragon off.
You'll receive Sharp Fangs and Meteorites for defeating Bahamut. And yet...
Bahamut
Yeah, he basically turned into King Ghidorah minus two heads. Bahamut has some new attacks, in addition to the old stuff:
- A beam attack that travsl horizontally across the screen
- Supernova, a massive sphere that follows Ifrit
- Gigaflare, an enormous beam attack that will slowly track Ifrit
- Radiance, a multi-line beam attack that sweeps across the battlefield towards Ifrit
- Celestial Foundry, a huge series of beam attacks that are faintly highlighted by lines appearing in space beforehand
- Teraflare, a charging attack
You now have control of Ifrit Risen, an enhanced version of Ifrit that is much more powerful. In addition to Ifrit's normal abilities you can now use Lightspeed via the X button, which comes close to teleporting Ifrit to Bahamut.
Most of Bahamut's attacks boil down to simple - if flashy - beams. As long as you wait for them to die down a bit before rushing in you should be able to avoid most of the damage directed towards Ifrit. Once the skies are clear use Lightspeed to zip in and deliver multiple combos before Bahamut can react. Back off, wait for beams, then repeat the process.
Spitflare is, again, quite handy in this fight. That said, you shouldn't use it too often once Bahamut is down to about half health. Eventually it will begin charging up for Teraflare, and you'll need to deplete the move's gauge before Teraflare goes off and kills you. Spitflare makes this quite easy. You can make do without Spitflare, but... why take chances?
Inflict enough damage and you'll be prompted to endure one more Cinematic action. Succeed and the battle will end. Finally. You'll receive a Light Shard, Wyrrite, and Magicked Ash for defeating Bahamut... again. Clive will also gain the power of Bahamut, and many... many... many cut scenes will take place before you can try out your new abilities.
Part 36: Things Fall Apart
Main Walkthrough


