

In order to trigger this section of the main questline you first need to introduce yourself to the world of Cassette Beasts by completing This Is The World We Live In. Once you've returned to Harbourtown Kayleigh will invite you to drinks, and once the discussion is done you'll unlock Take Me On (along with a few other quests).
To continue Take Me On you need to pay a visit to New Wirral Park, a location that spreads along the map to the north of Harbourtown. Return to the spot where you fought the Dominoth and learned about Recording in the Harbourtown Outskirts. Near the switch that brought the Dominoth over is a dirt pit, and you can hop from a platform on your left and glide north to reach the entrance to New Wirral Park.

Head west of the entrance to the park and you'll trigger a cut scene involving a Confident Woman, outside a Ranger Outpost. You'll need to trek over to meet her, though this is easier said than done. Glide your way to the north and you'll find the cliffs up to the outpost on your left. You'll need to go north, around the outpost to the west, and then south up the cliffs to find the front. Along the way you'll be forced to battle three groups of NPCs:
- First are a pair of Wannabes with Carnivipers. They have low defense and are no big deal.
- Second is another Wannabe with an Elfless. Fire works but changes its form to Water, while Metal is likely your best bet... but you may not have Metal-type moves yet. Overall not a big deal.
- Last is a Recruiter with Traffikrab and Macabra forms. You probably won't be able to do any significant damage, so just rely on your strongest attacks.
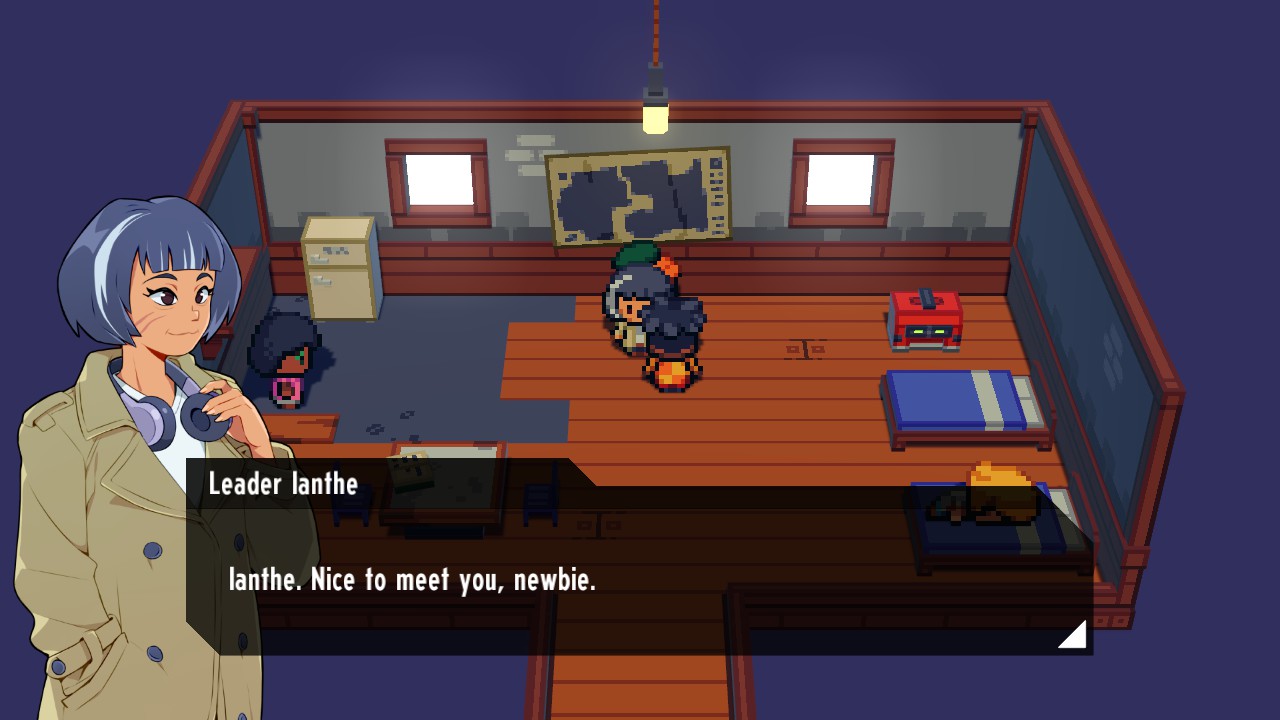
Inside the Ranger Outpost you'll meet Ianthe, head of the Rangers. At Kayleigh's suggestion she'll induct you into the Rangers... as a trainee. To become a full Ranger you'll need to travel New Wirral and defeat the twelve Ranger Captains, each of whom will put you to the test. This will take up a significant chunk of the game, so don't assume you're done with Take Me On just yet. You'll also unlock the quest Rumour Has It, which will provide some hints on where to go next.
Before you leave the Ranger Station, check the chest on your right for Pulp, Wheat, and a Basic Tape. You can also check the fridge on the left side of the room for a Canned Ice Latte and a Rewind. You've got a lot of traveling ahead, so you might as well be prepared. Note, too, that you can use the Ranger Station to fast travel to New Wirral Park via the map from this point on.

The remainder of this quest consists of tracking down the various captains and challenging them to battles. They're all over New Wirral, and you can fight them in any order you like, as they appear to scale with your level. (Whether you can reach some of them early in the game is another matter, of course.)

#1 - Captain Wallace
- Traffikrab - Plastic-type (Wallace)
- Lobstacle - Plastic-type (Wallace)
- Traffikrab - Plastic-type (Ranger)
The closest challenger to your starting point, Captain Wallace is located on a ridge to the south of the New Wirral Park Ranger Outpost. To reach him you'll need to head to the southwest corner of New Wirral Park, where you'll find a bit of a box canyon with a lowered bridge. Look along the rock wall to the right of the bridge to find a switch that will raise it, allowing you to get at Wallace.
Accompanied by a Ranger, Wallace specializes in high defenses and melee attacks. The two Traffikrabs will throw up Plastic Walls and then pepper your party with attacks, occasionally turning themselves into Water-types. Earth attacks are your best bet, and you can go with Lightning, Plant, or Astral attacks if the Traffikrabs turn into Water-types. Wallace will change into Lobstacle when defeated, so take out the Ranger's Traffikrab first so you're not suddenly facing a tougher battle.
Defeating Wallace will earn you your first stamp, as well as Fused Material, an Elemental Wall Sticker, an Olive Up!, and a bunch of Wheat.
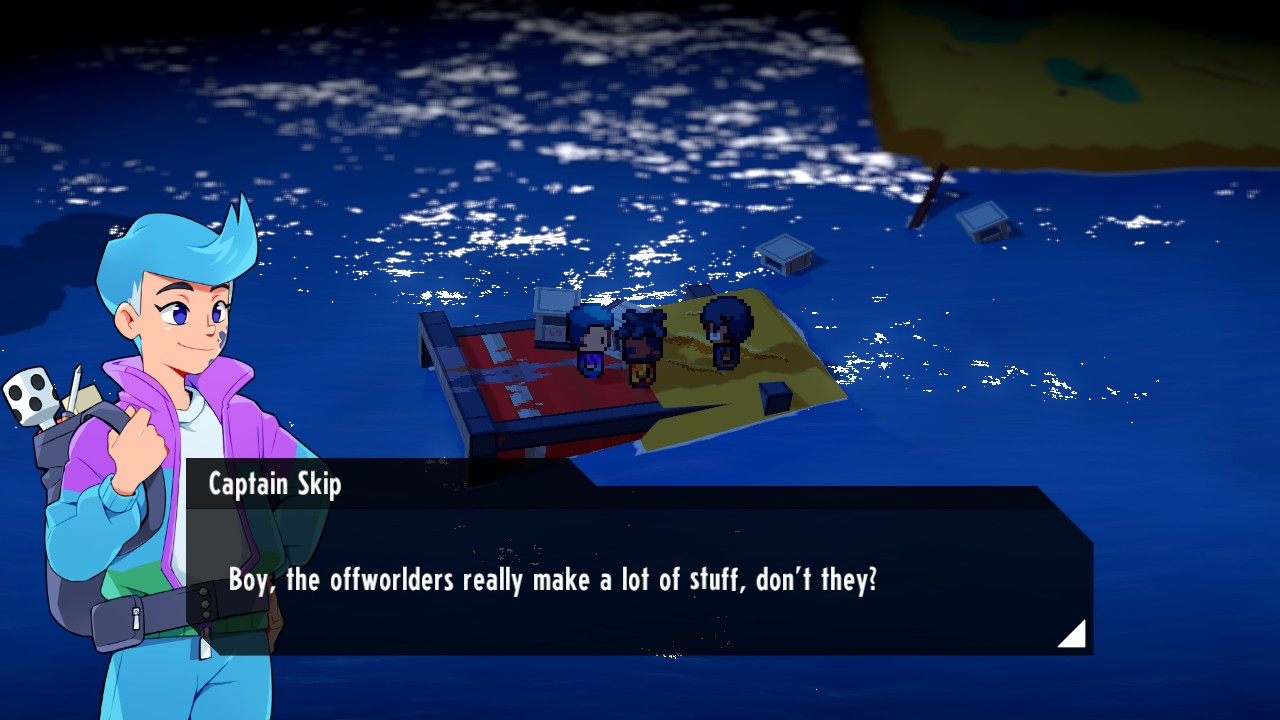
#2 - Captain Skip
- Binvader - Metal-type (Skip)
- Binterloper - Plastic-type (Skip)
- Binvader - Metal-type (Ranger)
Your second opponent, Captain Skip, is located just off the shore of Western Harbourtown. To reach Skip you'll need to swim, which means Recording a Diveal. Diveals are most easily found on Diveal Island, a little section of land in the northwest of Thirstaton Lake. Walk west from New Wirral Park and through Lakeside to find it. Once you can swim you can float out to Western Harbourfront via the docks, and you'll find Skip on top of what appears to be a cargo container, a little ways out to sea.
Skip's Binvaders will set up Metal Walls, then try to summon in help and hit your monsters from afar. The Binvaders are slow, so you can get around their defenses by using Fire moves to quickly Burn them, which will drain their health a bit each turn. Lightning will have a similar effect. Neither is a great choice against the Plastic Binterloper that shows up later, so consider switching to Earth attacks. Your original moves will continue to dispel Metal Wall on the Binterloper, though they will also give it Contact Dmg Lightning, so stick to Fire.
Defeating Skip will earn you Fused Material, a Binvasion Sticker, an Upgrade, and various materials.

#3 - Captain Zedd
The third captain is Zedd, a sleepy fellow who is taking a nap on the east side of Autumn Hill. You'll find him in the area full of Bulletinos, in a dirt-filled pit with a raisable bridge. You'll need to complete the Scattershot side quest to battle Zedd.

#4 - Captain Judas
- Manispear - Metal-type (Judas)
- Jellyton - Poison-type (Judas)
- Dandylion - Plant-type (Ranger)
Fourth opponent Captain Judas Knight is located in the Southern Isles, though the easiest way to reach him is via the Deadlands. Make your way along the southern coast of the Deadlands to the east, until you reach the area's bonfire. Continue east of here until you hit the southeastern tip of the area. You'll find a path to the Southern Isles, and Judas will be standing nearby.
The trick to this fight is the Dandylion, which will spend the majority of the battle healing Judas' forms. Use Air, Fire, or Poison to cut it down - though be prepared for this process to take a bit, as Dandylion has a lot of HP. Manispear can be handled with Fire or Lightning. Once Manispear is gone Judas will turn into a Jellyton, granting him much higher offensive capabilities, though if the Dandylion he won't take nearly as long to take out. Both Manispear and Jellyton can use Revenge Strike, so tend towards ranged attacks over melee if you can.
Defeating Judas Knight will earn you Fused Material, a Pre-emptive Strike Sticker, an Olive Up!, and a bunch of crafting materials.

#5 - Captain Clee-0
The fifth captain on the list is Clee-0, a robotic server-turned-Ranger. You'll find Clee-0 in the Eastham Woods, though you'll need to find a way to reactivate her via the Coin-Operated side quest. Complete the quest and you can fight her.

#6 - Captain Lodestein
- Wingloom - Lightning-type (Lodestein)
- Plasmantler - Lightning-type (Lodestein)
- Manispear - Metal-type (Ranger)
Your sixth opponent, Captain Lodestein hangs out in "Ham", the thin valley to the west of Eastham Woods. You can reach "Ham" most easily by dropping down into the valley from the northwest corner of Eastham Woods. Once there, look for a lever in the middle of the area that raises two platforms with speed ramps. Get on top of them, and use Bulletino Dash to zip over the north-facing ramp. Lodestein is on the next platform to the west, and you can use Electromagnetism to latch onto the blue block over his head and pull yourself over to greet him.
This battle will have Lodestein and his Ranger buddy making your characters over and over, inflicting extra damage with each of their attacks. This gets especially grating when Wingloom starts attacking both of your characters simultaneously. You'll find health dropping at a rapid pace each turn. Manispear is a persistant nuisance, so get rid of it quickly with Fire attacks and the Burn status, then turn on Wingloom. Plastic is a great element to use in this fight as it will dispel Wingloom's Multitarget in a hurry. Plasmantler will attempt the same tactics as Wingloom, and is similarly susceptible to Plastic.
Defeating Lodestein will earn you Fused Material, a Battery Sticker, an Olive-Up!, and many materials for bartering.

#7 - Captain Penny Dreadful
- Skelevangelist - Earth-type (Dreadful)
- Djinn Entonic - Astral-type (Dreadful)
- Sanzatime - Earth-type (Ranger)
Your seventh opponent, Captain Penny Dreadful, is located in the Deadlands. To get to her you'll need access to Electromagnetism, which you'll gain during the All I Ever Needed quest. Head east of Harbourtown Station until you see a blue block dangling nearby, then use Electromagnetism to zip up and over to it. This will put you in the Deadlands. Continue east until you see the remains of houses. Penny Dreadful will be standing by herself in a little clearing.
The Ranger's Sanzatime is pretty straightforward, but the Skelevangelist will make a nuisance of itself by promptly becoming Ghostly, which prevents your characters from doing anything to it. All you can do in this situation is take out the Sanzatime, bolster your defenses, throw out monsters that won't take much damage (avoid Fire, Lightning, and Plastic), and wait for Ghostly to wear off. Once it does the Skelevangelist will conk out. Penny Dreadful will follow up with a Djinn Entonic that also likes to make itself Ghostly, but if you use a Poison, Plastic, or Metal move this will fail, and you can pick it apart.
Defeating Penny Dreadful will earn you your seventh stamp, as well as Fused Material, a Ritual Sticker, an Upgrade, and a bunch of crafting materials.

#8 - Captain Gladiola
- Palangolin - Metal-type (Gladiola)
- Cryoshear - Ice-type (Gladiola)
- Southpaw - Metal-type (Ranger)
Captain Gladiola waits for you on an island in the southwest of the Mire Sea, on the bottom-left corner of the world map. If you hop into the waters near The Marshes and swim southwest you'll find your way to Gladiola's island quickly enough. Once there, pull the lever on the right side of her little plateau, then jump onto the wind current that appears. You only have a few seconds to rise to the top before the wind subsides, so don't dally.
This fight gets irritating quickly thanks to the Dodge move, which both enemies will immediately use to raise their Evasion. They'll then use Peekaboo, lowering your characters' Accuracy, and follow up with melee attacks until their statuses wear off. You may still land hits when these two moves are active, but the chances aren't great. Gladiola's Cryoshear will also follow this trend, and use Double Slice to inflict extra damage. You have a few options:
- Bring in fast forms that will go first, and inflict status ailments before your Accuracy drops. The Lightning status Conductive is especially useful in this fight.
- Use attacks that hit no matter what. These tend to not do as much damage, but at least they hit.
- Throw up Walls that will inflict status ailments and protect you from damage. Then just wait until Accuracy is back to normal for a turn and lash out.
Regardless of your approach, take out the Southpaw first. You don't want it to double team your party with the Cryoshear. That's just too much damage.
Defeating Gladiola will earn you Fused Material, a Jagged Material Sticker, an Upgrade, and assorted materials. You can also find a chest containing an Undertow Sticker, an Aerosol Tape, Plastic, and Pulp on Gladiola's island.

#9 - Captain Heather
- Aeroboros - Air-type (Heather)
- Huntorch - Plant-type (Heather)
- Spooki-onna - Ice-type (Ranger)
Your ninth opponent is Captain Heather, who is located in the far west of the map, on an island in a section of the Mire Sea. Enter Cherry Meadow and follow the northern path west, glide down into Cast Iron Shore, and keep going west. You'll find her island a little ways away from the shallows of Cast Iron Shore (though if you reach the shipwreck of the 'Titania', you've gone too far north).
This fight is a pain in the butt if you rely on melee attacks. The Spooki-onna will use Avalanche every turn, doing no damage but giving every monster Snowed In status, which disables melee attacks for that turn. Heather's two forms are then free to pelt you with ranged attacks. Unless you have priority moves to sidestep Avalanche (and they're typically not very strong) you'll need to rely on ranged attacks of your own to defeat Spooki-onna. Lightning and Metal are your best choices. Once Avalanche is no longer a factor the fight becomes pretty straightforward.
Defeating Heather will earn you Fused Material, a Fog Sticker, an Olive-Up!, and assorted materials.

#10 - Captain Buffy
- Lilygator - Water-type (Buffy)
- Grampus - Ice-type (Buffy)
- Dandylion - Plant-type (Ranger)
Your tenth opponent, Captain Buffy, hangs out in Cherry Meadow, and if you enter Cherry Meadow from Lakeside you'll see her up on a cliff. You can't reach her from here, however, and you'll need to travel through Cherry Meadow in a counterclockwise motion to get to her. Once you find a lever that raises a bridge you'll be within striking distance of challenging Buffy.
This fight consists primarily of Buffy stealing your AP and the Ranger's Dandylion feeding his to his captain. Let Buffy build up too much AP and her Lilygator will use Last Rites to annihilate one of your monsters. Ouch. If you can't wipe the Lilygator out quickly - Lightning is great here - then either try to steal the AP back, or use status attacks to incapacitate the Lilygator as you chip away at its health. The same pattern goes with the Grampus, which also has Last Rites, though you'll have to employ different weaknesses to get the job done (Lightning and Metal). The Dandylion is a secondary concern, given how long it takes to defeat.
Defeating Buffy will earn you Fused Material, an AP Refund Sticker, an Upgrade, and a bundle of crafting materials.

#11 - Captain Cybil
- Sparktan - Lightning-type (Cybil)
- Sirenade - Air-type (Cybil)
- Cluckabilly - Air-type (Ranger)
Your eleventh opponent, Captain Cybil, is in The Marshes. You'll find her one map segment west of the bonfire, though the easiest way to get to her (assuming you can't just go over obstacles with field actions) is by coming south from Cherry Meadow. Head into The Marshes once you can see a Landkeeper office on your left and you'll find Cybil standing on a wooden platform.
Cybil's trick is to perforate your characters with Shrapnel, then have Cluckabilly use Change the Record to force a form swap, dealing damage in the process. The sheer inconvenience of constantly having your forms change is bad enough on its own, so you can either focus all your fire on Cluckabilly and try to get rid of it in a hurry, or use Fusion and ignore the swap. Cybil's Sirenade form uses Sonic Boom to hit both of your characters, but the lack of the Conductive status ailment makes things a bit easier.
Defeating Cybil will earn you Fused Material, a Change the Record Sticker, an Olive-Up!, and assorted materials.
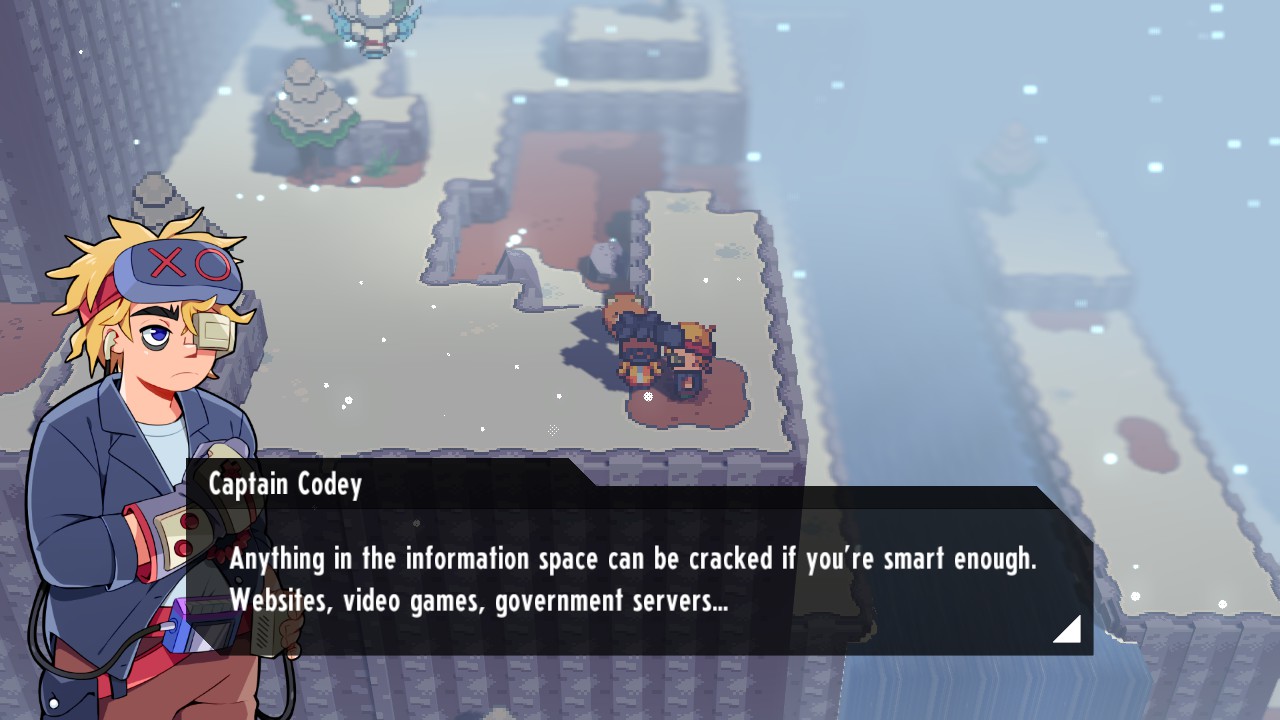
#12 - Captain Codey
- Arkidd - Glitter-type (Codey)
- Artillerex - Air-type (Codey)
- Apocrowlypse - Glass-type (Ranger)
Your final opponent, Captain Codey likes to hang out on the frosty cliffs of Mt. Wirral. To reach him you'll need access to Pumpkin Vine Ball, an ability closely linked to the quest Come Back And Stay. Check along the eastern cliffs of Mt. Wirral once you can climb the walls and you'll find Codey sitting by himself, not far from a waterfall.
Codey's schtick is the use of Bootlegs that don't conform to the usual types of each monster. His Arkidd will turn your team into Glitter-types until its own type changes, which gives you an opportunity to choose a weakness to exploit. Still, Glitter will get bandied back and forth a lot in this fight. Apocrowlypse is more dangerous since it can make your monsters Glass-types, then deal out Resonance until they're OHKOed. This becomes especially dangerous once Artillerex shows up, so prioritize taking the Apocrowlypse down first.
Defeating Codey will earn you Fused Material, a Glitter Bomb Sticker, an Upgrade, and a bunch of materials.

#13 - Ianthe and Wilma
- Gearyu - Metal-type - Level 60 (Ianthe)
- Robindam - Plastic-type - Level 60 (Ianthe)
- Djinn Entonic - Astral-type - Level 60 (Wilma)
- Decibelle - Air-type - Level 60 (Wilma)
Thought you were done, eh? Not quite. Head back to Town Hall in Harbourtown and speak to Ianthe once you've filled out your trainee card. She'll congratulate you on your hard work, then offer you a job as a Ranger Captain. There's just one catch: You need to beat her next. Ianthe and another surprise addition.
Ianthe and Wilma don't play fair here. Gearyu is a pretty straightforward (and brutal) damage-dealer, while Djinn Entonic will steal AP and Confuse your characters with Moonshine. They follow up with Robindam, a ranged Plastic attacker with the brutal Brick Blast move, and Decibelle, an Air-type with a preference for AOE attacks. Let's have a look at each enemy:
- Your first priority should absolutely be Djinn Entonic. Its ability to Confuse your characters will ruin your strategies. Lead with one or more Plastic, Metal, and / or Poison forms and demolish this thing. Fuse your monsters if need be, just get rid of Djinn Entonic.
- Next should be Decibelle. Though it hits harder than Djinn Entonic, Decibelle is more straightforward. Astral is ideal, as it will keep Decibelle from using high-AP attacks thanks to the drain effect, though Ice and Lightning attacks are good as well.
- With Wilma's two forms gone you can move on to Gearyu, which can hit quite hard but is slow and fairly predictable. Fire is a good choice here.
- Last up should be Robindam. It hits hard enough that you want to isolate this thing and bring it down at your own pace. Earth is ideal, though you can use Fire to turn it into Poison and try something else instead, if you prefer.
Note that if you bring Ianthe and Wilma down to their final two forms they will use Fusion to transform into a Plastic / Wind warrior. This can really ruin your day, given its raw power, so do your best to wipe out Wilma before taking out Ianthe. (And if you do run into this Fusion, well... Fuse. Fast. It will mop the floor with your monsters individually.)

You'll receive Fused Material, a Headshot Sticker, an Upgrade, a Basic Tape, and a bundle of materials for defeating Ianthe and Wilma. Ianthe will give you a Captain's Badge, making you an official Ranger Captain. She'll also unlock the Notice Board in Harbourtown, which will allow you to collect additional Fused Material for hunting down rumours.
Speak to Ianthe in Town Hall. She'll explain the use for Fused Material, and give you a Fusion Radar. This will allow you to track down Rogue Fusions that are currently active in the world. This is very handy if you're looking to procure more Fused Material.

Rematches
Ianthe will suggest you go chat with the many Ranger Captains again. They're in the same spots as before, and when you speak to them you can challenge them each to a rematch. They're tougher than before, and have more advanced forms to boot. They will also use Fusion if the fight lasts long enough, so try to build up your own Fusion meter before getting into a fight with one of the captains.
These fights seem to be structured so you'll always fight four enemies, and the last two will fuse. So far as I can tell the two fighters share their transformations. You'll need to absolutely mash one of the two trainers to avoid a fusion, which is not always easy to do.
- Captain Wallace (Reward: Fused Material, Elemental Wall Sticker, Upgrade)
- Weevilite (Plastic)
- Fungogh (Plant)
- Weevilite (Plastic)
- Lobstacle (Plastic)
- Captain Skip (Reward: Fused Material, Binvasion Sticker, Upgrade)
- Binterloper (Plastic)
- Binterloper (Plastic)
- Binterloper (Water)
- Binterloper (Fire)
- Captain Zedd (Reward: Fused Material, Meditate Sticker, Upgrade)
- Galagor (Astral)
- Djinn Entonic (Astral)
- Artillerex (Fire)
- Pyromeleon (Fire)
- Captain Judas (Reward: Fused Material, Parry Stance Sticker, Upgrade)
- Manispear (Metal)
- Hedgeherne (Plant)
- Blossomaw (Plant)
- Jellyton (Poison)
- Captain Clee-0 (Reward: Fused Material, Roll Again Sticker, Olive-Up!)
- Khufo (Astral)
- Jormungold (Poison)
- Triphinx (Metal)
- Arkidd (Lightning)
- Captain Lodestein (Reward: Fused Material, Battery Sticker, Upgrade)
- Mothmanic (Lightning)
- Smogmagog (Metal)
- Manispear (Steel)
- Plasmantler (Lightning)
- Captain Penny Dreadful (Reward: Fused Material, Ritual Sticker, Upgrade)
- Queenyx (Earth)
- Fortiwinx (Earth)
- Djinn Entonic (Astral)
- Ramtasm (Astral)
- Captain Gladiola (Reward: Fused Material, Jagged Edge Sticker, Olive-Up!)
- Palangolin (Metal)
- Southpaw (Metal)
- Cryoshear (Ice)
- Glaistain (Mirror)
- Captain Heather (Reward: Fused Material, Avalanche Sticker, Upgrade)
- Aeroboros (Air)
- Spooki-onna (Ice)
- Hedgeherne (Plant)
- Zeustrike (Lightning)
- Captain Buffy (Reward: Fused Material, AP Starter Sticker, Olive-Up!)
- Liligator (Water)
- Blossomaw (Plant)
- Faerious (Ice)
- Galagor (Astral)
- Captain Cybil (Reward: Fused Material, Broadcast Sticker, Upgrade)
- Zeustrike (Lightning)
- Rockatrice (Air)
- Decibelle (Air)
- Smogmagog (Fire)
- Captain Codey (Reward: Fused Material, Glitter Bomb Sticker, Upgrade)
- Arkidd (Metal)
- Apocrowlypse (Glass)
- Artillerex (Wind)
- Aeroboros (Glass)
Defeat all of the captains a second time and you'll earn Fused Material, an Ice-IX Tape, and a heap of materials.