

X'tol's Landing - Enemies
- Wanderer - 39 HP - Weak to Blunt, Sword
Parting ways with the starting island, the group now finds themselves in foreign territory. You'll start off in front of X-tol, an enormous golem that should be able to send the party home... though not yet. Later, perhaps.
Start by looking to the left of the landing zone. There are several steps that will take you down to a cave, where you'll find a chest containing a Solstice Mage Ring. This grants the bearer 1 MP whenever they successfully time a block, making it a great piece of equipment for any member of the party. Snag it, then head outside and jump down the cliff near the cave to find a chest containing 90 gold.
Head south to find a clearing. The path to the northeast will take you back to X-tol's landing, and you can find some Grain along the way if you care to make the trip. East of the clearing is more Grain, as well as multiple avenues down into a pit where you'll find two Wanderers. Check the right side of the battle zone for some Lettuce, as well as a wall to scale. Climb on up.

This will put you back on the world map, though not for long. Your next destination is a short walk to the east. (And it is worth noting now, if you hadn't before, that you can camp on the world map.)
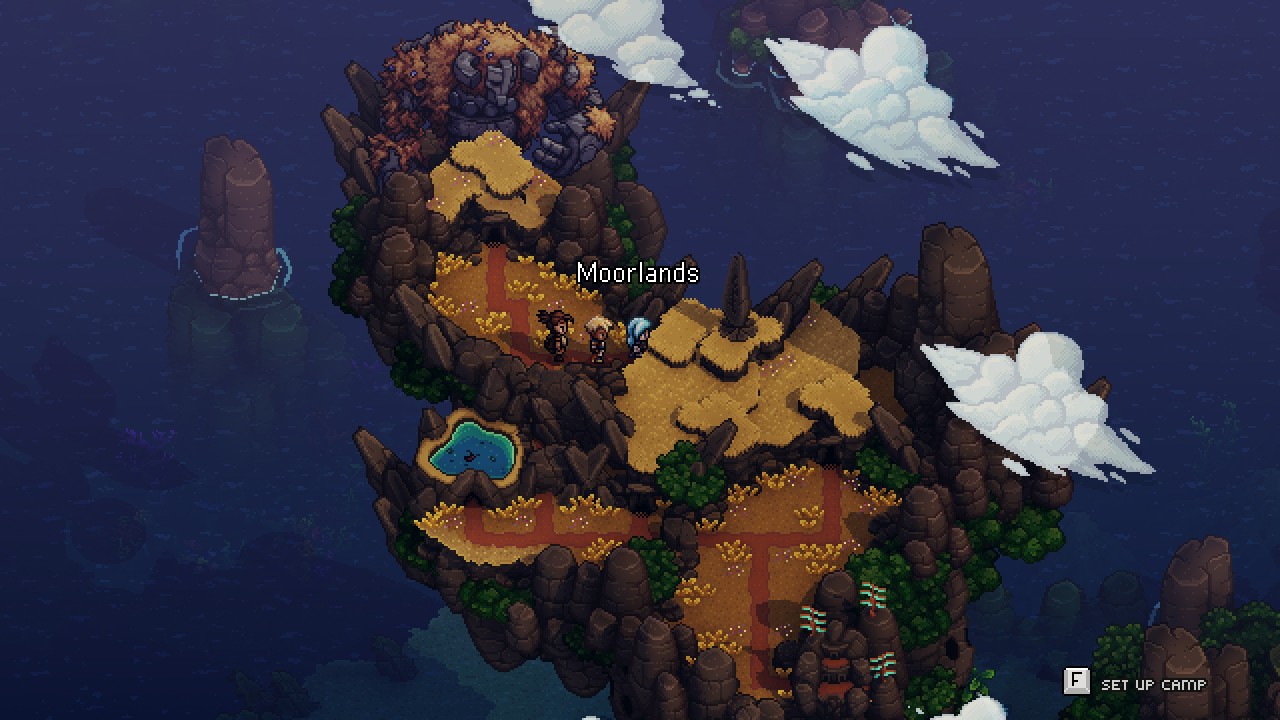
Moorlands - Enemies
- Ant Bruiser - 35 HP - Weak to Moon and Sun, resists Blunt and Sword
- Rochèvre - 65 HP - Weak to Moon, Sun
- Srower - 52 HP - Weak to Sword
The jaunt through the highlands continues. Use the save point right by the entrance, then look to the south. You'll see burrowing Ant Bruisers milling about. These things are tricksy foes, as their charged attac will summon more of their kind - and they resist physical attacks. Make liberal use of Moon and Sun Skills, as well as Boosting, or fighting these creatures will quickly get out of hand.
Near the Ant Bruisers you'll see a patch of crumbling rock. If you climb up on the ledges to the right of this patch you'll find a spot where you can jump down. This will dump you through the earth and into a cave. Check it out to find a bunch of Mushrooms, then climb back out. There are a few of these patches in the Moorlands, and you'll want to exploit them all before you leave.
Back aboveground. Check to the west of the patrolling Ant Bruisers for some Grains, then head east. The path will weave through the rocks and eventually bring you to a pair of Srowers. They're nothing special, so long as you prevent their Boomsplosion attacks. Climb the ledges on the left side of their clearing and you'll wind up on a higher-level eastbound path. If you check the lower levels along the way you'll find some Grains.
Keep trekking eastward until you eventually come to a clearing with more Ant Bruisers. A Srower will join them if you get into a fight. Near this clearing is a blue, crystalline formation. You can't do anything about it right now. What you can do is climb the rocks above the formation, which will lead you to a dead-end eastbound path. At the end is a chest containing a Power Belt, a rather straightforward accessory that makes its wearer a bit stronger. Sounds good.

Jump back to the ground near the Power Belt chest and you'll find some Grains on your left, as well as another Ant Bruiser / Srower fight - and they'll invite a Rochèvre to join in, as well. South of this battle are two Bell Pepper plants, and to the east are stairs down to a cave.
Head inside the cave and you'll find an Ant Bruiser, and it will be joined by two Srovers if you choose to fight. Climb the wall to the left of the battlefield and you'll find Tomato and Lettuce plants at the top. South of the plants you'll head back outside. Circle around the top of this plateau to find some Potatoes... as well as a suspicious cliff ledge, jutting out to the south. Jump off of the cliff and you'll fall through a patch of brittle ground that you probably noticed earlier.

You're now inside a cave. Head east. Before long you'll find handholds and ledges that will take you back outside, where two Srovers appear to be harassing an Ant Bruiser. Take out the enemies, then leap into the water they were guarding. Take a left out of the pool and you can climb up ledges to get at a chest containing four Teal Amber Ores. To the right of the water and across a northbound bridge is a campsite where you can heal, save, and grab some Lettuce.
Head east of the campsite. There's another group of baddies waiting, and yet more north of the first bunch. Nothing you can't handle at this point. To the right of the first group is another brittle plot of dirt, and you can drop down onto a ledge to the south of the dirt in order to circle around and get up above it. Jump through to find a chamber with two plots of Mushrooms, as well as another brittle dirt plot in the west. Leap through this one and you'll wind up in a lower chamber with Ant Bruisers, more Mushrooms, and a chest containing a Silver Sword for Zale.
Climb back to the surface using the walls to the west of that last chest. West of the second group of enemies is a rock formation that will surely be important some day, and to the north are some Lettuce plants. East of here is the main path, and if you jump into the water you can swim out and find a chest containing a Rock Lid for Garl.
At the east end of the little lake you'll find a watery passage. Three Srovers are waiting to fight inside. Go out the southern exit of this cave and you'll be in next to another pool, with multiple directions to choose from. Start by climbing on top of the hill containing the cave. There are Potatoes growing near the top, and if you hop into the hole in the middle of the plateau you'll drop down beside a chest. It contains the Recipe for Mushroom Soup.

Almost done. South of the watery cave is a signpost. If you head west of this signpost you'll emerge back on the world map, near a Fishing Lake called Windy Loch. In addition to its complement of fish, you can find some Potatoes and Grains growing on the far side of the pond. If you head east of the signpost you'll run into a new friend: Teaks! A Traveling Historian, Teaks will choose to tag along with the party, though not as a playable character. Teaks will join the group when you set up camp, and you can bring her special artifacts to learn more about them.
Rest once you're done listening to Teaks. The next morning you can head east of the campsite, where you'll come to a puzzle. Wipe out the enemies guarding said puzzle at a crystal will rise out of the ground. Stand on the purple gem in the ground and use it to alter time, twisting the light beam around to shine on the three diamond-shaped indents. This will light up runes, and if you light up all three runes you'll receive a Solar Rain Scroll, a Combo for Zale and Garl. The light feeding the runes fades over time, so make sure you work fast.

Almost done. Head east of the puzzle and you'll see some ledges next to you. Climb north and you'll find a clearing with some Berry bushes. There's also a Wanderer up here, though it is not aggressive. Speak to the fellow several times - Chrono Trigger fans will get a kick out of this one - and he'll give you some Mushroom Soup. (And no, I don't think you get anything for continuing to talk. I tried for a while.) Return to the main path and continue east to leave the Moorlands behind.

Return Trip
- Return to the Moorlands once you have the Mistral Bracelet. About halfway through the area there's a chest on a bluff that you can't reach. South of it is a green crystal that you can push around. Walk along the south end of the route, heading east, until you find a path to the south end of the crystal. Blow it north to the bottom of the bluff and it will be replaced with a block you can climb. The chest at the top contains a Rainbow Conch.
- Make another trip to the Moorlands once you have the Cobalt Hammer. Enter through the northern entrance and travel east until you see a blue, crystalline formation. Use the Cobalt Hammer to smash the crystal down. Behind it is a chest containing a Rainbow Conch.