

The Vespertine - Enemies
- Melee Matey - 114 HP - Weak to Moon, Sun, Poison, resists un-Boosted Blunt, Sword
- Ranged Matey - 114 HP - Weak to Blunt, Sword
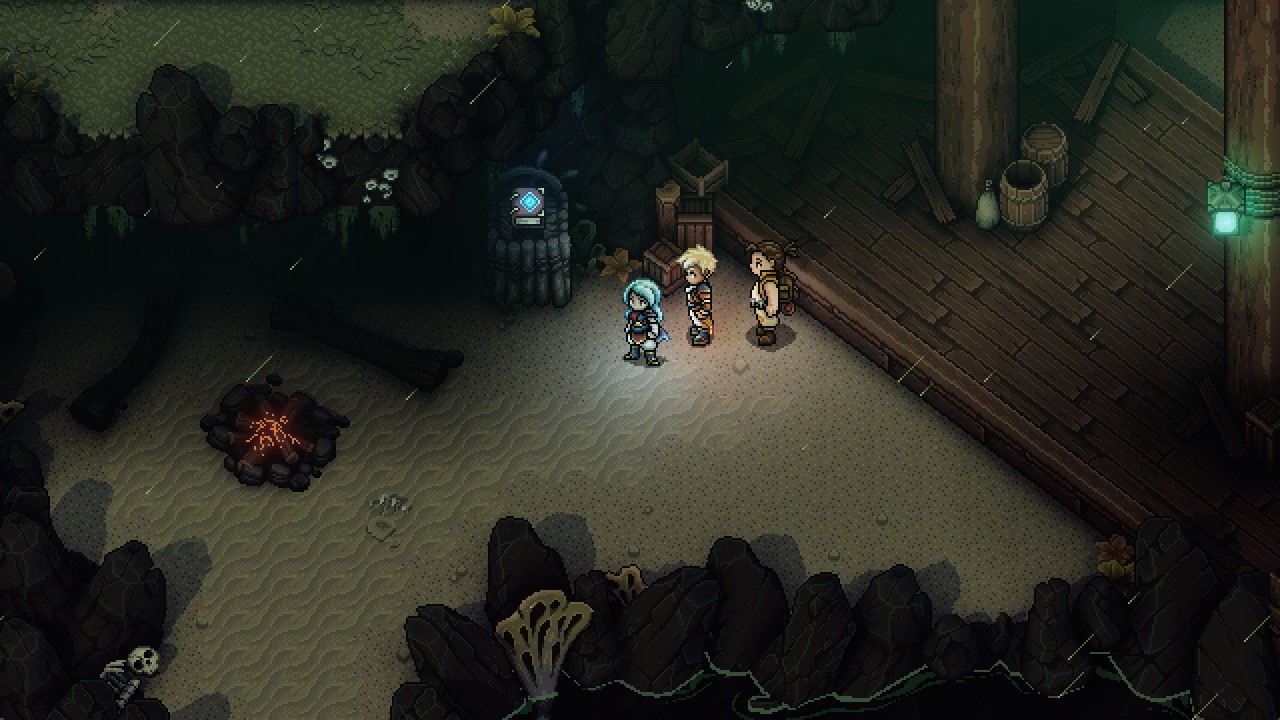
After the debacle in Brisk the crew will leap aboard the Vespertine, a legendary, ghostly vessel that was the target of the pirates more or less from the beginning. Once aboard the vessel will teleport to a place called the Sea of Nightmare, and the party will meet Hortence, the ship's ghoulish (but fairly friendly) navigator. Hortence is willing to help the group claim the vessel, but they need to find her map first.
Time to explore. (Don't worry about avoiding the blue flames, they won't hurt you if you bump into any of them.) Cimb the western mast up to the crow's nest and use the rope stretching between the two masts to travel east.
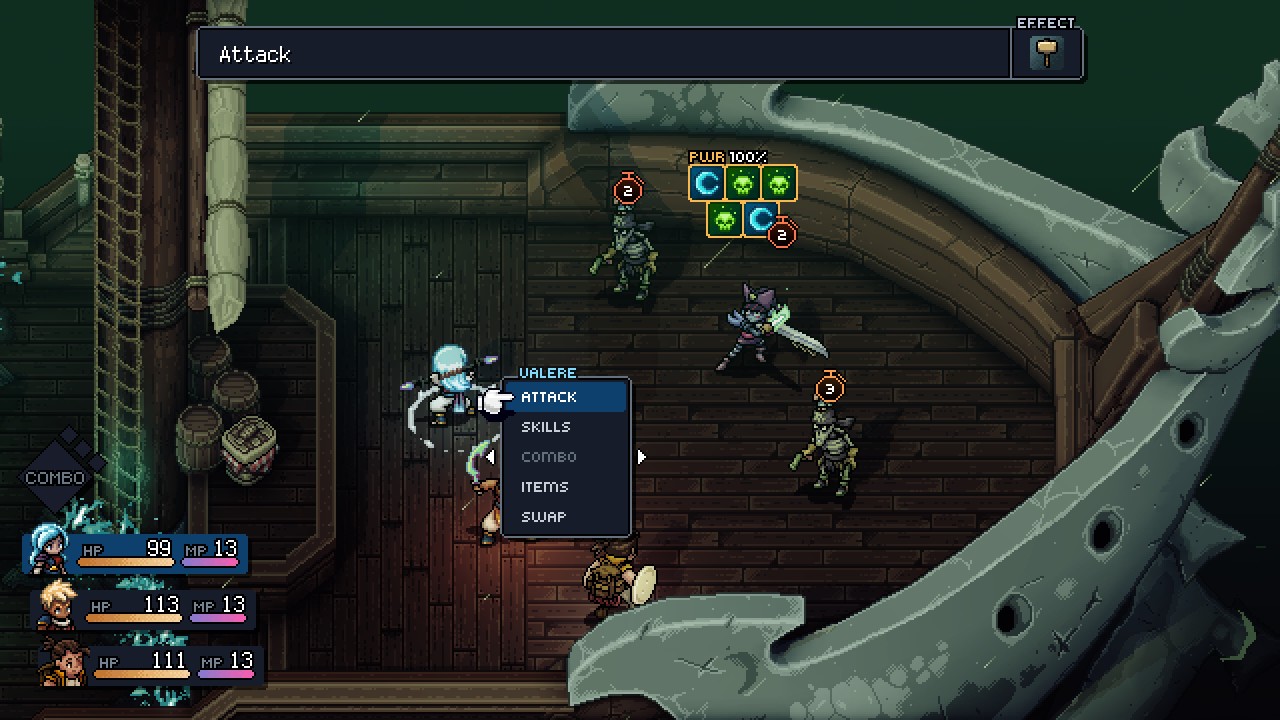
Leap off the side of the eastern mast and you'll land amongst the first enemies of the Vespertine: A pair of Ranged Mateys and a Melee Matey. Neither enemy type is anything special, though you'll want to use melee attacks on the Ranged Mateys and Skills on the Melee Mateys. Wipe them out to lower the blue flames on the deck, allowing you to get at the stairs in the middle of the ship.
Check the base of the eastern mast for a picnic basket containing Chaudrée, then head to the west end of the deck. There's a partially-hidden bedroom over here, hinted at by a carpet, and inside is a picnic basket containing a Hearty Stew. Walk out the left side of the bedroom and you'll be back outside, where a picnic basket containing Mooncradle Fish Pie awaits.

Return to the deck and go down the stairs to the south of Hortence. There are two Melee Mateys and a Ranged Matey gawking at a picnic basket, just north of the stairs. Wipe them out to claim the basket, which contains more Hearty Stew. West of the stairs you'll find three Melee Mateys prowling a bunk area, and east of the stairs you'll find Ranged Mateys wandering a small storage space. Wipe everything out.
Defeat all of the enemies on the lower decks and you'll get rid of the blue flames blocking your progress. There's a picnic basket containing Mooncradle Fish Pie in the eastern room where you fought the Ranged Mateys, and a chest in the western galley contains Hortence's Map. You'll also find a campfire and a save point in the galley.

Take the Map to Hortence on the deck. She'll hand over control of the Vespertine to you, and you can sail around the Sea of Nightmare for a while. Your goal is to disable the three Rods that protect the area's central island. The Rods connect to the island via brilliant green beams of energy, so it's nigh-impossible not to find each of them.
You can tackle the Rods in any order you like, debarking at the docks near each Rod. (Check the controls for your system to see which button allows you to leave the Vespertine. I had to hunt around on my keyboard for a bit to discover it was the Space button.)
Northern Rod
You'll find a save point and a campfire right by the entrance to the northern Rod. Head northeast to find a hopping path across the water that will take you counterclockwise around the area, until you reach a clearing. When you try to head west through the clearing a group of Melee and Ranged Mateys will jump down and attack.
Head west of the clearing after the fight and you'll wind up on some ruined bits of ship, near a grapple point. Use the Graplou to fling yourself up a level and you'll come face to face with more Mateys. Look east of here and you'll find the path up to the Rod itself.
To the southeast and southwest of the Rod are two smaller crystals which you can find by following the jolts of electricity streaming through the area. Use the Graplou on these crystals to disable them. Walk around the left side of the Rod to find a climbing wall up another level, where you can use the Graplou to destroy the two crystals on either side of the main crystal. Taking out all four crystals will disable the Rod. One down.

Southwestern Rod
This Rod is right by the entrance, though you can't get at the smaller crystals from the ground just yet. Use the campfire and save point near the Rod, if need be, then look around the edges of the map. There are six Cursed Doubloons spread around the area, and you need to get them all to stop the Rod. They're in the following locations:
- One is on an island to the southwest, protected by several Mateys
- One is on a tiny western island, by itself
- One is on an island to the northwest, accessible via a tightrope near the Rod
- One is on an island to the southeast, protected by a group of four Mateys
- One is atop a palm tree on the eastern island - Blow the northwestern crate down, then blow the eastern crate left, up, right, and down to dislodge the Doubloon from the tree
- One is on the island in the north, accessible via the northeastern path - A Matey will whistle up help as soon as you grab the Doubloon

- Go east and you'll find a lever in the northeast. Pull it to raise a platform that will let you shoot at the upper-right crystal. Cross over to the next clearing, defeat the Mateys guarding the platform, and blast the lower-right crystal from the wooden boardwalk in the south.
- Go west and you can target the upper-left crystal from a wooden boardwalk to the south. Atop a little tower in the northwest is a lever that you can pull to raise a platform that will get you onto a landing with more Mateys. Grapple over, beat them up, and shoot the lower-left crystal from the southern boardwalk.

Maelstrom Point
Once you've disabled the three Rods in the Sea of Nightmare you'll open the barrier defending Maelstrom Point, the central island of this area. There's nowhere else to go in the Sea of Nightmare, so you'd best head inside and get to leaving this cursed watering hole.
Head east from the entrance and follow the twisting path to the west until, eventually, you can grapple over to a campfire and save point. Make sure you stock up on fresh meals before you leave. Climb the ropes to the north of the campfire and follow the path a bit further to find the master of the Sea of Nightmare.

Stormcaller
Yo ho, mateys. Stormcaller is a powerful wind mage, as well as the captain of the Vespertine, and he has no interest in letting you commandeer his ship. Time to fight. Stormcaller uses the following attacks:
- A two-slash sword slice to one target
- Chain Lightning, an AOE spell with five Locks
- Ruler of Tides, a powerful AOE attack with eight locks
- First, you can just weather the damage. Use an item that heals the whole party, such as a Mooncradle Fish Pie or a Mushroom Soup. The Mending Light Combo also works nicely once you've built up enough CP. Go back to attacking afterward, pouring all your MP into an offensive.
- Or, second, you can deaden the effects a bit. As far as I can tell you can't break Ruler of Tides' eight Locks in two rounds, so the only way to avoid damage is to have Valere use Lunar Shield. This will lower the damage quite a bit and leave you in a better place afterward. You'll need to keep feeding Valere MP, so this won't always be an option, but it does work well.
