Part 39: Oasis, Container Yard, and Caer Xhan
Main Walkthrough
Get your own copy of Breath of Fire III on Amazon! As an Amazon Associate I earn from qualifying purchases, at no extra cost to you.
Monsters
- Adept - Steal Holy Robe, Drop Shaman's Ring
- Armor - Steal Claymore, Drop Gideon's Garb (only if not attacked physically), Learn Risky Blow
- DeathBot - Steal Damascus Mail, Drop Atomic Bomb, Learn Triple Blow
- Nitemare - Steal Hawk's Ring Drop Burglar's Garb, Learn Magic Ball
- TankBot - Steal Wisdom Seed, Drop Wisdom Fruit, Learn Sacrifice / Transfer
It's the beginning of the end. Ryu's party has arrived at Myria Station, home of a goddess of the same name, and they need to find their way to its innermost chambers. There's a long way to go before the team confronts their divine foe, though, so we'd best get started.
Worker's Area
When you arrive at the front door of the station you'll find it locked. The door suggests you try the worker's area. Head northeast through the gate by the door, then down the stairs ahead. To the east you'll find an elevator that doesn't work (yet), as well as three prospective directions that you can take.
- If you go up the stairs near the elevator you'll find the top of the elevator. There's a lever up here, and if you pull it you'll reactivate the elevator. We'll get to it in a moment.
- North of the elevator you'll find a path leading outside, to the end of the lift track. Check the blind spot along the edge of the lift track to find a hidden Life Shard.
- South of the elevator you'll find another dead-end exit to the outdoors. You'll find a box here containing Gas Shells.
Better use the elevator. If you ride it to the Arrival Platform you'll once again wind up outside, where you can find a chest containing a Wisdom Fruit. Another dead end. Ride it down to the Maintenance Deck instead, where you'll find another elevator leading back up into the Worker's Area.
Follow the main path until you hit a hallway intersection. Once again, we should look around a bit:
- There are two doors in this hallway that require keycard access. No getting in those just yet.
- Down the northeast corridor you'll find a set of stairs. Up the stairs you'll find command consoles that will unlock the front entrance of Myria Station, as well as deactivate a laser grid to a laboratory of some kind. Trigger both consoles.
- The door in the western passage leads to a locker room. Check the lockers for 800 zenny and an Hourglass (the latter is in lockers on the backside of the front-facing lockers), then check the cabinets in the northeast for Napalm. This room contains beds for sleeping and a diary for saving.

Ultimately you'll need to go up the stairs at the end of the western passage. You'll find yourself in a small office. Check the shelves for 400 zenny, then head out the door. This will bring you to the front gate of Myria Station. You can exit back to the lift through the glass partition in the southeast. Check behind the desk in the room to the northeast of the entrance to find a Life Shard in a cabinet.
There are two doors on the west side of this area and another door in the northeast. One of the western doors is locked, and the other, while not unlocked, will ultimately take you to a dead end. You need to do some further exploring before you can unlock the areas to the west, and that means following the orange floor panels to the east. It's highly recommended that you bring Rei along for this trip, as he can get at some extra treasure when you reach the end.
Laboratory
Monsters
- Clone - Steal Vitamin, Drop Bell Collar, Learn Blind
- Hopper - Steal Fat Frog, Drop Balance Ring, Learn Air Raid
- Ice Drake - Steal Ring of Ice, Drop Dragon Fang
- Newt - Steal Heat Shotel, Drop Mind Shield
- Red Drake - Steal Ring of Fire, Drop Dragon Fang
The first thing to note about this area is its selection of enemies. There are two in particular, Ice Drakes and Red Drakes, that are a pain in the butt thanks to their Breath attacks. More notable, though, are the items that you can steal from them: Rings of Ice and Rings of Fire. Both accessories absorb their respective element, and can trivialize certain bosses. The Rings of Fire in particular make the Berserkers in the Container Yard much easier to defeat,
and allow you to safely use the high XP trick on Lava Men in Mt. Zublo.
Ride the moving sidewalks northwest. Check beside the left sidewalk and you'll find 10,000 zenny hidden by an angled wall partition. The next room over will fully restore your characters as soon as you step inside, making this an excellent spot for leveling if you find your team struggling to survive.
There are two doors in the corridor beyond the healing station. The northwestern door leads to a small room with a chest containing a Holy Robe, while the other northwestern door leads into a room with multiple levels. Head northwest of the entrance and you'll find three doors. Go through the far door first...
... and you'll find a horrifying monster in a glass enclosure, kept asleep by gas. Unfortunately the Card Key you need to go further into Myria Station is inside the enclosure, so you need to deactivate the gas and find a way in. Use the console near the glass to stop the flow of gas. Check the shelves on the left side of the room for a Swallow Eye before you leave.
In order to reach the monster you need to cross an electrified field that's accessible via the first door in the previous corridor. There are two ways to do this:
- Use the consoles in the two southern rooms to create a path through the electricity by aligning the plus and minus signs. If you don't want to figure this out yourself, align the right panel so there are four pluses in the top-left corner, the middle panel so there are four empty spaces in the top-left corner, and the left panel so there are four empty spaces in the top-left corner. This will create a path through the electricity.
- Just walk straight through. Ryu will take damage and get hit with status ailments, but you can heal it away on the other side. You can also do a half-and-half solution, messing with the consoles a bit to create a partial path across the panel.

Step onto the lift at the other end of the room to descend to a lower floor. Heal any injuries Ryu sustained, then head southeast through the corridor. There are two paths to take at the next juncture. Go all the way southeast and you'll emerge in a dead-end, barren room. Fiddle with the camera and you'll find a chest containing Skill Ink in the corner of the room.
Backtrack and take the next left that you ignored earlier. It will take you outside then back into the corridor area, where you'll find a door. Bypass the door for a moment and continue northwest. You'll find a dead-end pathway on your right. Look down it to find a hidden chest containing Ivory Dice.
Head back to the door you passed, head inside, heal your party up, and jump onto the lift. You'll rise into a room with a chest containing a Slicer... as well as one final door. If you stole any Rings of Fire or Ice during your trip through the Laboratory, now's the time to equip 'em.
Chimera
Steal: Firecracker
Drop: Icicle
Learn: Nothing
This is a simple enough battle, though it's pretty painful all the same. The Chimera specializes in powerful elemental spells, and can quickly whittle down a party that isn't protected against Flame, Frost, or Electric attacks. (Yes, it runs the full gamut.) You can expect the following from the Chimera:
- A normal melee strike
- Paralyzer, which Paralyzes a character and prevents them from taking actions
- Restore, which heals
- Inferno, a Flame spell against the whole party
- Blizzard, a Frost spell against the whole party
- Myollnir, an Electric attack against a single target
Paralyzer is particularly painful in this battle, as it will incapacitate characters until they're healed, greatly reducing your team's output. Use Remedy or a Panacea to remove this irritating status ailment whenever someone gets Paralyzed.
Otherwise, this fight just requires the use of your most powerful attacks, leaving someone to heal your party. Throwing up Barrier on your party members will mitigate some of the damage inflicted by Chimera's spells. If you plan to use Accession then make Ryu into a Flame, Frost, or Thunder Dragon, as that will negate one of the Chimera's elemental attacks. (You can also use all three of those Genes to make him into a Trygon, negating every elemental spell.) The Chimera is not especially susceptible to any attack type, so having your party smash it will their best Skills will suffice.

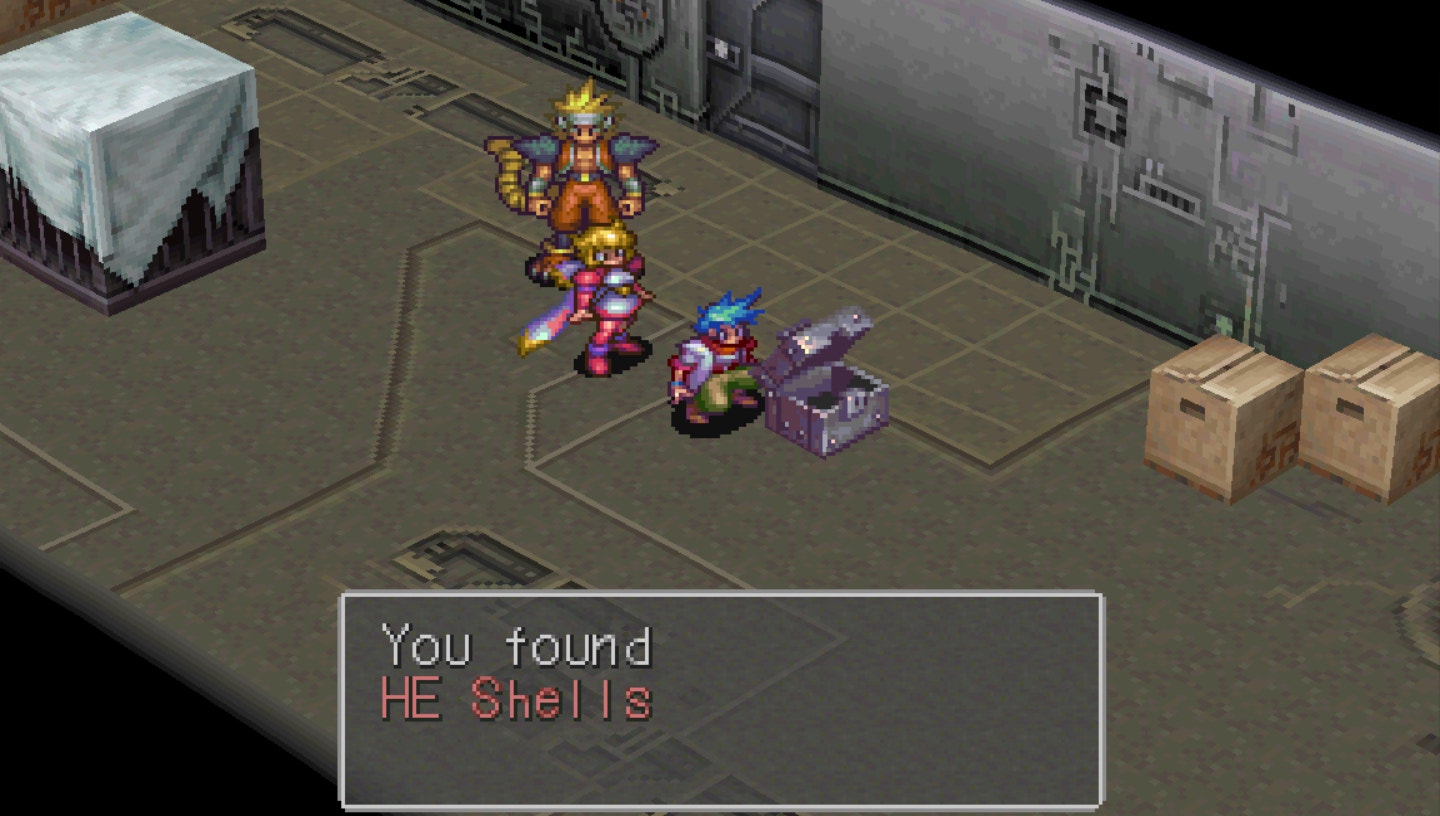
With the Chimera gone you can grab the Card Key B off of the floor, noting its unimpressive nature as you do so. This will allow you to reach the next major section of Myria Station. First, though, you'll need some extra firepower. Hop onto the lift in the Chimera's room and you'll find a box on the next floor down that contains HE Shells. Momo, the game helpfully notes, can use these shells to destroy plant life. Excellent.
If you didn't bring Rei along then your trip through the Laboratory ends here. You did bring him, though, then check to the southeast. You'll find a door leading out to a small, locked room containing three chests. Rei can open the door, allowing you to retrieve a Giant Shield, a Dragon Shield, and a Dragon Helm from the chests. All three are good pieces of equipment, and the Dragon items in particular ward off Flame attacks.
You're almost done with the front half of Myria Station. Head back downstairs to the corridor with the rest room. You may recall the two security doors in this hallway that required a Card Key, and now you have one. In the western room you'll receive an explanation to the existence of Honey, as well as find a chest containing a Demonsbane. The eastern room... well, you can't open that one yet. You need a better Card Key. Soon!
Main Walkthrough