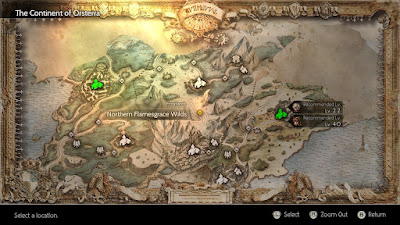
The snowy regions of Orsterra's inner ring of trails and settlements, the Flamesgrace Wilds are the resting place of the town of Flamesgrace, one of Orsterra's primary religious settlements. If you choose Ophilia as your starting character you'll trek through the Flamesgrace Wilds first to reach the rest of the world. As far as navigation goes this guide will assume that you're setting out from Flamesgrace.
Beautiful though they may be, the Flamesgrace Wilds are full of intemperate beasties:
- Ice Lizardman I - Weak to Axe, Staff, Fire, and Lightning. A melee fighter. Dark Stab kinda hurts...? Not a major threat. Whack it with Ophilia's staff.
- Ice Lizardman II - Weak to Axe, Staff, Fire, and Lightning. An upgraded version of the Ice Lizardman. Not much else to say.
- Ice Lizardman III - Weak to Staff, Lightning, and Dark. Similar to the other two, though this third variant has stronger melee Skills and can buff itself. A fair threat, and worth killing first.
- Snow Marmot - Weak to Bow, Staff, Lightning, and Dark. They typically just attack, and are no major threat. Stun them with Ophelia's staff and let her companion do the rest.
- Snow Fox - Weak to Bow, Fire, and Light. Pretty basic foe that occasionally uses ice magic. No major threat.
- Frost Fox - Weak to Bow, Fire, and Light. An upgraded Snow Fox that will use Ice Blast on the whole party. A little more dangerous, but not too bad.
- Wolf - Weak to Axe, Staff, Fire, and Lightning. A pretty standard canine. No huge threat here.
- High Wolf - Weak to Axe, Staff, and Fire. A more advanced version of the Wolf. Can use Horrific Claw to lock away a character's Boost ability for a while. Worth killing early.
- Frost Bear - Weak to Polearm, Axe, and Wind. A beefy, powerful enemy that you almost certainly won't see during this trip. Its Rampage attack can really hurt your party. Kill first if one does show up.
Northern Flamesgrace Wilds
As with every character's starting town, when you first leave Flamesgrace you'll see a young man at the side of the road. He's been injured, and needs a Healing Grape. Hand one over and he'll identify himself as Kit. He's on a trip to find his father. Helping him out here will complete the Kit, the Traveler Side Story and earn you 1,500 leaves. Not a bad start.
Just west of the long stairs leading to Flamesgrace you'll find a save point at an intersection. Go south of the stairs and you'll find an Herb of Clamor. Head north of the intersection and you'll find a winding path that leads to the North Atlasdam Flats, the home of Cyrus, Octopath Traveler's Scholar - and primary offensive spellcaster. Check on the right side of the road as you head north towards the Atlasdam Flats and you'll find a small side path with an Olive of Life.
The rest of the Northern Flamesgrace Wilds lays to the west of the intersection. Look to the south just as you start trekking west to find a chest containing an Inspiriting Plum. Continue north and you'll find the Western Flamesgrace Wilds.
Western Flamesgrace Wilds
Head straight west from the entrance of this area and you'll find a chest containing a Healing Grape. Follow the trail as it winds south. Take a right far enough down and you'll find a Shadow Soulstone. To the left is another winding trail that will bring you to a save point. Check the chest along the way for 800 leaves.
To the right of the save point is a cave entrance leading into the Hoarfrost Grotto. The Grotto is a Danger Level 25 dungeon that you should not enter if you're relatively new to the game, though once you've completed one or two Chapter 2s for your characters you should be more than ready to trek inside. Partially hidden behind a rock just south of the cave entrance, on the right, is a Critical Nut.
The remainder of the trail through the Western Flamesgrace Wilds will bring you to the North S'warkii Trail. This area surrounds the hunting village of S'warkii, home of H'aanit, an expert hunter you can recruit to your party.


