World Map - Jidoor Region - Enemies
As you explore the World of Ruin you'll likely come across a place known as the Cultists' Tower. Located amidst a snall mountain range along the Serpent Trench, the Cultists' Tower is full of brainwashed adherents to Kefka's twisted religion... and one of them is Strago. He won't respond to your party at all, and you'll need to find a way to wake him up. This means finding Relm, his mouthy granddaughter, and to do that you'll have to head to Jidoor.
(Note: If you did not save Shadow from the Floating Continent, you must first travel to the Cave in the Veldt to rescue Relm. This small part of the quest is found in the previous section of the walkthrough. If you did save Shadow you can complete this quest at any time after you obtain the Falcon.)
Jidoor is still the western-most town on the map. You'll find it northwest of Maranda, on the western continent. The enemies in these parts are quite powerful, so be careful fighting random monsters.
Jidoor - Weapon Shop
Jidoor - Armor Shop
Jidoor - Item Shop
Jidoor - Relic Shop
Jidoor is relatively unchanged, though everyone's a bit more dour. Of note is the Auction House, which has new items on offer now that you're in the World of Ruin. We'll discuss what you can buy here in another section of the guide.
Head north, to Owzer's Mansion. The mansion is dark and deserted, and if you try to climb the stairs to the art gallery you’ll be pushed back. Check the diary on the table near the stairs to learn about a lamp on the north wall, then activate the lamp. This will allow you to climb the stairs.
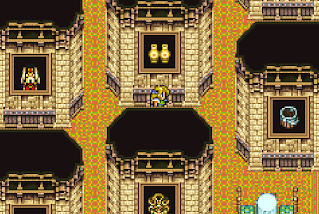
The pictures in the art gallery will now, in some cases, come to life and attack you if inspected. You can check Emperor Gestahl’s picture to find the Emperor’s Letter, a clue to another side quest, then check the female painting in the southwest corner for a battle. Winning the battle reveals stairs into the basement of the mansion.
Owzer’s Mansion - Enemies
Spooky. Random battles get in your way in the basement, though aside from some evasiveness the enemies aren’t too difficult at all. In the first larger room you’ll have to pass by a painting of a chair, and if you move too close you’ll get caught in a battle. North of the chair portrait are two doors, and if you look in the left door you'll find a chest containing a Moogle Suit.
Head through the right door after getting the Moogle Suit. There are three doors ahead that open and close in sequence. Check the passage behind these doors to find a hidden Lich Ring, then go through the first door on the left when it opens. The other two doors just toss you back to the first room with the two paintings.
In this next room you’ll find four floating treasure chests. Step beneath them and they’ll fall down on your head, triggering a battle. The chests contain a Potion, two Ethers, and a Gold Needle. In short, feel free to avoid them. Check the picture of armor on the wall to fight a Still Life, a creature that counters every attack with Doom, and kill it to reveal a door.
Beyond the door is a save point and two more doors. Save and heal, then ignore the closer door and go through the northern door. It leads to Owzer’s study, the end point of this weird little dungeon, where you’ll find both Owzer and Relm. Speak to Owzer to trigger a battle.
Chadarnook
HP:
- 56,000 (Goddess)
- 30,000 (Demon)
Weakness:
- Fire (Goddess)
- Fire, Holy (Demon)
The deadliest of Owzer's art pieces, Chadarnook is a two-part boss. It uses the following attacks:
- Normal, physical hits
- Thundara / Thundaga, Lightning spells (Demon)
- Flash Rain, which inflicts Ice / Water damage to your whole party (Demon)
- Last Kiss, which can inflict Doom status (Goddess)
- Entice, which essentially inflicts Confusion on a target - though one you can't dispel (Goddess)
- Lullaby, which inflicts Sleep on one target (Goddess)
- Poltergeist, which inflicts Sap on a target (counterattack, Goddess)
Chadarnook has two faces. The first you see, a lovely female, is easily the more painful of the two. She can irreparably Confuse one of your characters for a short while, as well as put your whole party to sleep, and her counterattack hits everyone for a rather painful amount of damage. The second face, that of a demon, swaps in Lightning-based spells. He can also impose a Doom countdown on your party. You’ll only see one face at a time, which is a mercy.
Chadarnook counts as a single creature, but the two faces have their own HP scores. That said, you can only kill the demon. Attacking the woman is a waste of time. Hold back and heal yourself whenever the girl is around, then blast the demon when it shows its face. The demon is weak to Fire-elemental attacks, likely to be common in your team, as well as Holy-elemental attacks which only Sabin and his Aura Cannon will be likely to exploit. Continue this back-and-forth until Chadarnook dies. He has a fair amount of health, so be prepared for a lengthy battle.
Defeating Chadarnook earns you the Lakshmi magicite. Relm also rejoins the party.
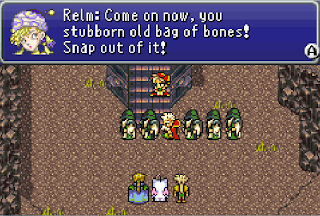
This next step is easy. Put Relm in your party and travel to the Serpent Trench in the east. The Cultists' Tower is south of Nikeah. Climbing the tower right now is probably not wise (unless you know a lot of magic), but you’ll find Strago wandering in a daze at the base. Relm knocks him out of his stupor, and he’ll rejoin your party.

-240213-152347.png)

-240213-153331.png)


