Weakness: Power (Illusionist Ginger) / Technique (Ginger's Minion A) / Speed (Ginger's Minion B)
Location: Great Sandy Desert
Unlocked: Begin Head to the Dust Ruins, return to Alabasta, check Sandy Oasis Bounty Board
Reward: Mezcal Cactus, Illusionist Ginger's Record Cube, 200,000 Berries
A chemist of cactuses, Illusionist Ginger is located in the Great Sandy Desert, on the northern side. To unlock her you need to free Alabasta from Crocodile, go to Waford, come back to Alabasta, and check the Bounty Board in Sandy Oasis. You can find Ginger in Donut Canyon, a small roundabout on the east side of Great Sandy Desert's southern half. Go through the canyon and you can't miss her.
This is a basic battle. All of the enemies use normal attacks, but Ginger's sometimes inflict Poison when they hit. None of them have much health, and should be pushovers by the time you're returning to Alabasta. Easy money.
Antlion Moyas
Weakness: Speed (Antlion Moyas, Moyas's Minion A) / Technique (Moyas's Minion B) / Power (Moyas's Minion C)
Location: Desert Near Alubarna
Unlocked: Begin Head to the Dust Ruins, return to Alabasta, check Sandy Oasis Bounty Board
Reward: Antlion Moyas's Record Cube, 130,000 Berries
A conman hiding among rebels, Antlion Moyas is located in the Desert Near Alubarna. To unlock his bounty you need to complete the events of Alabasta and return to the region after making a trip back to Waford. Check the Sandy Oasis Bounty Board and his bounty will appear. You'll find Moyas on the north end of the Rebel Army Camp, on the west side of the Desert Near Alubarna.
Despite his claims that he can take on Crocodile, Antlion Moyas is a bit of a wimp. His melee attacks inflict Bleed, he can heal himself, and... that's about it. Nami can wipe out the rest of Moyas' goons in one or two attacks, freeing the other Straw Hats to gang up on their prey.
Harbinger Vigo
Weakness: Power (Harbinger Vigo, Vigo's Minion A) / Technique (Vigo's Minion B) / Speed (Vigo's Minion C)
Location: Great Sandy Desert
Unlocked: Begin Head to the Dust Ruins, return to Alabasta, check Sandy Oasis Bounty Board
Reward: Harbinger Vigo's Record Cube, 150,000 Berries
An attacker of random targets, Harbinger Vigo is located in the Sandy Ruins of Great Sandy Desert. To access his bounty you need to defeat Crocodile and free Alabasta, then return to the region after a brief visit to Waford. You'll find his bounty on the Sandy Oasis Bounty Board. Vigo himself is in a tower adjacent to the building with the Yoisa Sign, and to get at him you'll need to bash through a rock two rooms to the east, climb to the bottom of the building, and swing over to the tower. Vigo is across from the vines leading to the top of the tower.
Vigo and his buddies hit fairly hard, but at the end of the day they're just glorified bandits without any special attacks. You shouldn't have any trouble with them.
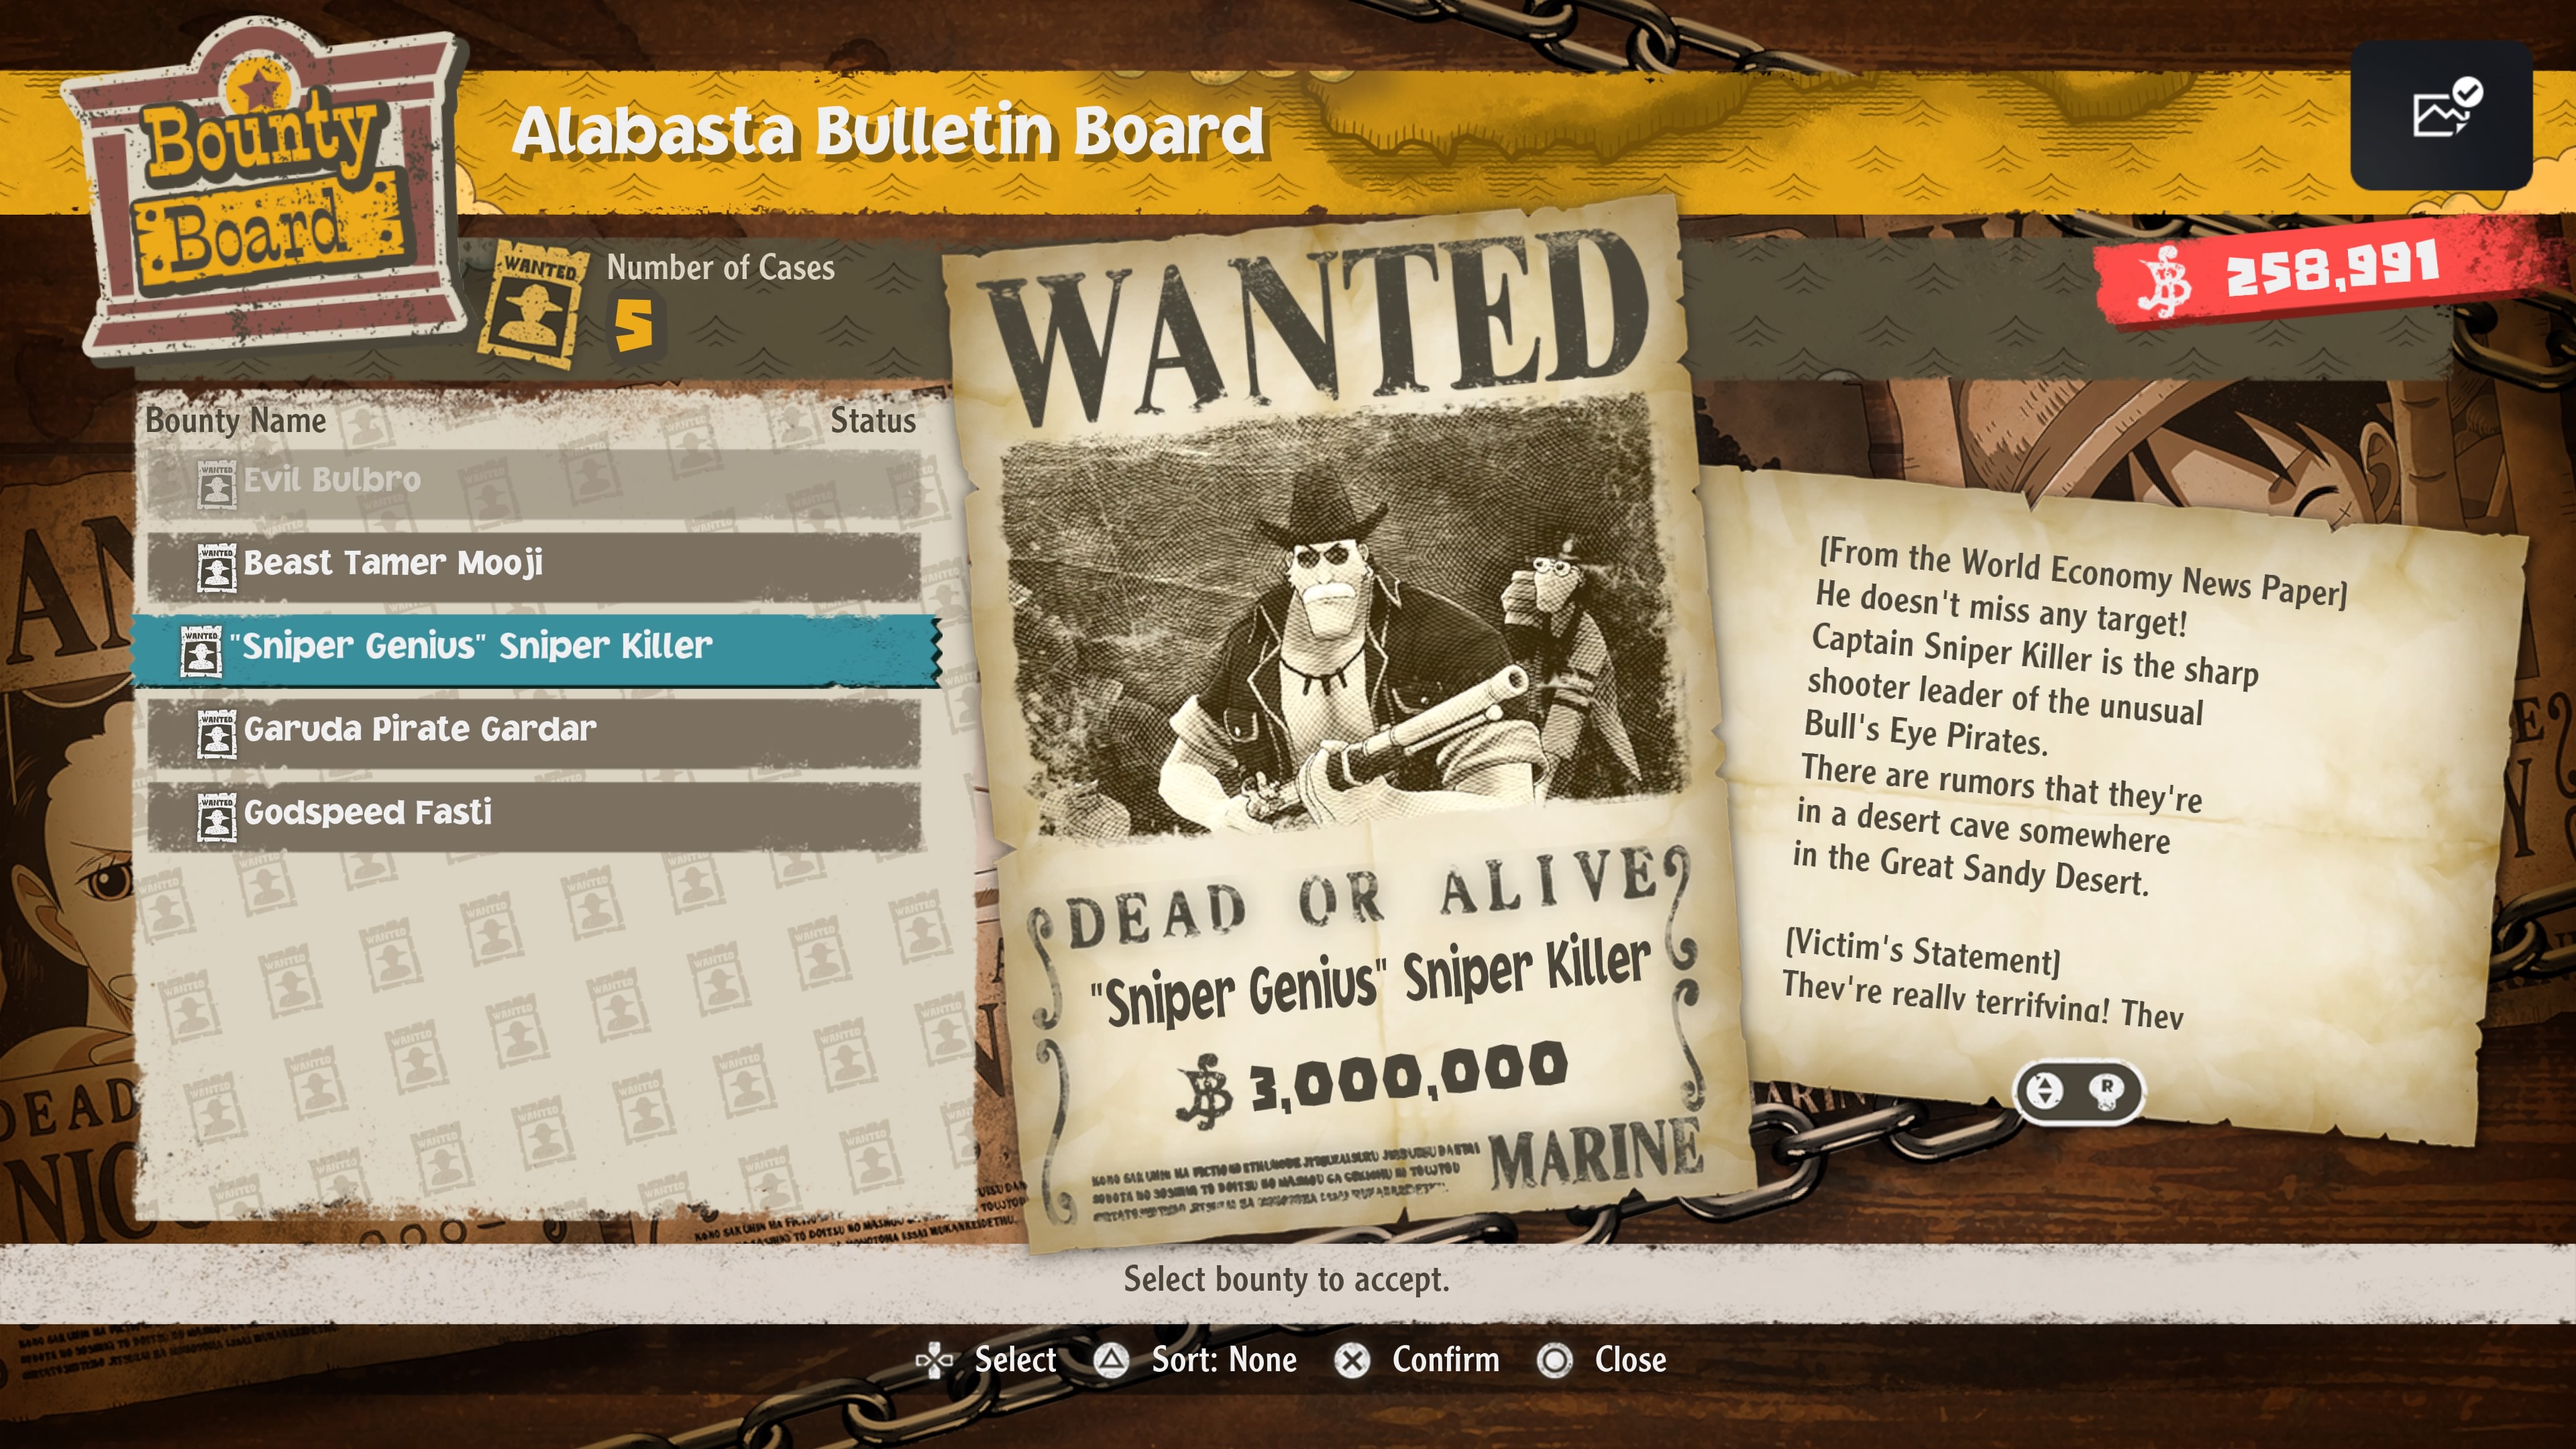
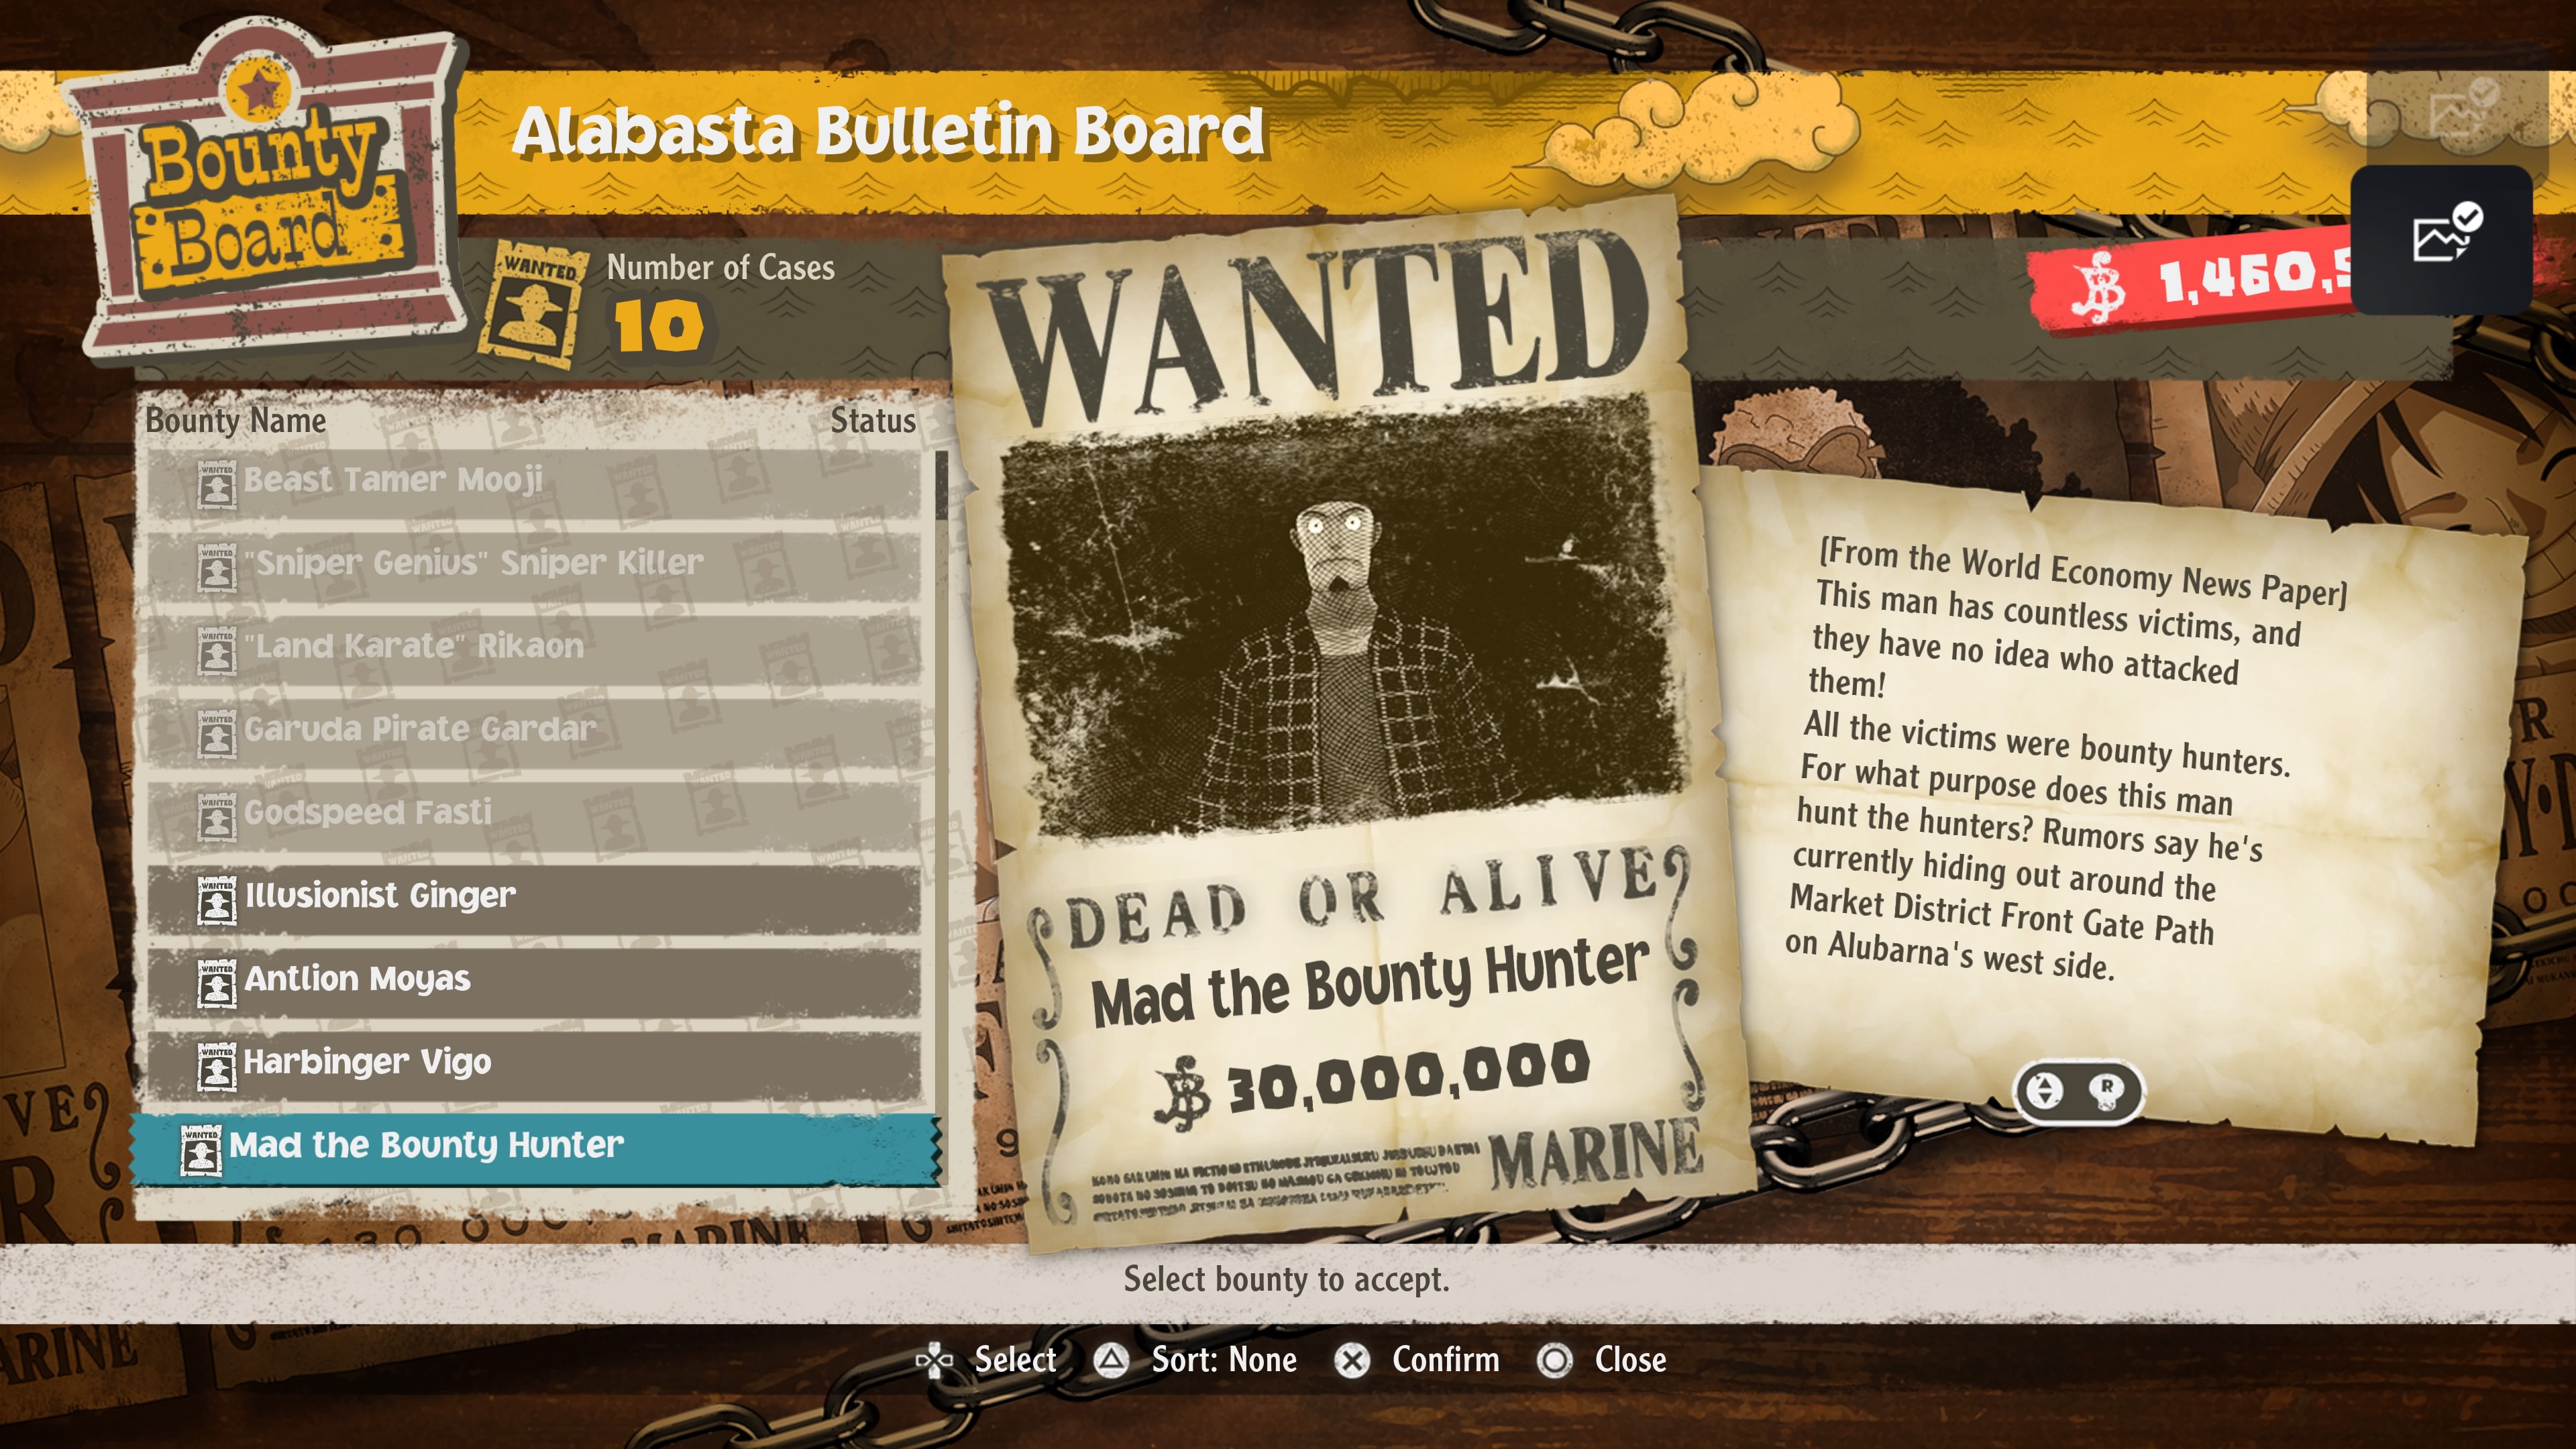
Mad the Bounty Hunter
Weakness: Speed (Mad the Bounty Hunter, Mad's Minion A, B) / Power (Mad's Minion C)
Location: Alubarna
Unlocked: Begin Head to the Dust Ruins, return to Alabasta, check Sandy Oasis Bounty Board
Reward: Bounty Hunter Mad's Record Cube, 300,000 Berries
Battler of fellow bounty hunters, Mad the Bounty Hunter is hiding in Alubarna. To unlock his bounty you need to defeat Crocodile and head back to Waford. The main game will bring you back to Alabasta shortly thereafter. Travel to the Sandy Oasis Bounty Board to find his bounty. Mad will appear in the southeast of Alubarna's Market District, through a blockade that only Chopper can bypass.
Mad wants to take on Zoro, which is unfortunate since Power and Speed fighters are your best choices for this battle. Nami can do tons of damage to the whole enemy party right off the bat, likely wiping out two enemies and badly damaging Mad, while one of your Power hitters can wipe out the third Minion. Mad himself can do a fair amount of damage and inflict Bleed with his attacks, but overall is nothing to write home about.
Water Seven
Super Evil Bulbro
Weakness: Speed
Location: Dock One
Unlocked: Complete Evil Bulbro Bounty Hunt in Alabasta, defeat Rob Lucci
Reward: 50,000 Berries
They're baaaaaaack. The Bulbro brothers have taken up residence in Water Seven's Dock One. You'll find them on top of the southern Shipbuilding Scaffolding, on the east side of Dock One. The easiest way to find them is to head south across the bridge to the Material Depot, then go up the cart tracks on your left. They will take you right to the Bulbros.
The two Bulbros are basically the same as before, and favor Spirit Slice. They're small potatoes compared to the Straw Hats, especially if you wait to recruit Franky before you fight them.
Talkative Idor
Weakness: Speed (Idor) / Technique (Idor's Minions)
Location: Water Seven City Area
Unlocked: Defeat Rob Lucci
Reward: Sleeping Bug, Talkative Idor's Record Cube, 90,000 Berries
A chatty man who is only capable of fooling Chopper, Talkative Idor is hiding in the far northwest of Water Seven City Area. You'll find him near the Employee Public Bath, hiding beside the two huge cranes that are stretched out over the nearby Abandoned Factory.
Idor is another simple Bounty Hunt once you've tracked him down. Have Robin or Zoro take out his Minions while your pack of Power players team up on Idor. None of your opponents have outlandish attacks to surprise you.
Whistling Paylin
Weakness: Power (Whistling Paylin, Paylin's Minion B) / Speed (Paylin's Minion A)
Location: Sewer
Unlocked: Defeat Rob Lucci
Reward: Whistling Paylin's Record Cube, Luffy's Cube Fragment, 165,000 Berries
A man in search of exotic animals, Whistling Paylin is located in the Sewer of Water Seven. Use the Yoisa Sign to reach the front entrance of the Sewer, then make your way southeast along B1F. Paylin and his goons are in a side passage that Luffy will need to grapple to reach.
This trio is another minor nuisance. Two of the three have guns, and all three largely stick to normal attacks. You probably fought tougher enemies wading through the Sewers. Take 'em down.
Dance-Dance Creez
Weakness: Power (Dance-Dance Creez) / Speed (Creez's Minions)
Location: Water Seven City Area
Unlocked: Defeat Rob Lucci
Reward: Lost Petal, Dance-Dance Creez's Record Cube, 120,000 Berries
A dancing fiend who seems to think that Chopper is being terribly mistreated, Dance-Dance Creez hangs out in Water Seven City Area. If you jump to the Yoisa Sign near the entrance to Dock One you'll find her almost directly south of you, by the water.
Another pretty basic fight. Creez can target anyone on the field with her cannon, while her two cronies will use normal melee attacks or Paralysis Bag to mess you up. Take the Minions down first, then gang up on Creez for an easy win. Your Power fighters will make this a pretty quick battle.
Pepper Pot Terrance
Weakness: Speed
Location: Water Seven City Area
Unlocked: Defeat Rob Lucci
Reward: Ogre Onion, Pepper Pot Terrance's Record Cube, 105,000 Berries
Leader of the Super Hot Spicy Pirates, Pepper Pot Terrance is one of the easiest bounties to find. He's in the southeast of Elevator - Top Floor, a short walk south of the Cats All Over tavern. You'll find Terrance and his crewing standing by some benches.
Although Sanji is the one with beef in this fight, every enemy you'll face is a Technique user. Terrance himself attacks, while the two Terrance's Minions use physical attacks and Paralysis Bag. Pretty sad showing all around. Use a few strong AOE Speed attacks to wipe them out as a group.
Mistaken Bentag
Weakness: Technique (Mistaken Bentag) / Power (Bentag's Minion A) / Speed (Bentag's Minion B)
Location: Sewer
Unlocked: Defeat Rob Lucci
Reward: Mistaken Bentag's Record Cube, 90,000 Berries
A man who lives up to his name by being perpetually confused, Mistaken Bentag is hanging out in the Sewer beneath Water Seven. To reach him you'll need to head to the lowest level - by elevator is the quickest way - then enter the Old Sewer. Drop to the lower level once you reach the two-tiered room that's full of water at the bottom and you'll find Bentag's gang waiting.
Bentag's group is a cut above the rest in Water Seven, though they're still not that tough. All three members alternate between normal attacks and Poison Bag to damage and / or Poison your characters. They all have different weaknesses, so you'll need a more diverse team than normal. Shouldn't be much of a problem regardless.
Bandit Nine Gillian
Weakness: Technique (Bandit Nine Gillian) / Power (Gillian's Minions A, B) / Speed (Gillian's Minion C)
Location: Water Seven Lower Coast
Unlocked: Defeat Rob Lucci, complete six Bounty Hunts in Water Seven
Reward: Bandit Nine Gillian's Record Cube, three Nami's Cube Fragments, 300,000 Berries
Leader of a band of bandits who want to take down the Straw Hats, Bandit Nine Gillian is hanging out at Water Seven Lower Coast to the south of Water Seven. To make his bounty appear you must defeat Rob Lucci, then complete the six Bounty Hunts that appear on Water Seven's Bounty Boards. Once the Bounty Hunt is underway you'll find Gillian on the east side of Lower Coast, up on a rocky cliff overlooking a palm tree.
Despite his name, Gillian only brought along three of his henchmen. The whole lot of them are pretty cookie-cutter, and shouldn't take up too much of your time.
Furious Medicine Dwanger
Weakness: Speed (Furious Medicine Dwanger, Dwanger's Minions B, C) / Technique (Dwanger's Minion A)
Location: Water Seven City Area
Unlocked: Defeat Rob Lucci, complete six Bounty Hunts in Water Seven
Reward: Remedy Brew, Furious Medicine Dwanger's Record Cube, Chopper's Cube Fragment, 500,000 Berries
A doctor with the opposite of bedside manner, Furious Medicine Dwanger is hanging out on Water Seven's Main Street. To make his bounty appear you need to complete the events surrounding the main story of Water Seven, then take down the first six bounties in Water Seven. Dwanger's bounty will appear on the Bounty Boards around the city once all that's done. You'll find him in a back alley on the west end of Main Street, up some stairs on your left as you cross the bridge from Cafe Park.
The battle against Dwanger is fairly easy, as with most Bounty Hunts, and one of your AOE Power fighters can quickly mop up most of the competition, Dwanger included. Have a Technique fighter take out the remaining Minion.
Mysterious Baritone Lazarus
Weakness: Power (Mysterious Baritone Lazarus) / Speed (Lazarus's Minions)
Location: Dock One
Unlocked: Defeat Rob Lucci, complete six Bounty Hunts in Water Seven
Reward: Mysterious Baritone Lazarus's Record Cube, 375,000 Berries
The head of the Opera Pirates, Mysterious Baritone Lazarus is hiding somewhere in Dock One. To make his bounty appear you need to defeat Rob Lucci, then take down the six Bounty Hunts that appear on Water Seven's Bounty Boards. Once you've accepted the Bounty Hunt Lazarus will appear to the west of the entrance of the Material Depot, on the south side of Dock One.
Lazarus and his buddies are outnumbered during this fight, and aside from decent hitting power they don't bring anything special to the table. Nami can take out the two Minions and put a ding in Lazarus, leaving your Power fighters to mop him up.
Sweet Poison Portnoy
Weakness: Power (Sweet Poison Portnoy, Portnoy's Minion B) / Speed (Portnoy's Minion A)
Location: Water Seven City Area
Unlocked: Defeat Rob Lucci, complete nine Bounty Hunts in Water Seven
Reward: Golden Jelly, Sweet Poison Portnoy's Record Cube, 700,000 Berries
A man with a severe sweet tooth, Sweet Poison Portnoy is located in Water Seven City Area. To unlock his Bounty Hunt you need to defeat Rob Lucci, which will trigger the appearance of Bounty Hunting in Water Seven in general. Complete the first six Bounty Hunts to make three more appear on the city's Bounty Boards, then complete those Bounty Hunts to make Portnoy's appear. He's waiting outside Red Bird Apparel, in the northeast of Fountain Square, one of Water Seven's northern districts.
Portnoy has plenty of health and can hit surprisingly hard if he targets weaknesses, but he's otherwise just another goon to add to the list. Let your Power fighters deal with him while a Speed fighter handles Minion A.
Dressrosa
Ultimate Evil Bulbro
Weakness: Speed
Location: Dressrosa City Area
Unlocked: Complete Super Evil Bulbro Bounty Hunt in Water Seven, reach Chapter 9
Reward: 200,000 Berries
Ah, familiar faces once again. The Ultimate Evil Bulbros won't show up on Dressrosa's Bounty Board until you reach Chapter 9 in the game. Once you do, jump to the Square, At Fountain Yoisa Sign and walk east along Main Street. Just before you hit a drop that takes you to another area, check the rubble on the south side of the street. There's a path to a ruined gate. The Bulbros are hanging out here.
The Bulbros favor Spirit Slice, as usual, and are a piece of cake to defeat. Though, the aftermath... well... at least you're getting paid.
Devil Marin the Witch
Weakness: Power (Devil Marin the Witch, Marin's Minion A, C) / Speed (Marin's Minion B)
Location: Dressrosa City Area
Unlocked: Reach Chapter 9
Reward: Devil Marin the Witch's Record Cube, three Luffy's Cube Fragments, 480,000 Berries
A fortune teller with a mean streak, Devil Marin the Witch is in Dressrosa City Area. To unlock her bounty you need to reach Chapter 9, then revisit Dressrosa. Marin hides along the "Old" Royal Plateau Area, in the north of the city, and you can find her by jumping to the Coliseum Road Yoisa Sign and heading north through Blacksmith Road. Marin is a short walk east of the exit to Blacksmith Road.
Three out of the four combatants in this fight have a weakness to Power, so they'll fall very easily to Luffy's AOE attacks by this stage of the game. Finish off anyone remaining with the rest of your crew.
Anarchy Pirate Zenran
Weakness: Technique (Anarchy Pirate Zenran, Zenran's Minion C) / Speed (Zenran's Minion A, B)
Location: Dressrosa City Area
Unlocked: Reach Chapter 9
Reward: Anarchy Pirate Zenran's Record Cube, three Franky's Cube Fragments, 600,000 Berries
A fellow without shame, Anarchy Pirate Zenran is located in Dressrosa City East. To trigger his Bounty Hunt you'll first need to defeat Doflamingo, then leave Dressrosa and return during Chapter 9. Jump to the Dressrosa City East Yoisa Sign, then look across the street, to the northwest. There are two tilted buildings, and between them is a path Chopper can use to reach what looks like a small, paved park area. Zenran is back here.
Zenran's gang is spread out, making them mildly irritating to defeat, though they're just a bunch of goons who try to smack you with swords. No big deal.
Dicing Vence
Weakness: Speed (Dicing Vence, Vence's Minion B) / Power (Vence's Minion A) / Technique (Vence's Minion C)
Location: Dressrosa City Area
Unlocked: Reach Chapter 9
Reward: Dicing Vence's Record Cube, 400,000 Berries
A gambler with whom Robin shares a bit of a past, Dicing Vence is hiding in plain sight in Dressrosa. To unlock his bounty you must first reach Chapter 9. You'll find him right out front of the Coliseum on Coliseum Road, in the west of Dressrosa. Apparently he has no idea he has a bounty on his head, though he's happy to fight for his freedom.
Vence is another pushover. You have enough variety on your team by this point that you can take him out without an issue.
Weapon Maniac Ganot
Weakness: Technique (Weapon Maniac Ganot) / Power (Ganot's Minions)
Location: New Royal Plateau - Bottom
Unlocked: Reach Chapter 9
Reward: Weapon Maniac Ganot's Record Cube, three Zoro's Cube Fragments, 420,000 Berries
A weaponry fan with his sights set on Franky, Weapon Maniac Ganot hangs out on the New Royal Plateau. To unlock his bounty you'll need to reach Chapter 9, then revisit Dressrosa. Use Yoisa Travel to jump to the campsite at the beginning of New Royal Plateau: 1st Level, then look a little ways west of the sign. Ganot is standing on top of some rubble.
The fact that every one of Ganot's Minions is weak to Power makes this a very quick fight. Have Luffy use one of his AOE attacks to wipe them all out, then gang up on Ganot. He can't survive a sustained attack by four Straw Hats.
Deathless Biezom
Weakness: Speed (Deathless Biezom) / Technique (Biezom's Minion A) / Power (Biezom's Minion B)
Location: Dressrosa City Area
Unlocked: Reach Chapter 9
Reward: Deathless Biezom's Record Cube, 300,000 Berries
A man whose purported deathlessness intrigues Brook, Deathless Biezom hangs out in Dressrosa. To unlock his bounty you need to complete the main story of Dressrosa, then check in on the city during Chapter 9. You'll find Deathless Biezom on the north end of Coliseum Road, on the west side of Dressrosa. Jump to the Coliseum Road Yoisa Sign and he'll be standing a short walk away.
Despite his attempted grandstanding, Biezom is not, in fact, very strong, and though his crew has variety there are only three of them. Thrash them one-by-one, or use your strongest AOE attack to wipe them all out.
Fickle Milena
Weakness: Speed
Location: Dressrosa City Area
Unlocked: Reach Chapter 9
Reward: Fickle Milena's Record Cube, 780,000 Berries
A fraudster who wields marriage as a weapon, Milena is located in the southeast of Dressrosa City Area. To unlock her bounty you need to complete the main story events of Dressrosa, then return during Chapter 9. Once you've returned and accepted the bounty, head to the southern section of Foot of New Royal Plateau, to the west of N.R.P. Elevator. Milena is out front of the Apparel Brilliant clothing store.
Given that everyone on the battlefield is weak to Speed attacks, this fight is very easy. A strong AOE from Franky or Nami will do them all in.
Power Trainer Maite
Weakness: Power (Power Trainer Maite) / Speed (Blue Gorillas)
Location: New Royal Plateau - 3rd Level
Unlocked: Reach Chapter 9, complete seven Bounty Hunts in Dressrosa
Reward: Maite the Power Trainer's Record Cube, three Usopp's Cube Fragments, 2,000,000 Berries
An animal trainer gone rogue, Power Trainer Maite hangs out on Dressrosa's New Royal Plateau, 3rd Level. To unlock his bounty you'll need to complete seven Bounty Hunts in Dressrosa, a feat that requires reaching Chapter 9 of the game. Travel to the New Royal Plateau and you'll find Maite in Spike Canyon, standing on the same clearing where you fought Pica during Chapter 8.
It's nice to face something other than bandit variations for once, but Maite still isn't a difficult bounty. Smack Maite once to lower his health, then have Nami use one of her Lighning-based attacks to deal extreme damage to the Blue Gorillas and finish off the whole bunch of bad guys.
Insect Master Insk
Weakness: Power (Insect Master Insk) / Speed (various scorpions)
Location: New Royal Plateau - 1st Level
Unlocked: Reach Chapter 9, complete seven Bounty Hunts in Dressrosa
Reward: Insect Master Insk's Record Cube, 1,500,000 Berries
A pirate with a vicious love of bugs, Insect Master Insk resides on New Royal Plateau, 1st Level in Dressrosa. To unlock his bounty you'll have to reach Chapter 9, then complete the first seven Bounty Hunts available in Dressrosa. Claim the bounty and Insk will appear in the north of New Royal Plateau, 1st Level, near the entrance to the Sewer. Chopper will need to slip through the remains of a pink building to get at Insk.
Like Maite, Insk makes things a little more interesting by having a band of monsters helping him rather than thugs. Unfortunately all of Insk various Brothers are weak to Power attacks, making them highly vulnerable to Luffy's AOE Skills. Finish Insk off with one of your Speed fighters.
True Evil Bulbro
Location: New Royal Plateau - 1st Level
Unlocked: Reach Chapter 9, complete all other Bounty Hunts in the game
Reward: A Record Cube, 4,000,000 Berries
They're back! The Bulbros have escaped imprisonment sheer moments after their last capture, and this time they're after Mediator Marzin, the man who started the Straw Hats on their bounty hunting career in the first place. To unlock this Bounty Hunt you need to complete all previous Bulbro bounties, as well as finish every other bounty in Dressrosa during Chapter 9.
You'll find the Bulbros by Yoisa Traveling to New Royal Plateau, 1st Level. Head north until you reach the first bridge Franky built, then go west. Through a path only Chopper can tread and then back east, across another bridge Franky needs to build, you'll find... well, let it be a surprise.
Suffice it to say that you need to battle some familiar enemies, all of whom are stronger than normal mooks... but not that much stronger. Reinforcements will keep pouring in throughout the fight if you prolong it, though one or two AOEs will also end things very quickly. Once the battle is over you'll be done with Bounty Hunting in One Piece Odyssey. (Not that you needed much more money by this point.)