

The final storyline quest you can undertake in Pokémon Scarlet and Violet, The Way Home is the conclusion of all three Treasure Hunts that you started way back at the beginning of the game. Arven, Penny, and Nemona will all accompany you on this final trek into Area Zero, otherwise known as the Great Crater of Paldea. It's the central section of the region that heretofore has been a giant question mark in the middle of the map.
To begin The Way Home you must first complete Victory Road, Starfall Street, and Path of Legends, defeating Nemona, Penny, and Arven in combat to end each Treasure Hunt. Once that's done Arven will alert you to the Zero Gate, the entrance to Area Zero. The Zero Gate is located in the mountains southeast of Medali, and a road out the rear of the town will take you right up to the gate. Now that you've completed the Treasure Hunts the path to the Zero Gate will be unlocked.
Proceed into the Zero Gate and you'll meet up with Arven, Penny, and Nemona, and the game will put you on autopilot for a while. Proceed through the cut scenes - as well as one very reckless flight - and you'll wind up in Area Zero.
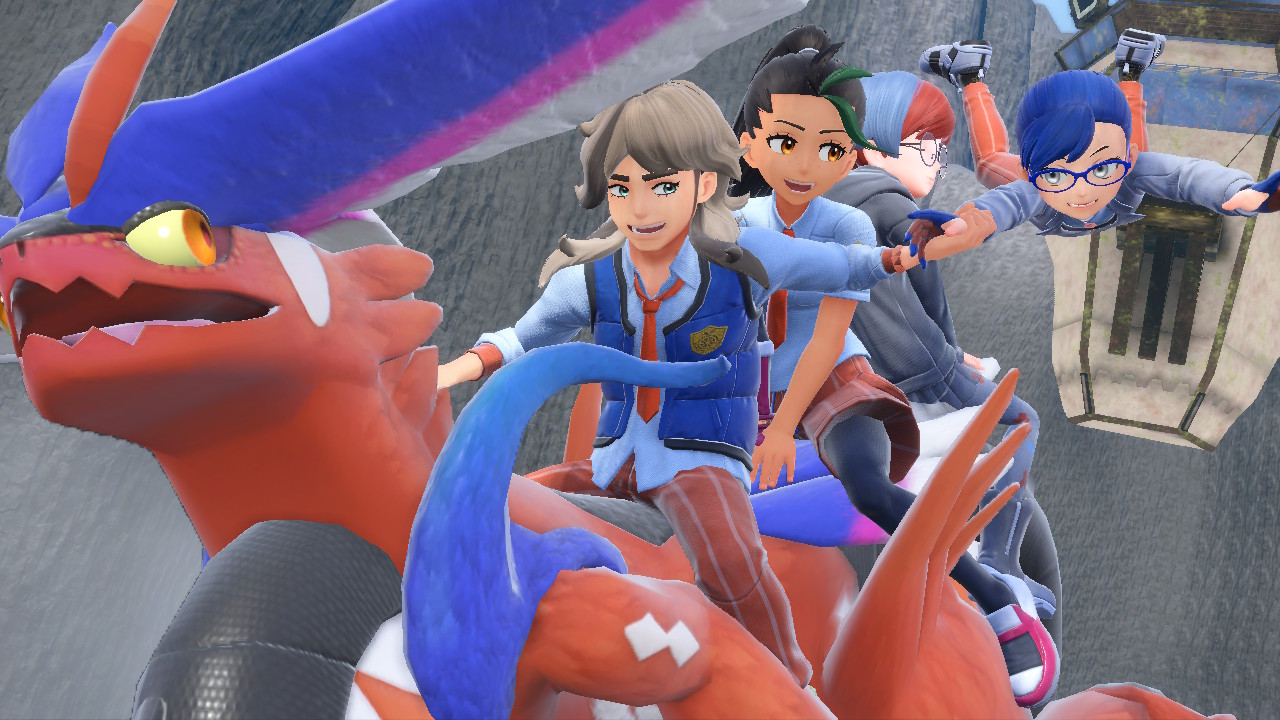
The road through the Great Crater of Paldea is long, but straightforward. You can't ride your mount, so you'll need to hoof it down, listening to your friends chatter with one another along the way. There are no trainers, but plenty of powerful Pokémon and items. We'll explore Area Zero more closely in another article, once our mount is willing to do some legwork. Much of Area Zero is locked away until you can jump, glide, and climb.
Get deep enough and you'll arrive at the first of the research stations needed to unlock Laboratory Zero, the final destination. Once here you'll need to Double Team a Glimmora, a Rock- and Poison-type Pokémon (and the same thing used by Geeta in your battle against her), with Nemona. Glimmora is very weak to Ground-type moves, and normally weak to Water-, Steel-, and Psychic-type moves. Nemona's Lycanroc will likely OHKO the beast. Head inside the research station once the Glimmora is gone and used the green console to release the first lock. You can also use the bed in here to fully restore your Pokémon, if you like.
Before you leave the research station, note the green portal to the right of the exit. This will instantly teleport you to other places in Area Zero. At the moment it will only take you back to the Zero Gate, allowing you to leave the area if you wish. Eventually there will be more warping options.

Head back outside and continue the descent. Follow the outermost path, lined with enormous stone columns, to find the second research station. You'll come under attack by a Pokémon which varies based on your version of the game:
- In Scarlet you'll meet a Scream Tail, a Fairy- and Psychic-type Pokémon with above-average stats, espcially in Speed and Special Defense. Poison-, Ghost-, and Steel-type moves are all super effective.
- In Violet you'll meet an Iron Bundle, an Ice- and Water-type Pokémon. It's fast and dangerous but has a poor Special Defense. Fighting-, Rock-, Grass-, and Electric-type moves will do it in.
Regardless of the Pokémon you fight you'll gain access to the second research station once it's out of the way. The Professor will explain why you're running into such radically different creatures in Area Zero, and Arven will give you the Scarlet Book / Violet Book that seems to be key to much of what's happening. Hit the button in the research lab and heal up if necessary.

Leave the research lab and continue to descent once again. You'll find the third past a creek bed and across a field, and, once again, a strange Pokémon will appear to challenge you.
- In Scarlet you'll run into a Great Tusk, the same species that you battled in the Asado Desert. It's a Fighting- and Ground-type, and is vulnerable to Flying-, Water-, Grass-, Psychic-, Fairy-, and Ice-type moves. Great Tusks's physical stats are massive but its special stats - notably its Special Defense - are quite poor.
- In Violet you'll run into an Iron Treads, also the same species you battles in the Asado Desert. It's a Ground- and Steel-type Pokémon, and is vulnerable to Fighting-, Ground-, Fire-, and Water-type moves. Iron Treads' stats are a little more balanced than Great Tusk's, though it is still strong physical and weak in special stats.

- Slither Wing, level, 66
- Scream Tail, level 66
- Brute Bonnet, level 66
- Flutter Mane, level 66
- Sandy Shocks, level 66
- Roaring Moon, level 67
- Slither Wing is Bug- and Fighting-type Pokémon. It knows Lunge, Leech Life, Low Sweep, and Zen Headbutt, and has an Attack stat that can annihilate your Pokémon. Its Speed is fortunately just average, and it has a four-times weakness to Flying-type moves. Fire-, Psychic-, and Fairy-type moves also work.
- Scream Tail is a Fairy- and Fighting-type Pokémon. It knows Play Rough, Drain Punch, Ice Punch, and Zen Headbutt. It's fast and has high defenses, but Scream Tail's Attack stats are poor. Poison-, Ghost-, and Steel-type moves will take it down.
- Brute Bonnet is a Grass- and Dark-type Pokémon. It knows Earth Power, Payback, Giga Drain, and Sucker Punch. Despite otherwise high stats and painful moves Brute Bonnet lacks Speed, and its Special Defense isn't amazing. Bug-type moves will eviscerate this thing, and Fighting-, Flying-, Poison-, Fire-, Ice-, and Fairy-type moves all serve as solid backups.
- Flutter Mane is a Ghost- and Fairy-type Pokémon. It knows Power Gem, Mystical Fire, Shadow Ball, and Thunderbolt. Flutter Mane has ridiculous Special stats and high Speed, but its physical stats and HP are quite poor. Ghost- and Steel-type moves will take it down, but Flutter Mane can demolish Pokémon of either type, so consider throwing out a type that can resist those moves and has a high Special Defense. Flutter Mane will almost certainly get to attack first.
- Sandy Shocks is an Electric- and Ground-type Pokémon. It knows Discharge, Earth Power, Flash Cannon, and Power Gem. Its Special Attack and Speed are pretty high, but its stats are otherwise average. Ground-, Water-, Grass-, and Ice-type moves will all take it out, and given Sand Shocks' moveset you may want to deply a Ground-type to bear the brunt of its attacks.
- Roaring Moon is a Dragon- and Dark-type Pokémon. It knows Dragon Claw, Night Slash, Earthquake, and Stone Edge. Similar to a lot of Sads's Pokémon it has a high Attack stat and is very fast, but doesn't have amazing defenses. Roaring Moon has a four-times weakness to Fairy-type moves, and is also weak to Fighting-, Bug-, Ice-, and Dragon-type moves. Deploying a Fairy-type with good defenses is your best bet for taking it out.
AI Turo
- Iron Moth, level 66
- Iron Bundle, level 66
- Iron Hands, level 66
- Iron Jugulis, level 66
- Iron Thorns, level 66
- Iron Valiant, level 67
If you're playing Pokémon Violet your opponent is Turo, and his team is stacked with a metric ton of futuristic Pokémon, some of which you've seen and some of which you have not. You don't have any allies in this fight, so hopefully your team is up to the task.
- Iron Moth is a Fire- and Poison-type Pokémon. It knows Sludge Wave, Fiercy Dance, Discharge, and Air Slash, and has the stats to make all of them hurt. Its Defense is poor, however, and it has a four-times weakness to Ground-type moves that make Ground-type Pokémon ideal for taking it down. Rock-, Water-, and Psychic-type moves are also good.
- Iron Bundle is a Water- and Ice-type Pokémon. It knows Drill Peck, Water Pulse, Snowscape, and Freeze-Dry. Iron Bundle has high Attack and Speed stats, but its HP and Special Defense are lousy. Fighting-, Rock-, Grass-, and Electric-type moves are all effective, and Steel-type Pokémon will have little trouble with its attacks.
- Iron Hands is a Fighting- and Electric-type Pokémon. It knows Thunder Punch, Drain Punch, Fake Out, and Iron Head. Iron Hands' physical stats are quite high, but its Special Defense and Speed are very low. Ground-, Psychic, and Fairy-type moves are all effective here.
- Iron Jugulis is a Dark- and Flying-type Pokémon. It knows Dark Pulse, Air Slash, Flash Cannon, and Flamethrower. Aside from its high Special Attack and Speed stats Iron Jugulis is somewhat on the average side statistically, giving you plenty of room for a OHKO if you can survive its first attack. Rock-, Electric-, Ice-, and Fairy-type moves will all take it down.
- Iron Thorns is a Rock- and Electric-type Pokémon. It knows Brick Break, Thunder Punch, Stone Edge, and Earthquake. Similar to Iron Hands, Iron Thorns has high physical stats but is a bit slow, though its defenses are overall better. It has a four-times weakness to Ground-type moves, making them your best bet, though you can also use Fighting-, Water-, and Grass-type moves to win the fight.
- Iron Valiant is a Fairy- and Fighting-type Pokémon. It knows Psycho Cut, Brick Break, Spirit Break, and Poison Jab. Iron Valiant is heavy on offense and Speed, with lackluster defenses and not much HP. Flying-, Poison-, Steel-, Psychic-, and Fairy-type moves will all wipe it out without too mcuh trouble, assuming your Pokémon survives the initial assault. A neutral Pokémon with good defenses will do well in this fight.

Regardless of the Professor you wind up facing, you'll still have another battle after winning, this between your partner Pokémon - Koraidon or Miraidon - and the Professor's. This fight is pretty easy, despite how it seems at first, and you just need to keep your Pokémon healed until it can Terastallize. Once it can, use Tera Blast to annihilate the competition.

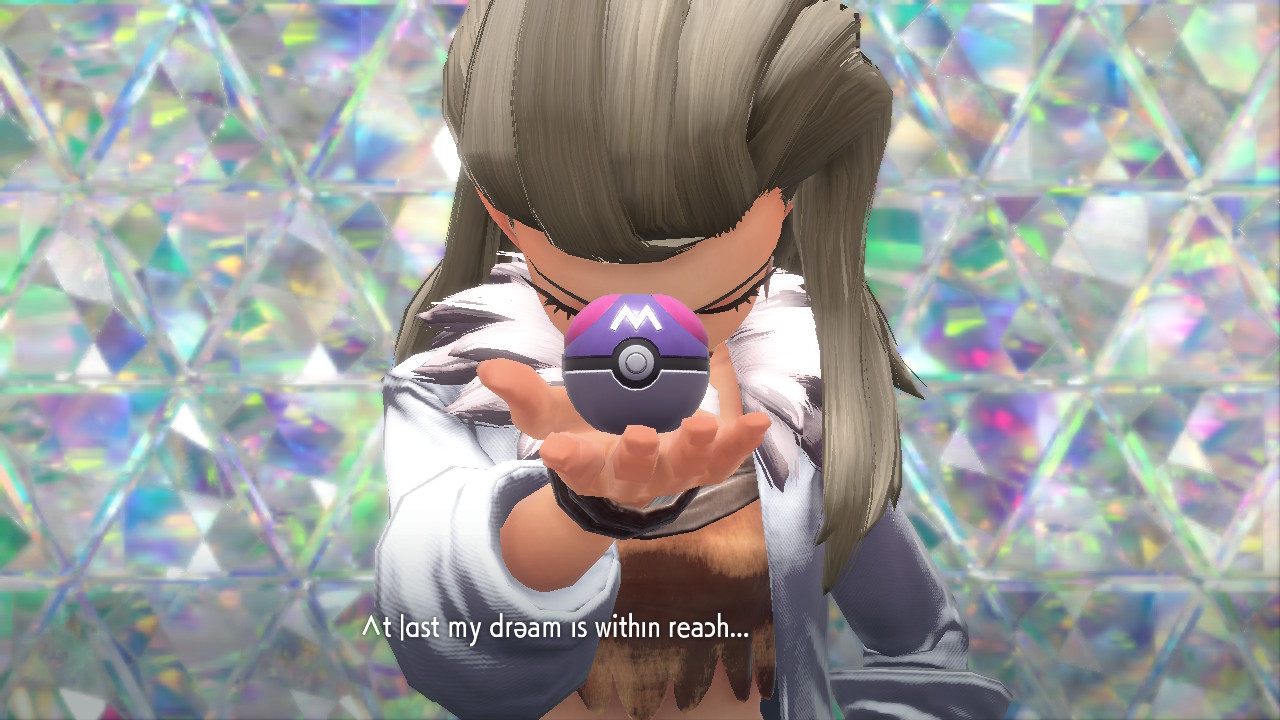
Defeating the Professor's last-ditch attack will win you the game! Woo! After a string of nice cut scenes and the credits roll you'll be back in your dorm at the Academy, and you'll get called to the Director's Office. Clavell will congratulate you on your hard work, and will give you a Master Ball. With this item you can catch any Pokémon in a single attempt, without fail. Be sure to save it for a difficult catch. You'll also be able to use either Koraidon or Miraidon on your battle team from this point on, assuming you change them to their Battle Form and have a space free on your roster. Nice.
In addition to these prizes you'll also unlock a new challenge: Fighting the Gym Leaders of Paldea a second time. Each one will use their true Pokémon team in the rematch, and will be more than capable of taking on your end-game fighters. Completing each of these rematches will also unlock a special tournament against basically every important NPC that you've fought throughout the game, as well as a few you haven't. In other words, Pokémon Scarlet and Violet might have rolled the credits, but your journey is far from over.