

Though Potion Permit is billed as a potion-brewing experience, you'll spend a substantial amount of time exploring the wilderness. While poking around you'll run into plenty of monsters, all of whom can do you harm. Some are aggressive, while some won't attack until provoked. If a monster manages to deplete all of your health you'll be sent back home by Forrest and wake up at 12:00 the next day, losing out on the morning hours. Suffice it to say that you don't want to be knocked out.
This guide will help you combat the many monsters of Potion Permit. Some of them require a bit of finesse to battle, and you will want to battle them. Each one drops a unique item that you can use to craft potions, and you'll need them all for some of the more complex brews.

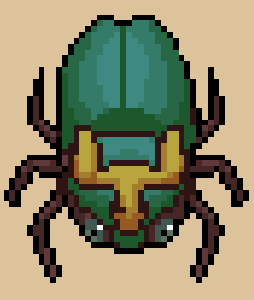
Greedbonnet
Location: Meadow Range
Drops: Spores
A fairly minor nuisance that ambles around. You can kill them in a few hits.

Green Blob
Location: Meadow Range
Drops: Sticky Jelly
A quivering, largely-harmless mass. When defeated Green Blobs explode into two smaller Mini Green Blobs that usually cause more trouble. Back off after defeating one to avoid damage.

Mini Green Blob
Location: Meadow Range
Drops: None
The result of killing Green Blobs. Once the larger Blob has exploded into these they are very easy to clean up.

Honeypaw
Location: Meadow Range - Before the Landslide
Drops: Honey, Bear's Claw
The most dangerous enemy of the early area of Meadow Range. Honeypaws will lunge at you once in range, and continue to attack every few seconds. Keep out of their reach by standing on the other side of an obstacle, or roll to avoid their claw swipes.

Pangol
Location: Meadow Range - Beyond the Landslide
Drops: Rigid Pelt
A mellow creature that only attacks after hit with a Hammer. Rolls up into a ball and hurls itself in your direction after several seconds. Slam it with your Hammer to break its armor, then use a quicker weapon once the Pangol's on its back to finish it off.

Bonemask
Location: Meadow Range - Beyond the Landslide
Drops: Savage Mane
Quick creature that charges up, then rushes at you. With earlier weapons it can only be hurt when not charging up, so once you see flames around its mane you should take cover behind a tree or rock.
Crownmite
Location: Meadow Range - Beyond the Landslide
Drops: Bug Leg
Peaceful bug that will hit back once you break its armor with a Hammer. Back off after taking the first swing to avoid its initial attack, then keep hitting until the Crownmite is on its back. Use a faster weapon to finish the kill.

Blackpaw
Location: Meadow Range - Beyond the Landslide
Drops: Black Fur
Stronger variant of the Honeypaw. Uses obstacles to keep it from hitting you.

Goldenhorn
Location: Glaze Iceberg, Barren Wasteland
Drops: Golden Shell
A stronger variant of the Crownmite. Smack it with your Hammer until it's stunned.

Blossom Shooter
Location: Glaze Iceberg
Drops: Timber Fruit
A stationary creature that launches explosive seeds in two different patterns. Find a safe spot near it, hack once or twice while it fires off seed pods, then move to a new spot. Move back and forth to avoid damage until it's defeated.

Bomber Bee
Location: Glaze Iceberg
Drops: Ominous Tongue
Flying nuisance that charges at you. More dangerous upon death, as it will explode a few seconds after it's defeated. Roll away to avoid damage.

Koblin Assassin
Location: Glaze Iceberg
Drops: Dark Shard
Speedy creature that will slash at you, then hide behind its shield. You need to use your Axe to cut through its defenses, then keep slashing once it's stunned.

Elder Wolf
Location: Glaze Iceberg
Drops: Premium Pelt
Gets up close, waits a few seconds, then charges at you. With stronger weapons you can usually kill these before they charge. Otherwise you should back up behind something, or be ready to roll out of their way.

Spook Digger
Location: Glaze Iceberg
Drops: Quality Nut
Oddball creature that will attack you with nuts once provoked. Pretty easy to take out once you've started hitting one.

Grandhorn
Location: Barren Wasteland
Drops: Majestic Horn
Huge beast that won't attack unless provoked. Its horns will glow, and after a few seconds it will charge at you. Take several swipes, then get behind something to avoid damage. Grandhorns take many hits even with fully-upgraded tools, so fighting one may take a while.

Sandcrawl
Location: Barren Wasteland
Drops: Hard Shell
Another version of the previous beetle enemies. Use your Hammer to knock them over.

Sunclaw
Location: Barren Wasteland
Drops: Giant Pincer
Swift enemy that can do a surprising amount of damage. Get ready to roll once it raises a claw, or hide behind something while attacking. Fast swipes with the Axe are recommended. Honestly one of the most dangerous enemies in the game, despite taking few hits to defeat.

Koblin Mage
Location: Barren Wasteland
Drops: Luminous Crystal
Magic user that summons fireballs to hurl at you. You'll have several seconds to get out of the way. Move in close while avoiding fire, then give the Koblin several swipes before it can flee.

Koblin General
Location: Barren Wasteland
Drops: Juicy Meat, Dark Crystal
A larger, slower, more durable version of the Koblin Assassin. Hides behind its shield and uses its club to smack you at medium range. Pull out your Axe, swipe once or twice, avoid its counterattack, then keep hitting its shield until the Koblin is stunned. After that a continuous attack with your Axe will eventually finish the Koblin off.

Ironfin
Location: Barren Wasteland
Drops: Razor Fin
Found only in the far south of Barren Wasteland, Ironfins are the most troubling monster in Potion Permit. They surface from the sand only occasionally, and most of the time it's to perform a quick leaping attack. Watch the Ironfin's movement through the sand, roll or get behind something to avoid any attacks, and wait for the Ironfin to surface for a few seconds. Ironfins are only vulnerable once they're at rest. You'll likely need to play this game of cat-and-mouse a few times before you can take one down.