

Part Twenty-One: Viper Manor Revisited (Another World)
S.S. Invincible
Fargo escorts everyone back to the S.S. Invincible upon escaping Hermit's Hideaway, and you'll watch a sad montage. Once that's done you'll be free to wander the ship. Go belowdecks and you'll see a series of cut scenes, during which no less than General Viper, Fargo, Marcy, and Karsh / Zoah (depending on who you recruited earlier) will all join your party. Talk about cast member overload.
After the mass migration into your ranks you'll be whisked off to the Pearly Gates, the entrance to the Sea of Eden. Harle will tell you that you need to retrieve items from the six Dragons, as well as get Lynx out of your party, before you can enter the Sea of Eden. She'll also ask you a question; ultimately your decision doesn't affect anything besides her immediate response...
... though after a sad cut scene, you'll notice that Harle is gone. You can't get her back in your party again until you reach a New Game+. Alas.
At this point you need to locate, and defeat, the six elemental dragons scattered throughout Home World and Another World. You've met several of them by now, so at least you have a place to start. It's recommended that you put Fargo in your party when you face the dragons, as each one possesses a valuable piece of equipment that he can steal.

Green Dragon - Gaea's Navel
We'll start with the Green Dragon, as it's one of two dragons that unlocks new characters for your party, and isn't that difficult to boot. The Green Dragon lives in Gaea's Navel, in the southwest corner of the world map, but trying to access the island by boat is useless. You'll need an alternate form of transportation to get over there.
Head to Home World and check out the Hydra Marshes. If you go west through the swamp you'll wind up on a series of root-like pathways, and this section will look familiar if you saved Kid and recruited Razzly earlier in the game. This article will guide you through the first part of this area if you didn't save Kid, all the way up to the point that you get the Beeba Flute and defeat the Wingapede. (If you didn't save Razzly earlier you can't get her now.)
Go back to the save point where you fought the first Beeba. There's another here, and it will go on about avenging its family. Kill it and you'll receive an Ancient Fruit. This, the Beeba claims, will properly tame the Wingapede. Walk east from the Beeba and you'll find another Beeba. Use the Beeba Flute beside it and you'll be whisked off to Gaea's Navel, this time without a fuss. If you choose to return to the Hydra Marshes you'll need another Ancient Fruit from the first Beeba.

Gaea's Navel
Upon landing at Gaea's Navel you'll be greeted by Leah, a little cave girl with a curious dialect. Claiming to be lost but not all that concerned, Leah suggests that something big is nearby - the Green Dragon? - and joins your party on the spot. You'll need to kill all of the monsters and get all of the treasures in Gaea's Navel to bring your quarry out of hiding.
(If you return to the place where you first landed and met Leah you can use the Beeba Flute to summon the Wingapede again and leave, though until you finish your business at Gaea's Navel Leah will leave the party whenever you depart for the Hydra Marshes.)
A land of beasts, Gaea's Navel, unsurprisingly, has a few new monsters for you to fight:
- Prey Mantis - Green Innate. Not too tough, though their Stinger attack can Poison your party members. Bring Antidotes and they won't be a problem.
- Prehysteric - Yellow Innate. More dangerous than they appear, Prehysterics hit relatively hard and can use their Jurassic Beat Tech to confuse a single character. This can lead to major irritation if multiple party members get confused at once. Take Prehysterics out first with strong Green Innate Techs and Elements. On the plus side they carry Denadorite and drop it often, which will be handy for crafting later.
- Pterodact - Red Innate. More or less the Polly boss you fought on the S.S. Invincible. Has higher-than-average health, is otherwise unremarkable.
The path splits in three directions from where you land. The path to the north is blocked by some sort of wind barrier, leaving east and west as your choices. Before you go anyway, walk up behind the mossy pillar on your right to find a path to some Denadorite, and climb the vines on your left to find a Green Brooch. Watch out for an ambush when you go after the Brooch.
To the west is a save point, so you might as well go here first. Start by going up the slope to the left of the save point. It leads to a chest containing Denadorite. Head back down the higher ramp, then use the handholds on your left to climb down to the lower path. There's another Denadorite to the right, and to the left is a path to the next screen.
Keep following the lower path to the left until it hits a dead end, where you'll find yet another Denadorite. Backtrack and use the handholds to climb to the middle path. You can walk right here to return to the previous screen and find, you guessed it, Denadorite. Backtrack again. There's a slope you can use that will take you to the upper path, and a bridge to the west side of the screen. Climb the handholds before crossing the bridge to find... Denadorite. Yup. Another Pterodact ambush awaits you up here if you take too long.
Cross the bridge and climb the tree on your left. The path across the trees will take you to the next screen to the west. This will bring you back to the spot where you landed. Climb out of the trees and Leah will comment on how quiet it is, assuming you've killed all the monsters and collected all the treasure in Gaea's Navel. Head to the landing spot and the monster Leah spoke of will charge out of the woods at you.
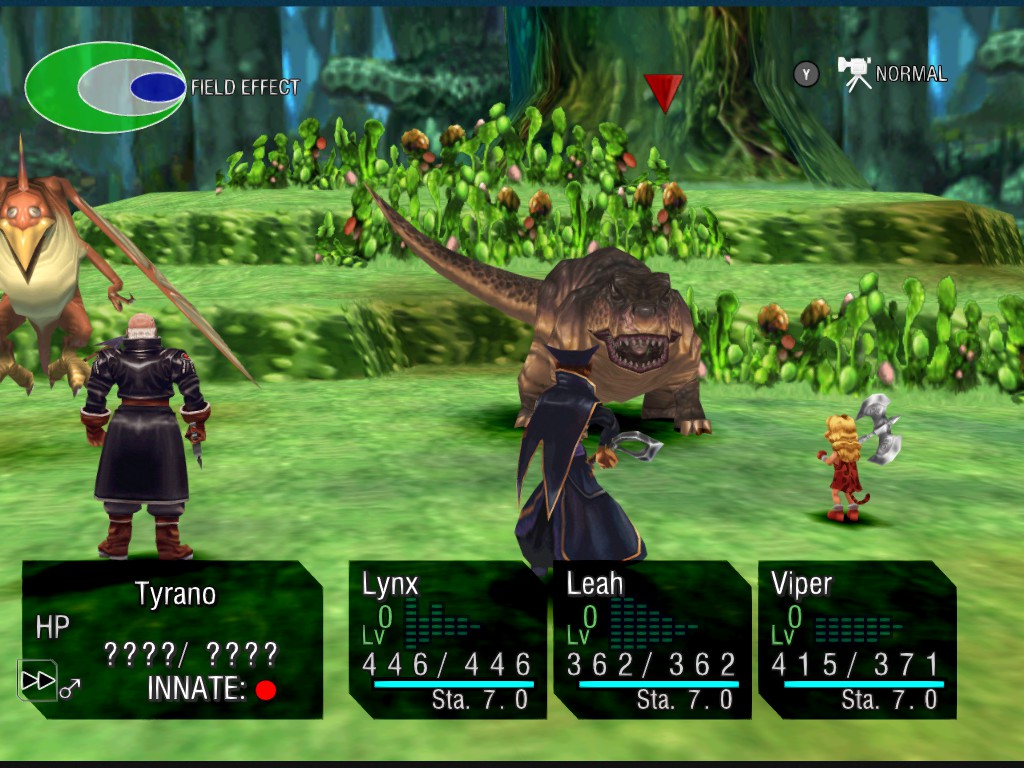
Tyrano
Nope, not the dragon. Accompanied by a Pterodact that you should kill first, the Tyrano isn't a big deal. Aside from normal attacks - which admittedly sting after a while - the Tyrano uses a move called Crunch Out, which can give a single target a Sprain. And... that's about it, really. Just a glorified normal enemy. Use Blue Innate Elements and Techs to take out the Tyrano in a hurry. Fargo can also Pilfer a Power Seal from it if you'd like an Attack boost.
You'll earn a Star Level, 1,718 g, and a Resistance Ring for defeating the Tyrano and the Pterodact. If only they were all this easy.
Leah will promptly run off after the fight, heading north, and when you follow her you'll discover that the blocked area is now clear. It's the resting place of the Green Dragon, and when you draw close the dragon will decide to... well, eat you. Fair.

Green Dragon
The Green Dragon is a bit of a nuisance. A purveyor of Green Elements, the Green Dragon will usually start off by casting Green Field, turning the Field Effect Green and giving itself a move advantage. If left unhindered it will then use Carnivore to hit everyone for 200+ points of damage. Besides that it can use Bad Breath to inflict a variety of status ailments on your characters, as well as Toxic Breath to predictably inflict Poison. Once its health is low the Green Dragon will use Heal Plus to restore itself. The Green Dragon almost never seems to use normal attacks, so that's something.
If you haven't already, equip your party with any accessories you have that protect against status ailments. Resistance Belts and Rings, the Star Fragment, and the colored Brooches will all help. Once you're protected against as many status ailments as you can manage, wade into battle and smack the Green Dragon with your most powerful Elements and Techs. Yellow Innate Elements are ideal, but any will do, so long as you counter Green Field and prevent the Green Dragon from using Carnivore. Do this consistently and you'll take little damage in this fight. Be sure to Pilfer the Green Plate from the Green Dragon if you brought Fargo along.
You'll receive a Star Level, 1,110 g, and the Genie Summon Element for defeating the Green Dragon. It will depart, leaving behind the Green Relic. In the immediate aftermath of the fight Leah will decide your way of life looks fun, and join the party for good.

Black Dragon - Marbule
Our second dragon also offers a new recruit. Found in Another World, the Black Dragon is located in Marbule, in a watery cave in the north of the Demi-Human town. If you refused to help Nikki in Home World while aboard the S.S. Zelbess the Black Dragon will give you the Black Relic and that will be all.
If, on the other hand, you agreed to help Nikki, you'll need to bring the Marbule of Home World back to its full splendor, as the Black Dragon won't even speak to you right now. Put Fargo in your party and head to the S.S. Zelbess. Speak to Home World's Fargo in his bedchamber and, er, Another World's Fargo will rather forcefully commandeer the ship. Once you watch Nikki's concert Fargo will gain his level seven Tech, Invincible, and the Lagoonates patrolling Marbule will become corporeal, allowing you to fight and defeat them. You need to defeat all of the Lagoonates, including the two in the Black Dragon's cave, to clear out Marbule.
(Once this is done, visit the S.S. Zelbess before you leave Home World. You'll find Miki in the restaurant belowdecks. She'll opt to join the party, as a... vacation. Right.)
Head back to Another World and check out the Black Dragon in Marbule. It has awakened, and it wants to test your might. Time to battle.

Black Dragon
The Black Dragon is not particularly strong compared to its brethren, and will typically dish out the most damage by attacking three times in a row. Other than that it has Dark Breath, which can inflict Darkness and lower accuracy, Gravitonne, which doesn't do much damage, and Gravity Bomb, which also isn't that impressive, but can occasionally Curse characters and lock away their Elements. All of them hit your entire party, so be ready with an all-healing Element. The only Element you really need to watch out for is Freefall, which is seldom used.
The obvious solution is, of course, to target the Black Dragon with White Innate Elements, though it will automatically counterattack with Anti-White. You can get around this by equipping an Angel Charm on your primary White Innate attacker (Riddel and Starky are good candidates) and simply ignoring the Element. Otherwise, just pummel the Black Dragon with strong normal attacks and non-Black Elements, keep the Field Effect out of all-Black territory, and heal as needed. Pilfer the Black Plate before you beat the Black Dragon if you brought Fargo along.
You'll receive a Star Level, 2,154 g, and the Grim Reaper Summon Element for defeating the Black Dragon. As it fades away it will give you the Black Relic.
Fire Dragon - Mt. Pyre
Enter Mt. Pyre in Another World - the enemies here are far weaker than you now, so we won't go over them again - and make your way north to the second screen of the area, where the path splits. Go east to the room with the (now probably frozen) lava fall that splits in two directions. Go down the south-facing slope. On your right is a cave tunnel that leads north to another screen. Keep following this path north on the next screen...
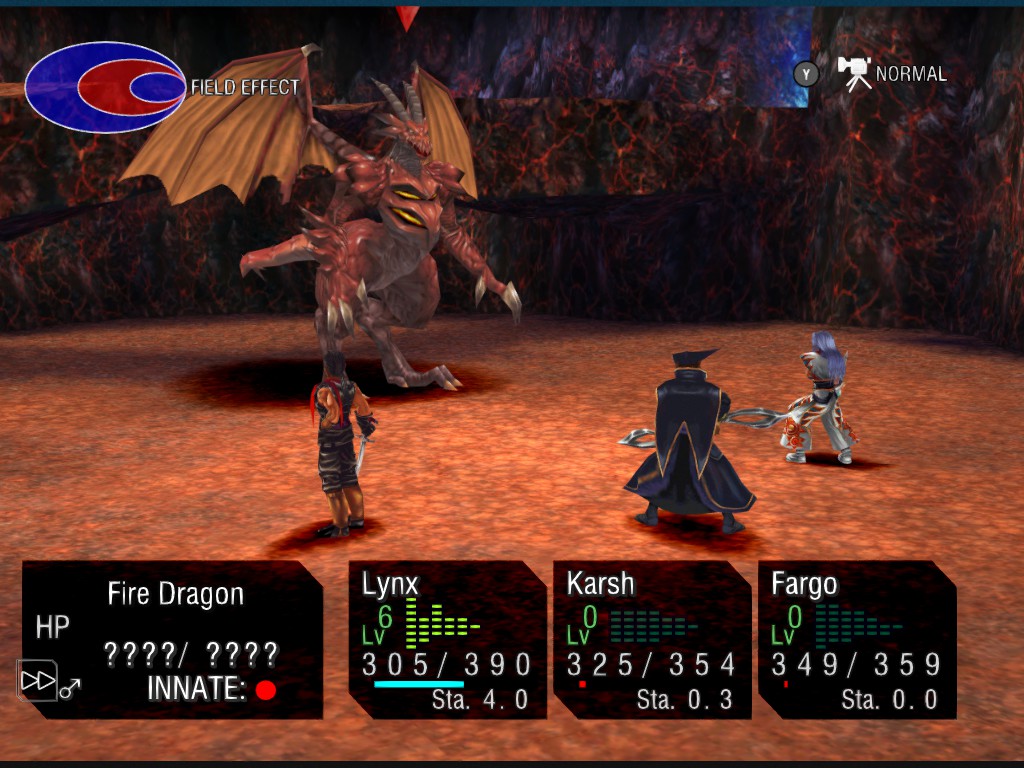
... and you'll find the pint-sized, staff-wielding lizard you fought before. Yep, this is the Fire Dragon. He'll challenge you to another fight. It's not a big deal... at first. Do enough damage, though, and the Fire Dragon will transform into a much larger, stronger form. The Fire Dragon thereafter hits a lot harder with its normal attacks, and has a Fire Breath Tech that can inflict large amounts of damage to the whole party. It can also use Fiery Breath on a single target, not a big deal, and Inferno on everyone. Both are dangerous, but Fire Breath is by far the Fire Dragon's greatest weapon.
Still, so long as you have enough Cure Alls, Heal Alls, and / or Recover Alls, this fight isn't too bad. Save up your Element Grids for the second form, then unleash your strongest Blue Innate Elements on the Fire Dragon, healing as necessary. Keeping the Field Effect Blue will prevent the Fire Dragon's best attacks from reaching their full potential. Try not to let anyone (especially your Blue Innate party members) dip below 200 HP. Healing any Burns your party sustains will help you survive the Fire Dragon's strongest attacks, though getting Burned happens often enough that you may just want to equip items to prevent status effects. Keep pummeling the beast until it goes down.
(Make sure that you Pillage the Fire Dragon after it transforms, not before. The Fire Dragon's original form only carries a Magic Ring, whereas the transformed Fire Dragon carries the much-more-useful Red Plate.)
You'll receive a Star Level, 1,800 g, and the Salamander Summon Element for defeating the Fire Dragon. It will then cryptically mention that you'll meet again, and hand over the Red Relic.

Earth Dragon - Earth Dragon Isle
Head to Earth Dragon Isle, just north of the main continent, in Home World. You'll find a bunch of surveyors checking the place over. Head to the big plot of sand in the north and you'll drop through and into a cavern.
When you land you'll be on sand that will try to drag you to the left, and to the right is a sand boil that will shoot you back to the surface. Go to the left to reach a Mythril, as well as several sand streams that will drop you to the bottom of the first section of cave. You'll start running into the following enemies down here:
- Fossickers. Yellow Innate. Not a big deal on their own, Fossickers can toss out Bombers, little enemies that sit beside your party members and explode after taking enough damage. Neither enemy should be a big deal at this point in the game.
- Yellow Bellies. Yellow Innate. A relatively weak enemy, Yellow Bellies can annoy your party by inflicting Sprain with their Slime attack. Kill these first before they can debilitate your party members.
- Rockroaches. Yellow Innate. These beefy HP sponges can't do a ton of damage, and are mainly annoying because they take a while to kill. High-power Green Innate Elements are recommended.
Also down here is a single Rockroach. If this is your first trip down here the surveyors will talk about explosives, and you'll need to leave and come back to clear the Rockroach out of the way. Speak to the man standing near the southern exit to receive an Explosive key item, for moving other Rockroaches around.
To the south is a larger section of cave with more enemies roaming around. Go left to find a chest containing Denadorite, then head back to the right. There's a Rockroach over here. Use the Explosive on it as a key item and it will be launched down into the pit below, blocking a stream of sand jetting out of the ground.
Go down the steps from the entrance and you'll find a man on your left, watching as a Rockroach mills around. He'll suggest you attack it when it's standing beside the cliff, then push it off said cliff by interacting with it when it retreats into its shell. (This part seems a bit fiddly, and you may need to fight the Rockroach a few times before it gets into the correct position.) Pushing the Rockroach down will black another stream of sand.
Head south along the rocky path and take a right to find a chest containing Denadorite, then backtrack west and get down in the sand. There's one last Rockroach to fight and push into a jet of sand. Blocking this third sand boil will activate the sand boil in the midst of the three. You can use it to launch to a previously-inaccessible path.
The final room of Earth Dragon Isle contains a save point and an empty pit of sand. Check the pit to bring the Earth Dragon out of hiding. Tell it you seek its blessing to trigger the boss battle.

Earth Dragon
The Earth Dragon has a tendency to use normal attacks, hitting once or more per turn, and doesn't resort to its special attacks all that often. When it does break out its Elements it can use Giddy Breath, doing damage to one character and inflicting Dizzy, and Catastrophe, which does around 200 points of damage to everyone. Catastrophe comes out so rarely that you probably won't see it at all if you can hit hard enough.
Have Fargo Pillage the dragon's Yellow Plate, then open up on the Earth Dragon with your best Green Innate Elements. The Earth Dragon is a bit on the slow side, so you can likely wipe out vast swaths of its HP before it can do much damage to you. Heal as necessary - keep your health above 200ish, in case Catastrophe makes an appearance - and take it down. Piece of cake.
You'll receive a Star Level, 1,547g, and the Thunda Snake Summon Element for defeating the Earth Dragon. It will then bestow the Yellow Relic upon you and send you on your way.
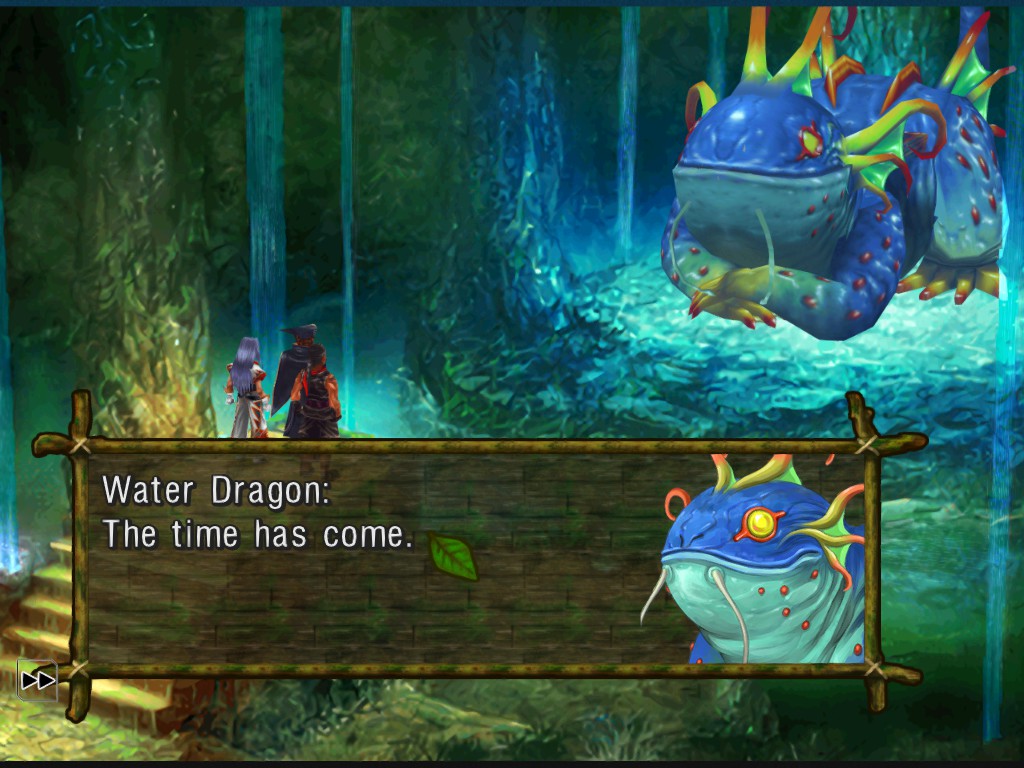
Water Dragon - Water Dragon Isle
Make your way to Water Dragon Isle, just south of the main island. Unless you skipped a chunk of the game this should be familiar territory. You'll find the Water Dragon right where you met it the first time, when you came here for the Ice Breath. Along the way you'll have to fight some new enemies:
- Lagoonate - Blue Innate. Okay, maybe not that new. If you did the Marbule quest you've fought these before, and they're the same. Red Innate works nicely.
- Mantarrey - Blue Innate. Another returning enemy from Marbule, albeit one you may not have ever seen, Mantarreys are swift enemies that don't have a ton of HP. No biggie.
- Sidesteppa - Blue Innate. Big, aquatic bug things, Sidesteppas are no big deal. All they have going for themselves is a healthy amount of HP. Red Innate all the way.
You'll only have to fight a small handful of enemies before you face off against the boss.
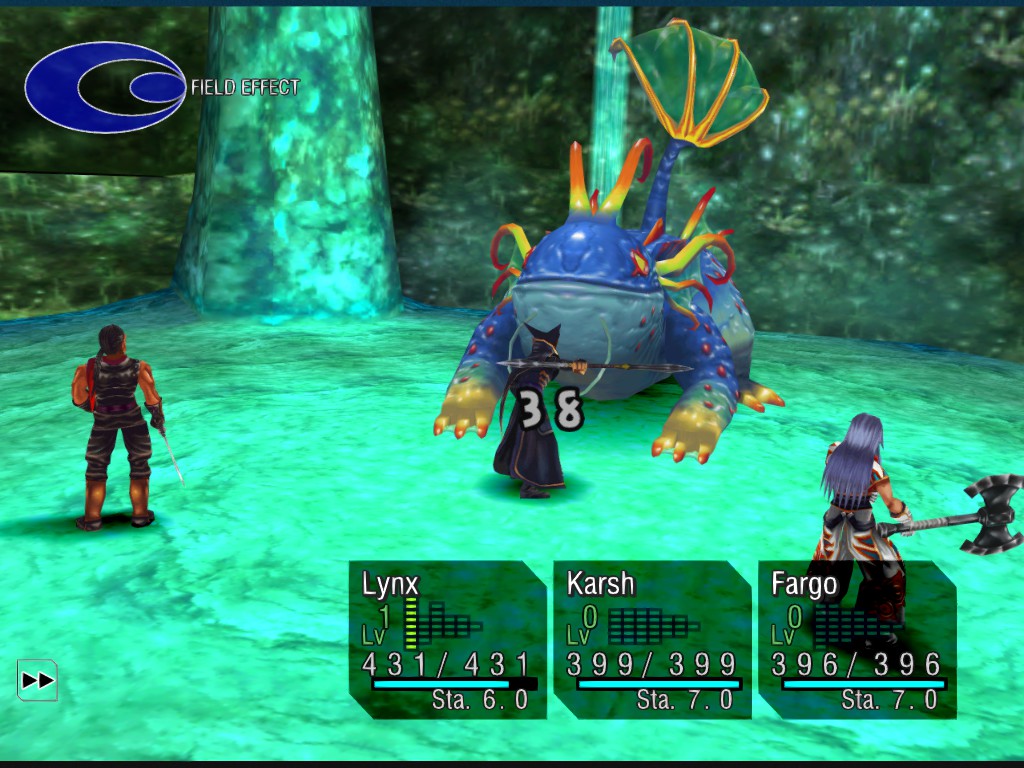
Water Dragon
The Water Dragon is a bit tame compared to some of the other dragons. Its physical attacks are a bit weaker on average, and its Elements aren't that strong. You may see the occasional Ice Blast, but it won't hit you very hard at this level. The Water Dragon also has two all-hitting attacks, Deluge and Tsunami Beam, and neither one is likely to reach much more than 150 points of damage unless its target is Red Innate and very weak. Flu is a bit of a concern during this fight, but it only slows down your Stamina regeneration, which isn't a huge deal.
Pilfer the Water Dragon's Blue Plate, then go to town on it with Red Innate attacks. Heal as necessary to avoid getting wiped out by Deluge or Tsunami Beam. Unless you're very lax on your healing the fight should be over pretty quickly.
You'll receive a Star Level, 2,036 g, and the Blue Whale Summon Element for defeating the Water Dragon. Content with your performance, it will give you the Blue Relic once the battle is over.
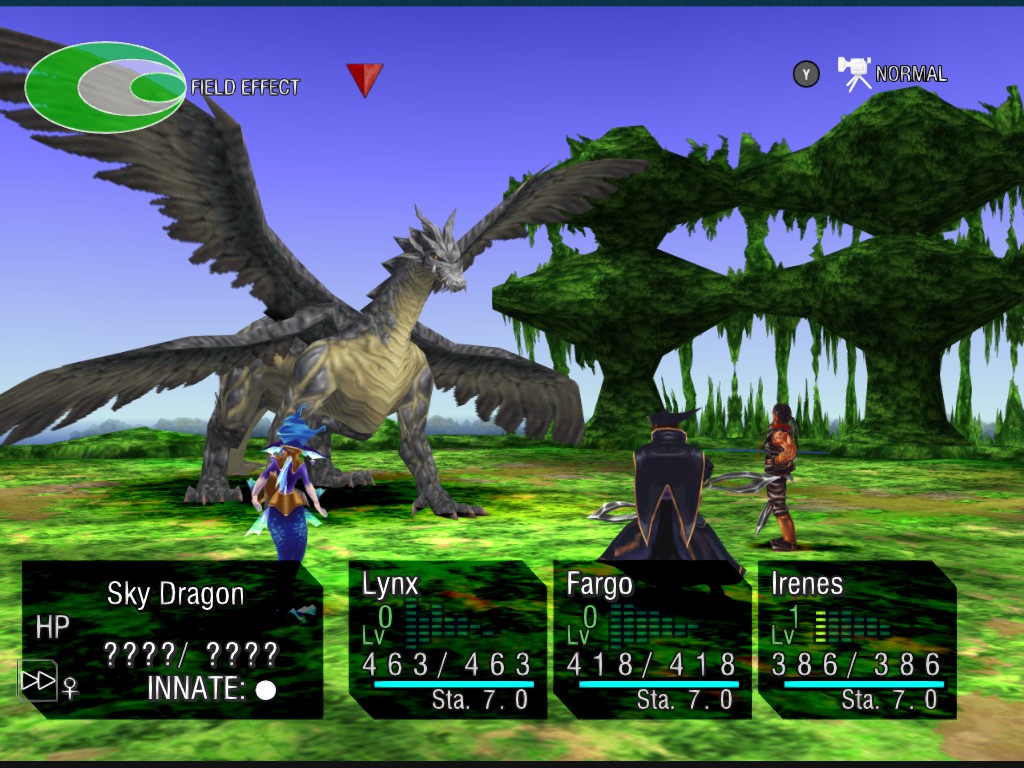
Sky Dragon - Sky Dragon Isle
Once you've defeated the other five dragons and collected their Relics you can challenge the Sky Dragon. It's found at Sky Dragon Isle, in Another World, sitting in the same spot where you can recruit Starky in Home World.
As a White Innate foe, the Sky Dragon is Lynx's natural enemy, and vice versa. Aside from normal physical attacks it uses White Breath against a single target and Holy Breath against everyone, the latter inflicting a considerable amount of damage. It will also use Null State to increase its Magic Defence, Negate Magic to temporarily ignore all Element damage inflicted on the Sky Dragon, and Magnify to increase Element damage inflicted on both sides of the battlefield. Magnify makes things especially dangerous for Lynx (and any other Black Innates you brought along) if the Sky Dragon decides to use Holy Breath. Do enough damage and the Sky Dragon will use Holy Healing to restore a big chunk of its health.
Suffice it to say that the Sky Dragon is probably the toughest of the dragons you'll face. Unless you're reviving a character you should stay away from White Innate attacks, opting for Black Innate Elements or just another color that will keep the Field Effect from becoming All White. If Magnify proves to be too dangerous - and it probably will - using Diminish to cut all Elemental damage in half will make the battle much easier, as the Sky Dragon's physical attacks are no big deal. Pilfer a White Plate from the Sky Dragon using Fargo, then chip away at the beast's health with your best attacks.
You'll receive a Star Level, 2,150 g, and the Saints Summon Element for defeating the Sky Dragon. Once the battle is over it will give you the White Relic, the last Relic you need to enter the Sea of Eden... though you're still missing one key ingredient.