
 |
| Fallout 4 created by Bethesda Game Studios. Images used for educational purposes only. |
Jamaica Plain is a ruined community in the southeast of the Commonwealth, a somewhat short jaunt to the southwest from the Castle. (Dangerous jaunt, mind, but short.) You’re most likely to come across Jamaica Plain if Preston asks you to settle the area for the Minutemen, though checking computers during missions or pure luck may bring you here as well.
Jamaica Plain has been utterly overrun by Ghouls. This makes it more complicated than most settlements, as the Ghouls are infesting every corner of this place, and many or them won’t become active until you get close enough. You’ll bring a ton of them down on your head just by parading through the streets, but if you want a clean sweep you’ll need to check the following buildings as well:
- There are two homes in the northeast with multiple Ghouls inside, wandering around and laying down
- A diner in the northwest has a Ghoul or two
- There are several Ghouls hiding in the southern building where the Workbench is located
- A fair number more inhabit Town Hall, also in the south
- And yet more live in the red-brick house next to the church, in the north
You do not have to kill every damned Ghoul to satisfy the requirements of establishing a settlement. The Ghouls near the workbench and the Ghouls in Town Hall seem to do it. That said, you should still try and kill as much as possible, ‘cause the Ghouls in the other buildings can still cause problems for your settlement if they wander out and happen to notice you.
Once you’ve eliminated the local Ghouls you can have a look around, which is definitely worth doing since Jamaica Plain is pretty large. There’s a fair amount of junk - not as much as you might like for creating a settlement, particularly not in the building area, but a decent amount - and among the junk you’ll find some treasures:
- You can access the church by entering the house next door, climbing to the top floor, and crossing the boards up here to drop into the roof. The church is too crazy in terms of collectibles, but if you look near the front door, by the Cooking Station, you’ll find the corpse of a dude named Luke Silverhand who’s carrying a Jamaica Plain Flyer, a Silverhand’s Note, and a Jamaica Plain Mayor’s ID.
- There’s a concrete barrier on the east side of Jamaica Plain in the middle of the road. The body of one Carl Everett is slumped here, and he carries the Jamaica Plain Town Hall Key and Carl’s Log.
- There’s a steamer trunk packed with goodies on the second floor of the Town Hall. Also here is the corpse of a dude named Sal, and he’s carrying the Jamaica Plain Mayor’s Password and Sal’s Holotape. Also, lots of pretty awesome Combat Armor. You can use the Password to unlock the mayor’s terminal on the first floor, which in turn opens a nearby wall safe. Both are normally Expert level cracks.
Once you have the Town Hall Key you can open the door in the basement of Town Hall, near the mayor’s office. This is a contained area with several rooms, but it ultimately boils down to a laser hallway filled with Turrets that will automatically kill you if activated. (Seriously, I was wearing X-01 Power Armor and I was instantly shredded.) There are two ways to handle this:
- Disable the Laser Tripwires one-by-one. It takes a while, but you’ll get a ton of raw materials in the process. Or, if you’d like to skip all that, check the console before stepping into the hallway - there’s a Jamaica Plain Janitor’s ID sitting on top of it, and using it will disable the lasers and open the door at the end, which wouldn’t open if you disabled the traps. (Fun bit of trivia: There’s a red button by the security door which reactivates the Laser Tripwires, including ones you’ve already disabled. This means you can endlessly harvest this hall for Fiber Optics, Crystal, and Steel. Nice. Just… be careful.)
- Unlock the Master door on the left side of the meeting room with the podium. In the very next room you can find a Jamaica Plains Archives Key, on a desk beside the door, as well as an Expert safe. A hallway beside the safe leads past the lasers.
Either way, you’ll wind up in a room with two Protectrons and a big ‘ol security door. Use the Mayor’s Password on the computer in front of the door to pop it open. Beyond another security door is a small display room. On the table directly ahead you’ll find two Holotapes - The Treasures of Jamaica Plain and Treasures Inventory - as well as Holotape Instructions. Everything else here, despite the grandeur, is junk - save, that is, for the 2076 World Series Baseball Bat sitting in the display case on your right. It’s a pretty cool melee weapon.
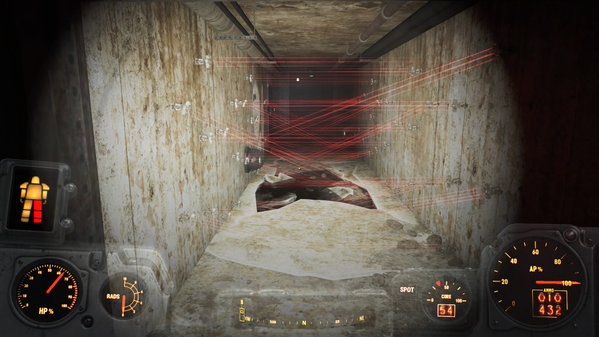 |
| The infamous laser hallway of Jamaica Plain in Fallout 4. Keep companions away from this thing. |
Setting Up
Jamaica Plain is not advantageous to your settlement attempts. Though the town itself is pretty damned large, the space you’re given for construction purposes is tiny, consisting of a parking lot, a few slices of street, and three buildings, one of which you can’t even enter. Lame. There’s also not much junk hanging about, so a Supply Line is more or less mandatory. Here are some tips for getting started:
- Yes, not much junk, Supply Line is good. That said, there is a fair amount of junk in the rest of the town, particularly in Town Hall. If you’re willing to go on a junk run or two you can get lots of rarer resources. Wood is still pretty much import-only, however.
- The tiny lot helps in one respect: you have an obvious choice for a building. The two burnt-out structures here are great for setting up bedrooms, once you patch up the roof above the Workbench a bit. You could also ignore them completely and use the parking lot for all of your housing needs.
- The parking lot is also an awesome place to centralize your defences. Set up Turrets here and they can draw in enemies from just about every angle. The tops of the three existing buildings aren’t bad for this either, if you’d rather spread out your defence.
- Speaking of defence, the closed building seems kinda useless at first glance, but it can serve as a handy wall. Set up a blockade between it and the other buildings and you’ll force attackers to go around, making your Turrets’ jobs even easier.