A brisk walk through the outdoors, the Denadoro Mountans are your greatest challenge to date in Chrono Trigger. Make sure to put Lucca in your party, as her Fire attacks will help you defeat some of this trail's most difficult enemies.
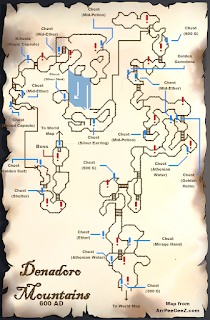
As soon as you enter the Denadoro Mountans you’ll see two sleeping Ogans and two Bellbirds, and the Bellbirds will awaken the Ogans. This is a hint for later battles. You can slip by if you wish, though all four enemies are easy to kill with physical attacks. Check the chest beside them for 300 gil. Northeast of here is a path to a dead end, though you’ll find a Mirage Hand for Robo. It's inside a partially-hidden chest on your left, under a tree, just after a screen transition.
Return to the first screen and check in the northwest. After a quick cut scene featuring Tata, the 'legendary hero' of Guardia, you’ll face another Ogan. Drive it off to trigger another cut scene, pitting you against an Ogan with a hammer. Hammer Ogans are much stronger than normal, though you can use Lucca’s Fire magic to fry the hammer and leave them vulnerable to your other attacks. Climb the ladder.
Take a left at the top of the ladder, on the next screen, and you'll find a path back to the first screen. Here you'll find a chest containing an Athenian Water. Return to the north and you'll see a sleeping Ogan on your right. If you get too close a Freelancer will jump down and wake it up, forcing a fight. If you check the other side of the Freelancer's perch you'll find a chest containing an Ether.
There are two Ogans ahead, one with a hammer and one without. Wipe them out, then check the chest behind them for 500 gil. Head east and you'll find yet another Ogan, this protecting a ladder. Defeat or ignore the Ogan, then climb the ladder.
You’re now in a small forest of sorts. Take the first split in the path that leads north and you'll find a chest containing a Mid-Ether. Return to the south and continue east, along the bottom of the screen, to face two Freelancers. Look near them to find an Athenian Water, inside a chest.
North of that last chest is a ladder, with another just beyond the first. Climb up the first ladder and look to the left of the second ladder for a Golden Helm. Keep climbing and you'll face an Ogan at the top. West of here you'll fight an Ogan and a Freelancer, and southwest of them you'll find a chest containing a Mid-Potion. West of the battlefield is another screen transition.
You’re now on the edge of a cliff, and if you head north far enough a Freelancer will pelt the party with rocks. Each one will deal five points of damage to Crono. Not a big problem, but still annoying. Rush north, snagging the Mid-Ether from the chest along the way, and make your exit. If you come back to this spot much later in the game, once Frog is a permanent party member, he can grab a Golden Gemstone from this Freelancer.
Soon after entering the next screen you’ll be attacked by a Freelancer and an Ogan. Carry on up the nearest ladder to face two more Freelancers. Northeast of them, sitting beside the path, is a chest containing 600 gil. North of here is a cliffside path, and it will take you to an area with more enemies Check the chest near the entrance to this area for 300 gil.
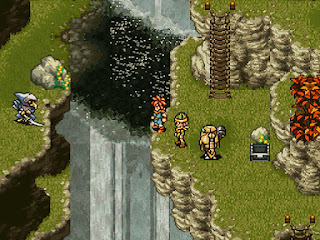
The continued path is north, but if you want to snag eeeeverything in the Denadoro Mountains you’ll want to approach, and fall down, the waterfall on the far left of this screen. Make sure you go all the way left before dropping down the waterfalls, or you’ll miss a chest containing a Silver Stud. Hop off the cliff near the chest and check the pathway at the bottom to find a Silver Earring. Both of these accessories are quite useful:
- The Silver Stud reduces MP expenditure by 50%, allowing its bearer to rely on Techs and Combos far more
- The Silver Earring boosts its bearer's max HP by 25%, making it handy for glass cannons like Marle or Lucca
To the northeast of the bottom of the falls you'll find a shortcut back to the main path.
Make your way back to the top of the waterfalls and go north. To the right of the Freelancers and the Bellbird is a chest containing a Mid-Potion. Head west, open the chest to the left of the next rope ladder to find a Mid-Ether, and go down the ladder. You’ll have to face two more Freelancers before you can leave this area.
Two Bellbirds wait on the next cliffside screen. Continue across the bridge they were guarding to find a Kilwala that’s enjoying the view. Talk to him enough times and he’ll give you a Magic Capsule. On the next screen, south of the Kilwala, you'll find a save point. You've come quite a way, so make sure you save and rest up in a Shelter.
To the south and on your right from the save point you'll find a chest that contains a Mid-Ether. South of here is a ladder, and if you look closely on your left as you climb down you'll spot a Speed Capsule on the ground. West of here is a screen transition, and if you check to your immediate right upon emerging from the trees you'll find a chest containing a Golden Suit. This last chest is well-hidden, so look carefully.
South of the entrance to this screen is a ladder you’re forced to fall down. Check the chest on your left for a Shelter, then have a quick look around. There are three sleeping Ogans which you can avoid, but you’ll be forced into fighting if you try to go up the ladder on the right anyway. A Freelancer bars your path, and if you chase him down you’ll face a brawl with two hammer-wielding Ogans and two Freelancers.
Up the final ladder and to the north is a cave. Inside you’ll find two little boys. Tell them you’re after the sword they’re guarding and you’ll get into a fight.
Masa and Mune
HP: 1,000 (both)
Two bosses? Seems challenging, but... nah. Masa and Mune use the following attacks:
- A single-target melee strike
- A combo whirling attack that inflicts Confuse on one target
- A counter combo whenever one of them gets hit
Pick either Masa or Mune (it doesn't matter which) and focus on that brother until he runs out of HP. Dual Techs are the better choice, as you'll get hit with counters less often. Beating one of the brothers will end the fight. You’ll want to keep your health high, though, as your trial is far from over...
HP: 3,600
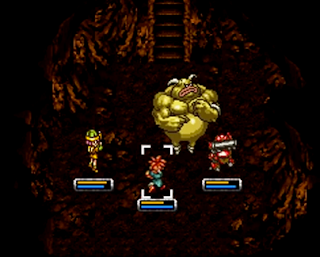
Ouch. This is the real fight. Masa & Mune is a beefy creature that’s as strong as he looks, and the sudden change in boss music should clue you in to the danger. Masa & Mune uses the following attacks:
- A single-target chop
- A single-target wind attack
- Vacuum Wave, a strong attack against the entire party
- Wind Slash, a counter against one or more targets (only while charging Vacuum Wave)
Other than his attacks, Masa & Mune has a lot of HP and no real vulnerabilities - but at the same time, he has no resistances, either. You’ll want to spend this battle chipping away at the beast with your strongest Techs and Dual Techs. Crono and Marle / Lucca’s Sword attacks are very good here, if you have them, and Robo’s Robo Tackle is great as backup. Heal and Wind Slash as needed and Masa & Mune shouldn't give you too much trouble.
Beating Masa & Mune will earn you the Broken Blade, which, as the name implies, is pretty useless right now. You’ll also get shot out of the Denadoro Mountains and back to the world map.
The Masamune
You need to do a few things before triggering the next major event.
- First, visit Tata’s House in Porre. He’ll give you the Hero’s Badge.
- Second, head back to the Cursed Woods (or do so for the first time, if you’ve never visited before - it’s northwest of Porre) and visit Frog. He's hiding in his home, in the northern bush. Show him the Hero’s Badge and you’ll be allowed open the left chest in his house. It contains the Broken Hilt - and also provides your next clue.
- And, third, head to Medina in 1000 AD and visit Melchior, south of town. He’ll clue you in to your next destination.
Part Sixteen: Ioka Village, 65,000,000 BC


