Want to know what happens next in the Chrono saga? Try Chrono Cross - The Radical Dreamers Edition for Nintendo Switch, available now on Amazon! As an Amazon Associate I earn from qualifying purchases, at no extra cost to you.
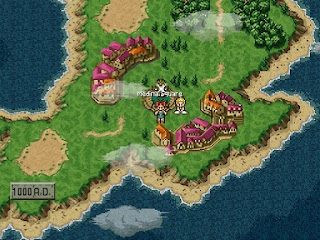
Medina Village - Market
Medina Village - Market
Melchior's Cabin - Vendor
Finally, back in 1000 AD! After popping through the Gate at the End of Time you’ll wind up in a small house owned by two Imps. You’re now in Medina Village, a little town populated entirely by Fiends. The Imps are friendly, and if you ever need it you can eat a slice of their cake to restore your HP. This is a one-time offer, so don’t eat it unless you really need it. You can use the wardrobe in this house to return to the End of Time.
Head outside, to the world map. You’re now in the midst of a village that’s very much unfriendly to Crono and company. Be ready to fight if you explore the rest of Medina. Let's have a look around, shall we?
- Medina Square is a good starting point. There’s nothing to find, but it doesn’t give you a good look at one of your future objectives.
- A short trip north of the Square is the Elder’s House. Check the kitchen counter for a Speed Capsule, and the desk on the second floor for a Magic Capsule. You won't spend any time with the elder outside this visit, but a guy who looks very much like the elder will pester your party for a decent chunk of Chrono Trigger.
- East of Medina Square is Medina Inn. You’ll have to fight an Underling and two Diablos to stay here. An easy fight, but... the cost of staying here is a hefty 200 G.
- South of Medina Square is the Market. To buy anything you’ll need to fight an Underling and a Gaoler. An easy win, but not worth the effort, as the owner will charge ridiculous amounts of money for items. 65,000 gil for a Zanmato? Nooo thanks.
The only other thing to see up here, in the woods to the north, is the Forest Ruins. This odd location consists of a short forest trail and a blue, glowing pyramid that you can’t currently penetrate. Check the chest outside the pyramid for a Mid-Ether, then leave. Once you've acquired a specific item (or, rather, powered-up a specific item) you can pop open the pyramid.
Head to the south of Medina Village. Here you’ll find a cave, your next destination, and a remote cabin. The Cabin is home to Melchior, the swordsmith, and he offers items and arms at much more reasonable prices. The only new item is the Crimson Blade, for Crono, though if you failed to open all the chests in 2300 AD there may be upgrades for your other party members as well. Melchior plays a role in the story within the next few hours, so don't forget where he lives!
Heckran Cave - Enemies
Believe it or not, this is the road home. The first thing to note about Heckran Cave is that most of the monsters in the cave are resistant to physical attacks. Stick to the magic you learned back at the End of Time. Marle and Lucca are good teammates for Crono, as their Antipode Bomb Double Tech can wipe out crowds with ease, though Crono and Robo's Supersonic Spin is also quite effective. Make sure you bring a Shelter along, to restore everyone's MP, as the boss is near-impossible if you don’t use magic.
There are two Underlings inside the entrance. Take them out with physical attacks, then follow the path deeper into the cave. You’ll find a chest containing an Ether to the right of one of the ladders. Near the exit are three Cave Stalkers and a Djinn Bottle. Take out the Djinn Bottle first to avoid its absorption attacks before going after the Stalkers.
In the next large chamber to the south you’ll meet two Rhino Weevils. These things shrug off physical attacks, forcing you to use magic. At this point the path splits, and you'll want to go south. Down here is a chamber guarded by two groups of enemies:
- Three Rolypolys, which are easy kills with magic
- Three Cave Bats, which are highly resistant to physical attacks and, again, require maic
Return to the central chamber and head west. Just off the beaten path is a chest containing a Mid-Ether. Go north of the chest and take a left to run into four Rhino Weevils. Just north of them is a chest containing an Ether.
Travel south until you leave the main chamber. In an adjoining corridor you’ll fight four Rolypolys, and then four Cave Bats. North of this corridor you’ll find a larger room with a Djinn Bottle and three Cave Stalkers, all of which you can avoid by sticking to the right side of the room. Also in here is a mysterious black box, which you'll need to leave for later.
The exit near the black box will take you out and down into the water flooding the central chamber. Follow the path south, east, and north to find a set of stairs leading into one final chamber. Use the Save Point to the left of the stairs (don't forget to use a Shelter!) then continue north. Boss time!
Heckran
HP: 2,100
Ah, the owner of this dusty little cave. Heckran looks tough, but he’s pretty easy as long as you mind his attack posture. Heckran has the following abilities:
- A physical strike against one character
- Nereid Cyclone, a strong, single-target Water attack
- Water, a Water-elemental attack against one character
- Water II, a strong Water-elemental attack against the whole party
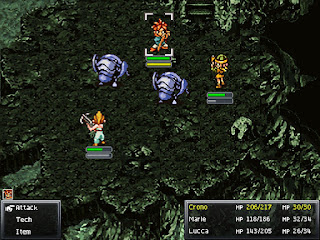
Normally Heckran stands with his claws spread, and will assault single targets. During this time you’re at liberty to attack him as much as you like. Magic is your best bet, since physical strikes do barely anything against Heckran's thick hide. Don’t bother with Combos, as they do less than just having your characters attack individually.
Every now and then Heckran will curl up and dare you to attack. If you take the bait he’ll use Water II, a high-damage spell against the whole party that will KO your characters if they're at least than 100 HP. Use this short phase to heal everyone, preferably with Aura Whirl, and leave Heckran alone until his counterattack interval runs its course.
Part Thirteen: Zenan Bridge, 600 AD


