Main Walkthrough
Guide is a work in progress.
The most volatile and unpredictable member of your hotel's staff, it shouldn't be any surprise that Yevna is in charge of the most unpredictable of Yog-Sothoth's Yard's many sub-systems. Alchemy is a complex, multi-faceted, and expansive art, and you won't fully uncover its potential until you're a ways into the game. Even then, you'll need to work hard to fully master every aspect of Yevna's alchemical abilities.
This guide will teach you the ins and outs of Alchemy in Yog-Sothoth's Yard. First, though, we need to get one thing straight: 'Alchemy' isn't just a single activity.
What is Alchemy?
Broadly speaking, Alchemy is the use of material ingredients to create something wholly new. This is no different in Yog-Sothoth's Yard, though in the game Alchemy means a few different things. You'll unlock the following alchemical abilities over the course of each playthrough:
- Random Alchemy, which allows you to mash two or more materials together to see what you get
- Formula Alchemy, which provides you with a list of ingredients and a percentage chance that you'll successfully create a specific item
- Summon, which allows you to sacrifice items in order to forcibly summon Guests to the hotel for a night's stay
- Soul Alchemy, which allows you to sacrifice items in exchange for Souls
The first three options are available as soon as Yevna joins the staff and you refurbish her room. Soul Alchemy is not available until Week 12, around the time that you can put Souls to use.
All of these processes involve roughly the same thing, which is combining items to achieve an outcome. Open the Alchemy menu (bottom-right corner of the screen), choose your form of Alchemy, then, for most of them, choose two or more ingredients. What you get is what you get. The more you use Alchemy, the better your Alchemy Level becomes - though this means different things for each type of Alchemy.
You'll get most of your materials for Alchemy from your Guests. There are a few ways to maximize the items left behind:
- Unlock more rooms and floors, and Upgrade your existing rooms - more Guests equals more items
- Activate the More Items Strategy
- Slaughter your Guests - this will ensure that every item is dropped, not just a random assortment
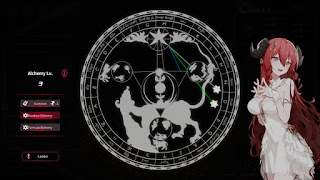
Random Alchemy
The most basic form of Alchemy is Random Alchemy. Here you're given two or more item slots (the higher your level, the more slots you'll unlock), and if you place items in the slots you can mix them together and see what you get.
Although it's called 'Random' Alchemy, this process isn't entirely random. The trick here is that you generally don't know what you're going to get if you mix two items together, though the results will usually be the same each time if you keep combining the same items.
If you take a closer look at any of your material ingredients you'll see two numbers. The smaller number in the bottom-right corner is the amount of that item you have in your stores, while the larger number in the upper-left corner is that item's Alchemy Value. Alchemy Value determines two things:
- That ingredient's placement in the list of alchemical items
- That ingredient's numerical value when combining two or more items
Adding together the Alchemical Value of two or more items will determine which item you get, based on its Alchemical Value. If we were to, say, combine a Four Leaf Clover (AV of 3) and a Mud Frog (AV of 4), we would almost always get some Fluorescent (AV of 7). Similarly, we could combine two Hosta Flax (AV of 2) and a Four Leaf Clover (AV of 3), and still get some Fluorescent. Once you know an item's Alchemy Value you just need to perform some basic math to get what you want.
You're probably asking why you 'almost always' get the item you want. Occasionally the alchemy will go a little sideways, and you'll get a different item instead. Multiple materials share the same Alchemy Value, each with a different color, and while you'll usually get the more 'common' material you'll occasionally wind up with the 'rarer' material instead. Material colors are, from most common to rarest:
- White
- Green
- Blue
- Purple
- Golden
- Red
The green, blue, purple, and golden categories have overlapping Alchemy Values. You're more likely to get a green material than a blue material, and a blue material than a purple material, and a purple material than a golden material.
In addition to crafting materials you'll occasionally wind up with a normal, useable item. Usually these are just everyday items that you can find elsewhere, but occasionally you'll get a rare Extra-Item instead. As an example, I combined a few random items while testing and got Shoggoth's Body Fluid. There doesn't seem to be a set way to get an Extra-Item - it just happens if you're lucky. The rarest items have a red border, and can't be used in Alchemy.
In the bottom-left corner of the menu you'll see a Ladder button. This describes how you raise your Alchemy Level. To move up a level you need to create the exact item shown in the box that's above your current level. The items you need to create to reach each new level are as follows:
- Level 2 - Fluorescent
- Level 3 - Iron
- Level 4 - Copper
- Level 5 - Impure Gold
- Level 6 - Old One's Crystal
- Level 7 - Necronomicon Scrolls (upgrade Yevna's Room)
- Level 8 - Whateley's Gold (formula from Hoshino's Shop)
- Level 9 - Brain Shelter (formula from Hoshino's Shop)
- Level 10 - Philosopher's Stone (formula automatically received in Chapter 12)
(Still working on this.)
There are a few more things to note about Random Alchemy before we move on:
- As you improve your Alchemy Level through practice you'll increase the maximum Alchemy Level that you can produce. At level 2, for example, you can only generate items up to an Alchemy Value of 35, whereas at level 3 you can generate items up to an Alchemy Value of 40. There's also a limit on single ingredients.
- There are some items that increase or reduce the chance of generating items of specific colors. If you wanted to get a purple or yellow item, for example, you would throw some Tuna into the mix, as it lowers the chances of getting a blue material in exchange.
- If you generate items in bulk (ten at a time) you will wind up with a mixture of items, rather than always getting ten of the same item. In other words, don't worry that you're wasting materials in a chase for something rare if you transform materials in bulk.
- Occasionally you'll generate Alchemical Sediment. Sediment has the same Alchemy Value as the items you generated, and you can add it to any combination you like, regardless of your Alchemy Level. Adding Sediment to a combination will always produce more Sediment.
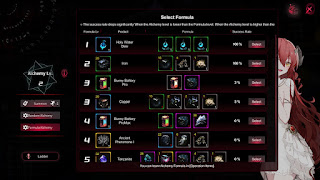
Formula Alchemy
Occasionally while playing through the game you'll receive a Formula. Formulae are specific recipes that will earn you a particular item every time you use Alchemy. You can get Formulae a few different ways:
- Through story events
- Through Affinity Events
- From Special Guests
- By completing Side Tasks
- Purchased from Hoshino
- By upgrading Yevna's Room
Note that you have to enter your Items menu (under the Operation icon) and Use the Formulae, under Supplies, before they will appear in the Alchemy menu.
Unlike Random Alchemy, which allows you to combine any materials you please, Formula Alchemy requires the use of very specific materials to create an item. If you want a Bunny Battery Pro, for example, you must combine a Bunny Battery and Metal Polymer.
Unlike Random Alchemy, where you'll always end up with something, there's a chance you'll fail at Formula Alchemy if you are at a low level. Each Formula has a Formula Level, and if your Alchemy Level is below the Formula Level your chances of creating the Formula will be quite low. (Though not zero!)
Formula Alchemy is handy for generating items that do not have an Alchemy Value. For the most part, however, you should not use Formula Alchemy for generating items that do have an Alchemy Value, as the combinations often aren't to your benefit. Stick with Random Alchemy and just do the math.
Summon
A twist on the usual alchemical processes, Summoning allows you to sacrifice materials in order to force Guests to stay at your hotel. Plug in the materials and hit Start. The higher the Alchemy Value of the items, the more new Guests you'll pull to your hotel. Pretty simple. The number of Guests your current item combination will Summon is listed at the top of the menu.
There are a few things to note about Summoning:
- The Summon command costs 1 AP.
- Summoning can only be used during the day.
- You can use multiple of a material, but unlike with other forms of Alchemy you'll create a stack of that item in a single slot, rather than spreading them out over multiple slots.
- You can't Summon more Guests than the hotel can accommodate. You can try, but it won't do anything besides waste items. The number of Guests currently staying at the hotel is listed near the top, and if you're maxed out these numbers will be red.
Soul Alchemy
Once you've reached week 12 you'll unlock a new form of Alchemy, known as Soul Alchemy. Soul Alchemy allows you to sacrifice items for
Soul Drops, aka Souls.
These can be used to bid on Extra-Items in the Carnival. Extra-Items are quite powerful, and since the story occasionally demands that you buy them you'll want a decent stock of Souls.
You can sacrifice up to five types of items in Soul Alchemy, and you can allocate as many of each item type as you wish. That said, you'll typically want to sacrifice Soul Fragments, obtained via the Slaughter command, and Sediment, obtained from Random Alchemy. Neither is terribly useful for anything else, and Soul Fragments in particular will pump up the amount of Souls you receive.
Soul Alchemy costs 1 AP to perform. You'll also incur a heavy gold cost whenever you convert items into Souls, and the cost rises the more Souls you want. Keep an eye on your bank account.
Alchemy Formulae
Below is a list of Alchemy Formulae in Yog-Sothoth's Yard, and how to acquire them. Not included are formulae that you purchase in Hoshino's Shop, after you create and give him some Eltdown Clay. Those formulae are acquired through pure luck, and you should check Hoshino's Shop regularly. Most of the formulae he sells allow you to create items with Alchemy Values.
(I'll be honest, Yog-Sothoth's Yard is not great at telling you when it has placed a new formula in your inventory. If there's no description beside a formula, then I have no idea how you get it. I'll do my best.)
- Ancient Pheromone I Formula - Storyline item
- Ancient Pheromone II Formula - Special Guest (Puyue Tao)
- Ancient Pheromone III Formula - Special Guest (Puyue Tao)
- Ancient Pheromone IV Formula - Special Guest (Latte)
- Ancient Pheromone V Formula - Special Guest (Puyue Tao)
- Ancient Pheromone VI Formula - Special Guest (Li Xiaoming)
- Ancient Pheromone VII Formula - Special Guest (Mika)
- Ancient Pheromone VIII Formula - Special Guest (Deep Sea Follower)
- Ancient Pheromone IX Formula - Special Guest (Orange Ginger)
- Ancient Pheromone X Formula - Special Guest (Phantom Moth)
- Ancient Stone - Purchase the Emerald Rosary Extra-Item at the Carnival
- Ancient Wood - Purchase the Emerald Rosary Extra-Item at the Carnival
- Broken Core Formula - Reach Week 33
- Cheap Metal Formula - Sold by Hoshino (3,000 gold)
- Cursed Stone - Purchase the Emerald Rosary Extra-Item at the Carnival
- Cursed Wood - Purchase the Emerald Rosary Extra-Item at the Carnival
- Eltdown Clay - Special Guest (Hoshino, Week 15)
- Energy Battery Pro Formula
- Energy Battery ProMax Formula
- Energy Battery ProMaxPlus Formula
- Energy Battery ProMaxPlusUltra Formula
- Gold Formula - Reach Week 20
- Holy Water Formula - Upgrade Yevna's Room to level 2
- Holy Water Dew Formula - Yevna Affinity Invitation level 3
- Infinite Bubble Formula - Special Guest (Soulless Foam)
- Necronomicon Scrolls Formula - Upgrade Yevna's Room to level 3
- Philosopher's Stone Formula - Reach Week 45
- Pure Element Gold - Reach Week 20, craft 5 Impure Gold
- Purple Dragonstone Formula
- Serpent Feather Formula
- Tanzanite Formula
- Yevna's Special Potion - Reach Week 13


